8i | 9i | 10g | 11g | 12c | 13c | 18c | 19c | 21c | 23c | Misc | PL/SQL | SQL | RAC | WebLogic | Linux
Forms and Reports Services 12c (12.2.1) : Create a New Domain
This article presents a brief overview of creating a new domain for a Forms and Reports Services 12c deployment.
Related articles.
- Oracle WebLogic Server (WLS) 12cR2 (12.2.1) Installation on Oracle Linux 6 and 7
- Oracle Forms and Reports 12c (12.2.1) Installation on Oracle Linux 6 and 7
- WebLogic Server 12cR1 (12.1.2 and 12.1.3) : WebLogic Server 12cR2 (12.2.1) : ADF Application Development Runtime - Repository Configuration Utility (RCU)
Assumptions
This article assumes the following.
- You have a suitable WebLogic 12cR2 (12.2.1) installation.
- You have installed Forms and Reports Services against the WebLogic installation.
- You have created a repository using the Repository Configuration Utility (RCU)
In this case, I'm using a virtual machine called "ol7.localdomain" for this installation. Any references to this and the database server holding the associated repository will have to be substituted accordingly.
Create Domain
The images were originally captured from a 12.2.1.0 installation. The process is similar for 12.2.1.2, but there are some extra screens. If you know what you are doing feel free to make adjustments. If not, just click "Next" on the additional screens.
Launch the Configuration Wizard with the following command.
$ $ORACLE_HOME/oracle_common/common/bin/config.sh
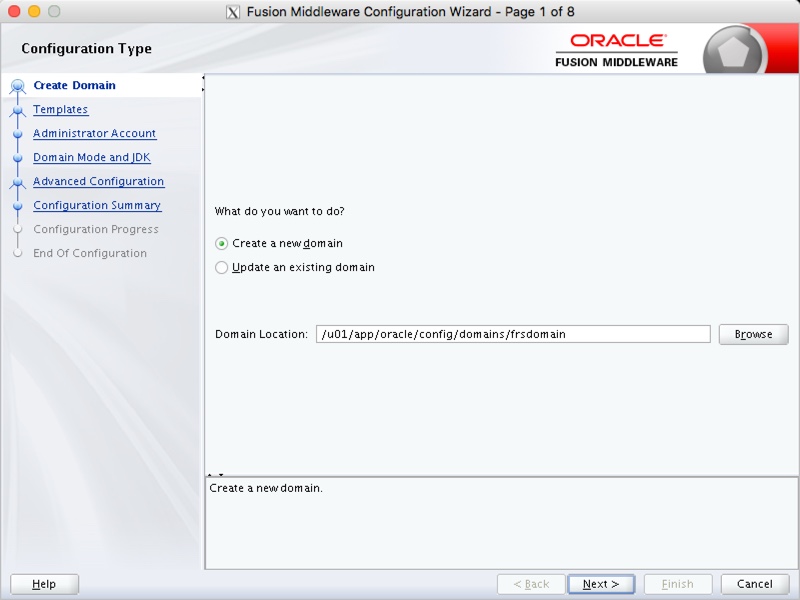
Accept the "Create a new domain" option, enter the domain name at the end of the "Domain Location", then click the "Next" button. In this case my domain was called "frsdomain", so the path I used was "/u01/app/oracle/config/domains/frsdomain".
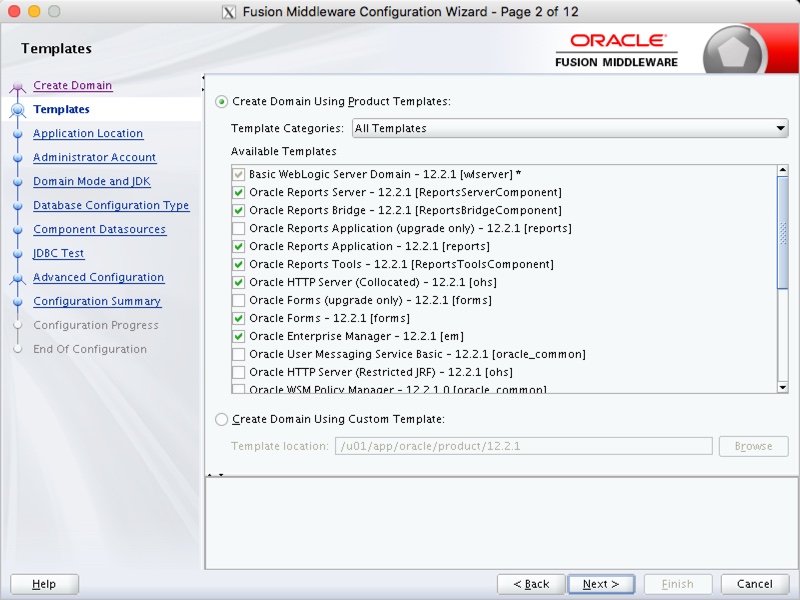
Select the required product templates and click the "Next" button. In this case, we need the following, which will bring some dependencies with them.
- Oracle Reports Server - 12.2.1 [ReportsServerComponent]
- Oracle Reports Bridge - 12.2.1 [ReportsBridgeComponent]
- Oracle Reports Application - 12.2.1 [reports]
- Oracle Reports Tools - 12.2.1 [ReportsToolsComponent]
- Oracle HTTP Server (Collocated) - 12.2.1 [ohs]
- Oracle Forms - 12.2.1 [forms]
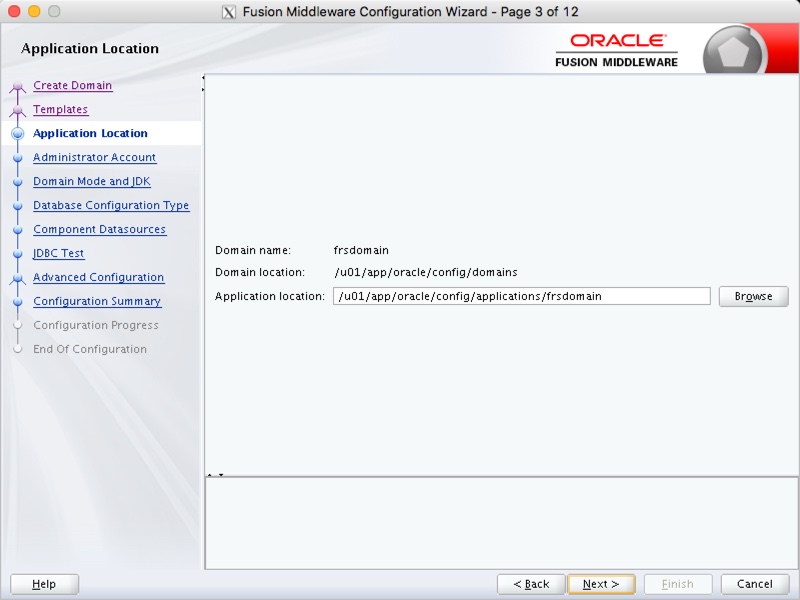
Enter the application location and click the "Next" button. I used "/u01/app/oracle/config/applications/frsdomain".
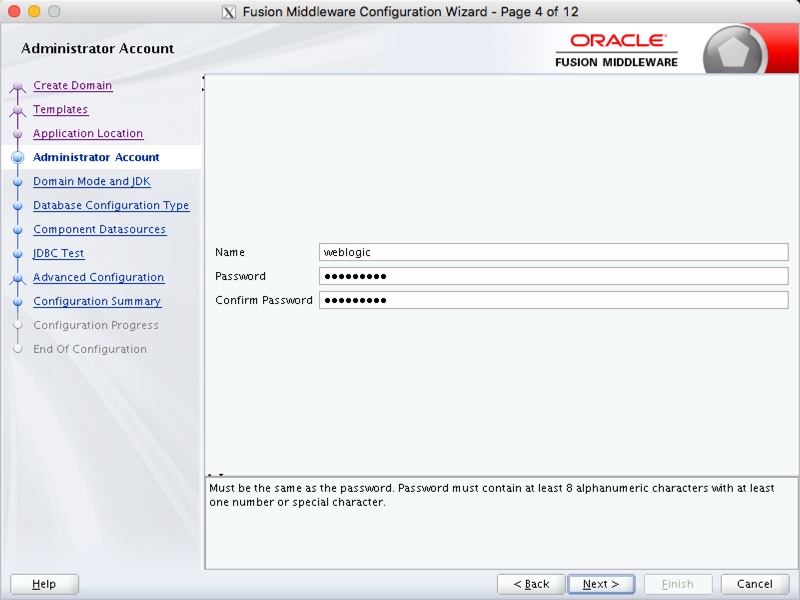
Enter the administrator credentials and click the "Next" button.
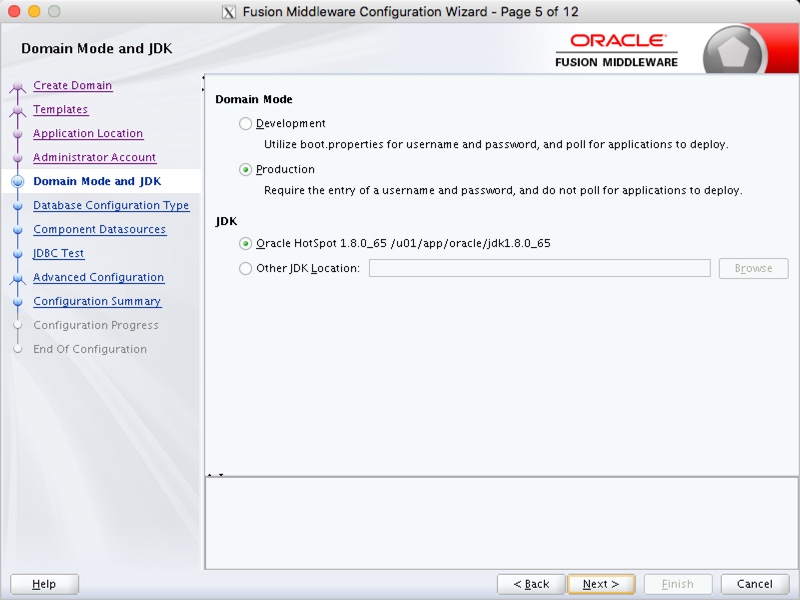
Enter the domain mode and JDK details, then click the "Next" button.
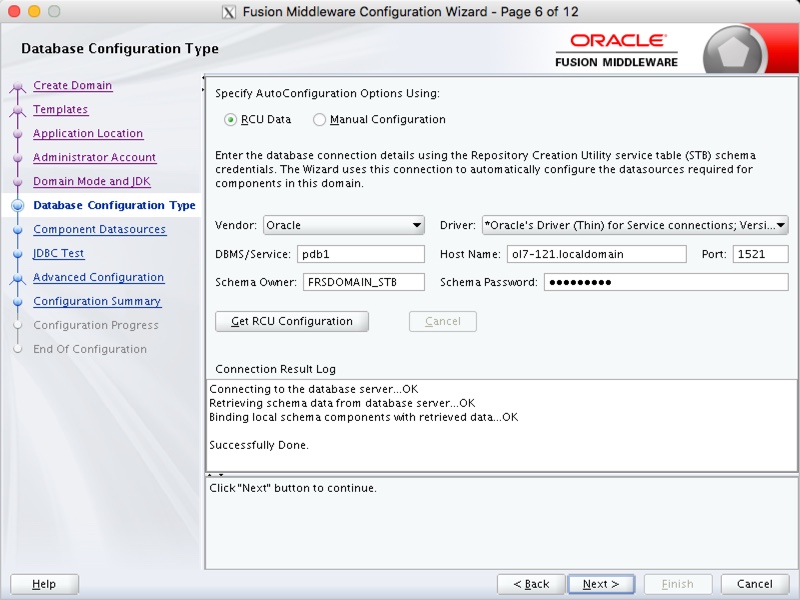
Enter the repository database connection details and click the "Get RCU Configuration" button. If the connection is successful, click the "Next" button.
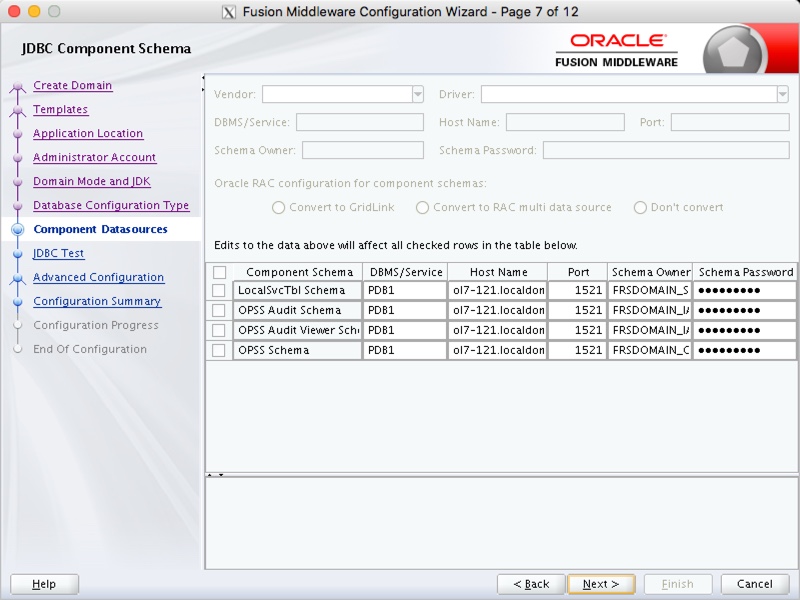
If you used the same password for all schemas, click the "Next" button. If not, fill in the correct passwords first.
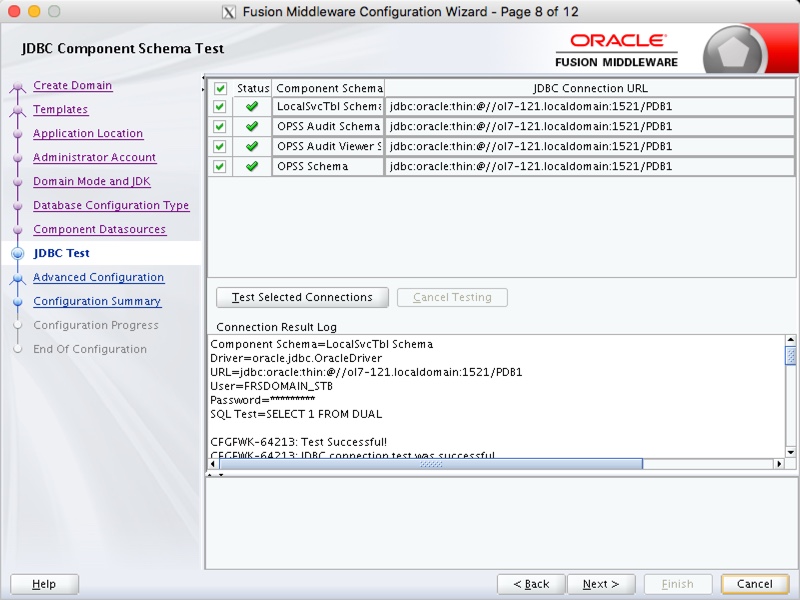
If all the connection tests were successful, click the "Next" button.
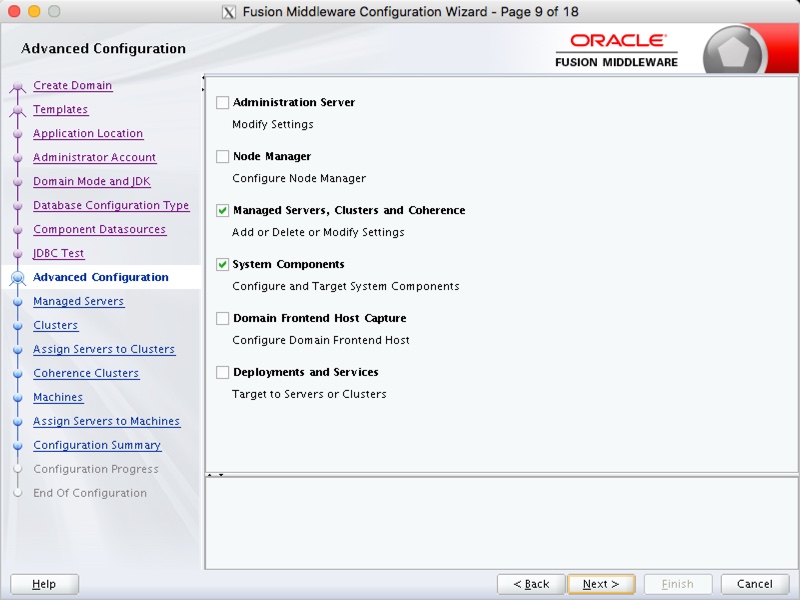
Select the ("Managed Servers, Clusters and Coherence" or "Topology") and "System Components" options, then click the "Next" button.
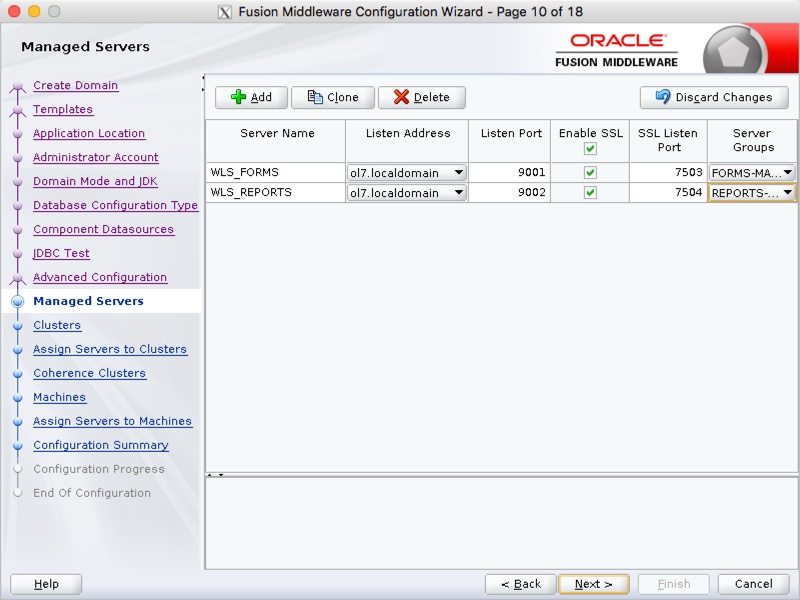
Enter the details for one or more managed servers, then click the "Next" button.
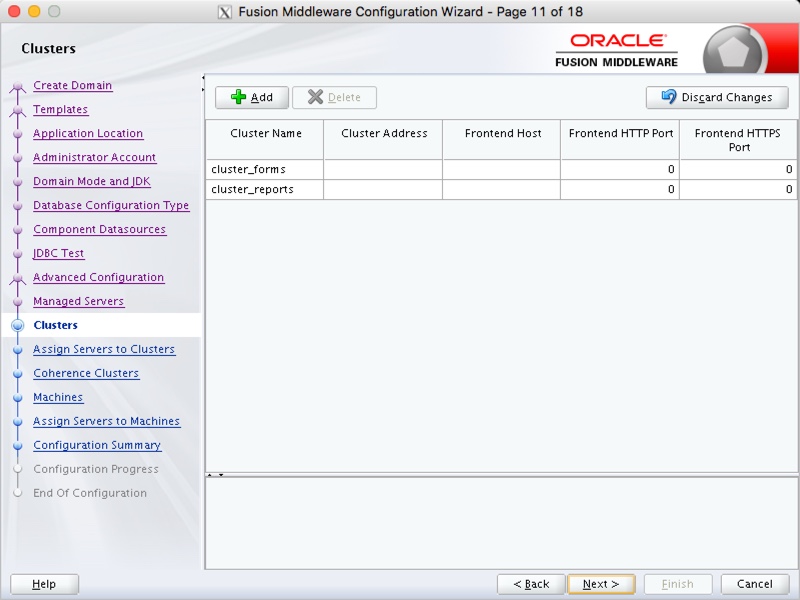
Assuming you don't need any custom settings, accept the default cluster settings by clicking the "Next" button.
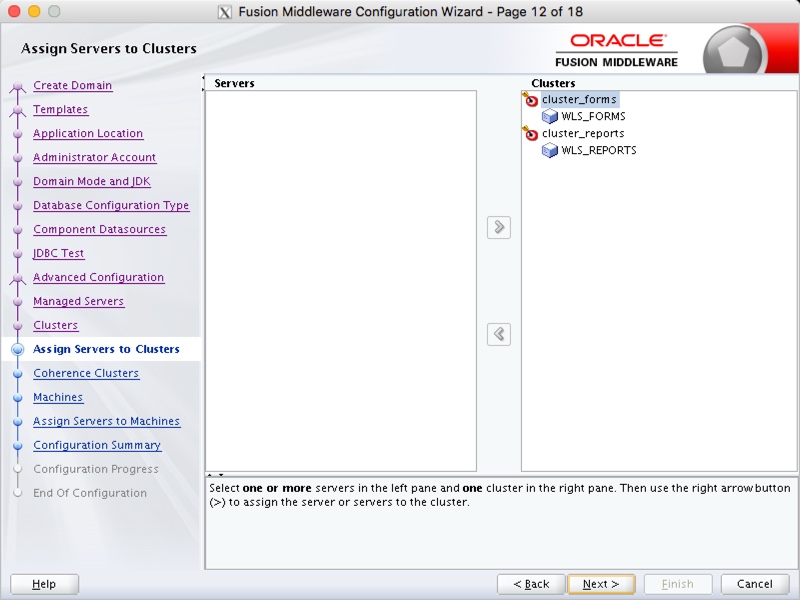
Assuming you don't need any adjustments, accept the default managed server to cluster assignments by clicking the "Next" button.
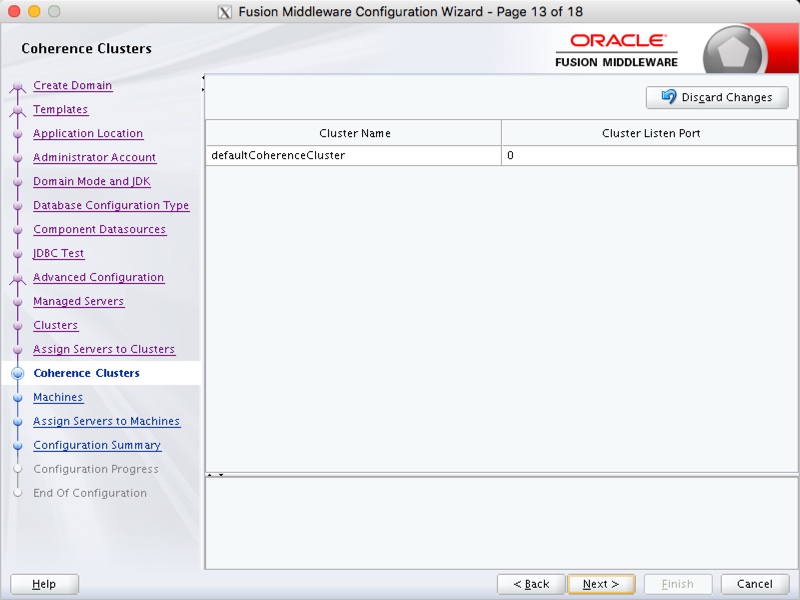
Accept the default coherence configuration by clicking the "Next" button.
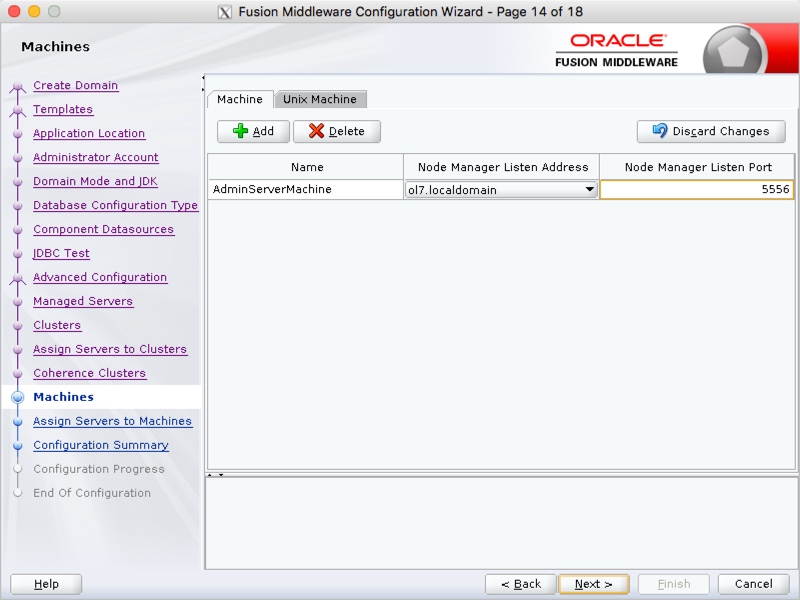
If you are building a multi-node cluster, put the references to all the node managers here. If you are building a single node cluster, like I am, accept the defaults by clicking the "Next" button.
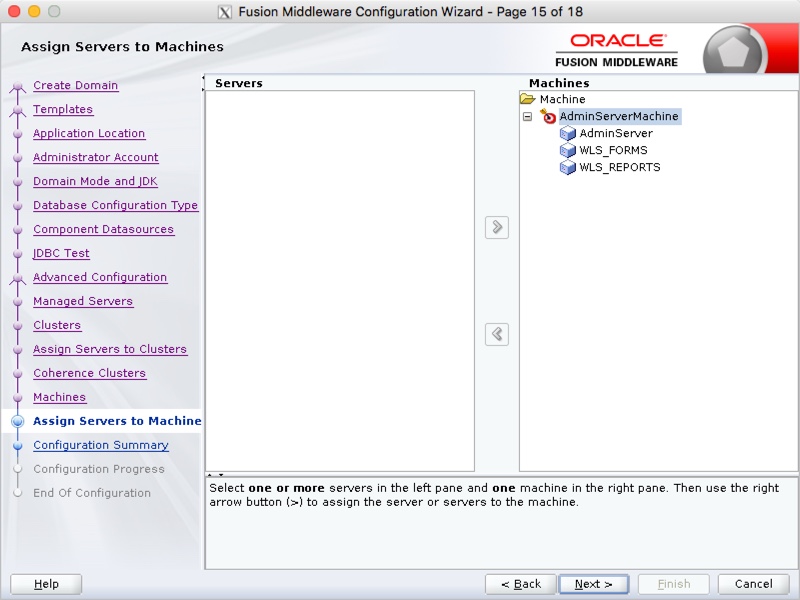
Map the managed servers to the node managers (machines) that control them. If you are building a single node cluster, like I am, accept the defaults by clicking the "Next" button.
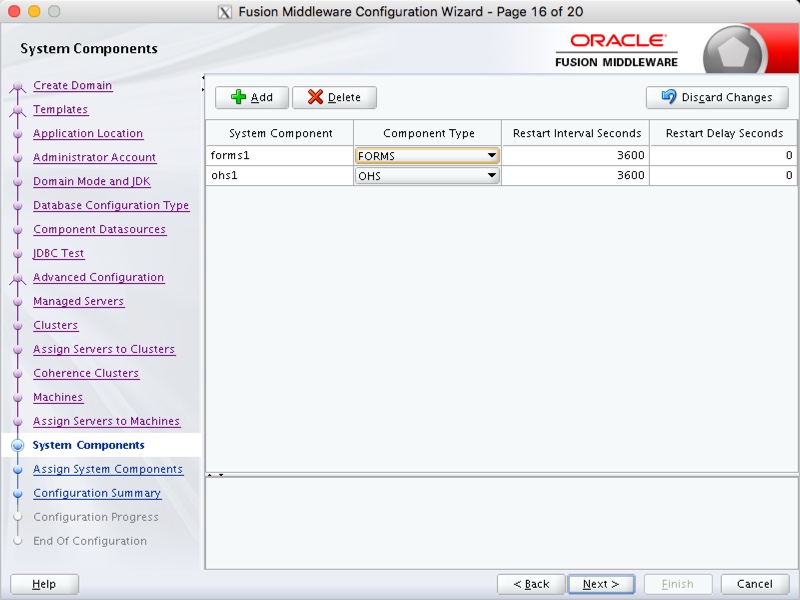
Click the "+ Add" button to add the OHS component (ohs1), then click the "Next" button.
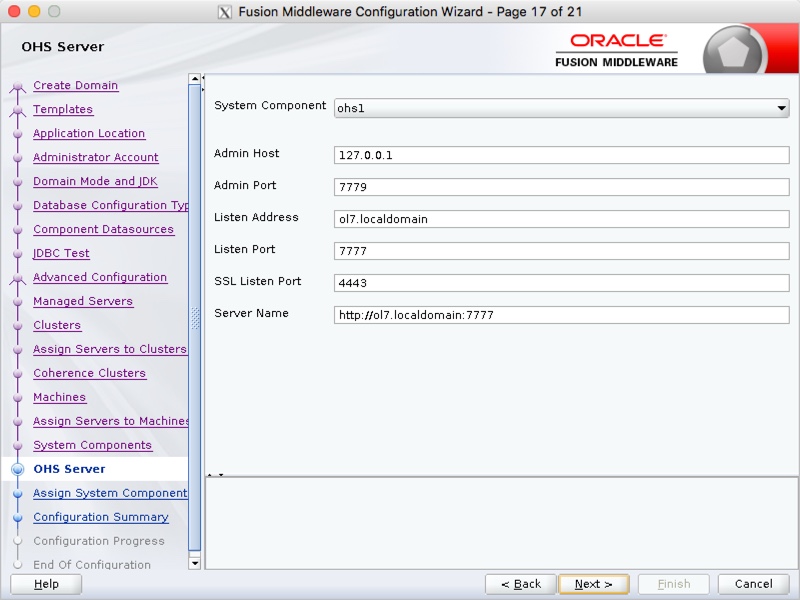
Accept the default settings for the OHS Server component by clicking the "Next" button.
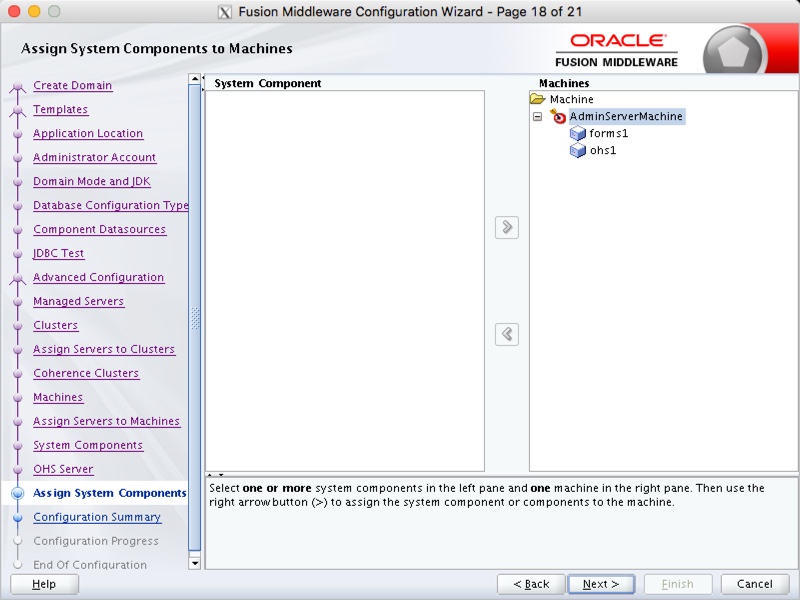
Map the system components to the managed server that controls them. Click the "Next" button.
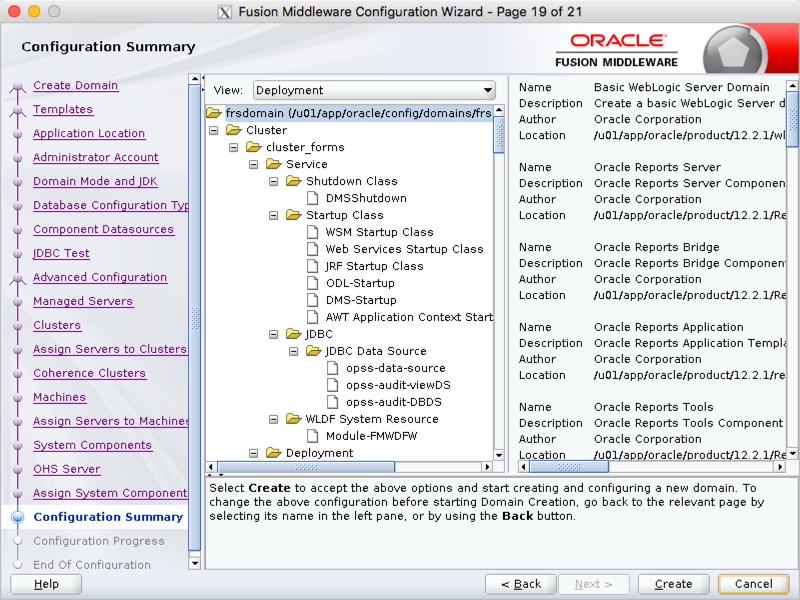
If you are happy with the configuration summary screen, click the "Create" button.
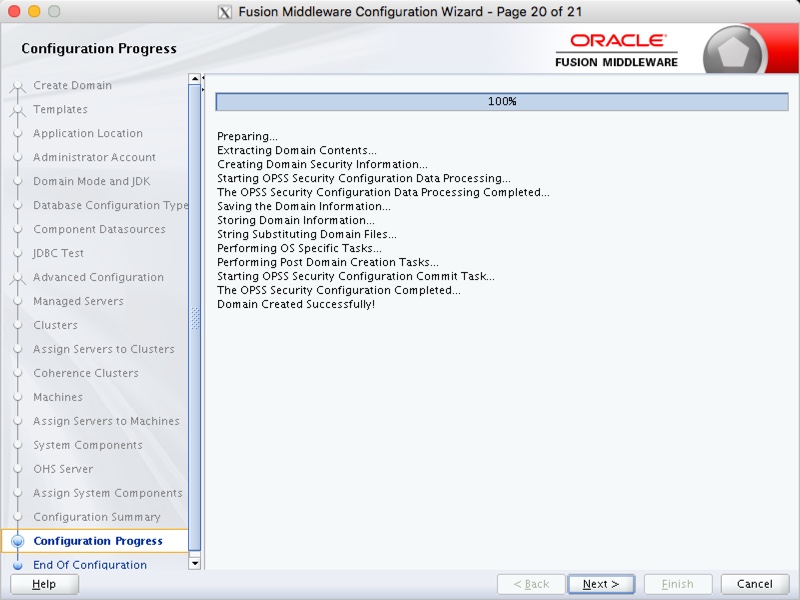
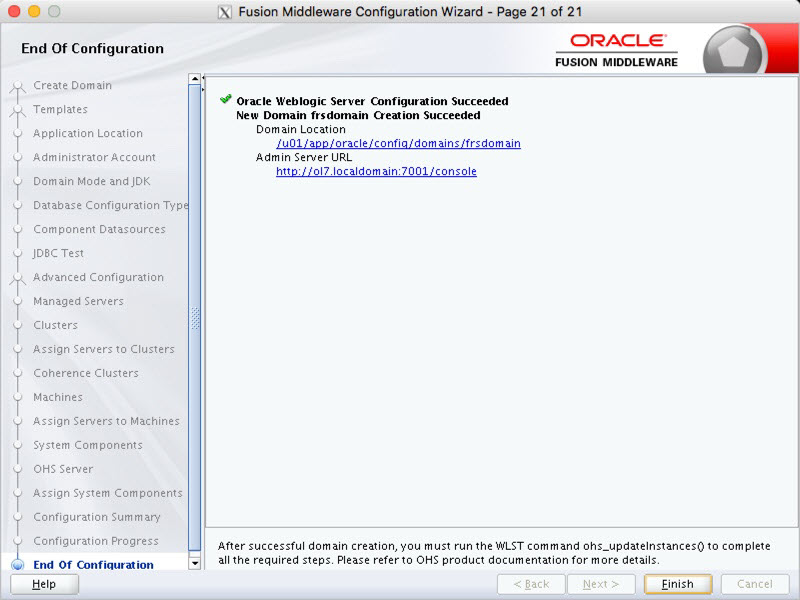
Once the domain is created, click the "Next" button.
Make a note of the Admin Server URL and click the "Finish" button.
Additional Configuration
boot.properties File
If you chose the "Production Mode" options for the domain, you will need to create a "boot.properties" file for the scripts referred to later to work without credentials. Adjust the DOMAIN_HOME and credentials appropriately.
export DOMAIN_HOME=$ORACLE_BASE/config/domains/frsdomain
mkdir -p $DOMAIN_HOME/servers/AdminServer/security
echo "username=weblogic" > $DOMAIN_HOME/servers/AdminServer/security/boot.properties
echo "password=Password1" >> $DOMAIN_HOME/servers/AdminServer/security/boot.properties
mkdir -p $DOMAIN_HOME/servers/WLS_FORMS/security
cp $DOMAIN_HOME/servers/AdminServer/security/boot.properties $DOMAIN_HOME/servers/WLS_FORMS/security/boot.properties
mkdir -p $DOMAIN_HOME/servers/WLS_REPORTS/security
cp $DOMAIN_HOME/servers/AdminServer/security/boot.properties $DOMAIN_HOME/servers/WLS_REPORTS/security/boot.properties
The "$ORACLE_BASE/config/domains/frsdomain" directory now contains a script that can be used to start the server. Remember to use the "&" if you want access to the command line to be returned.
$ $DOMAIN_HOME/startWebLogic.sh &
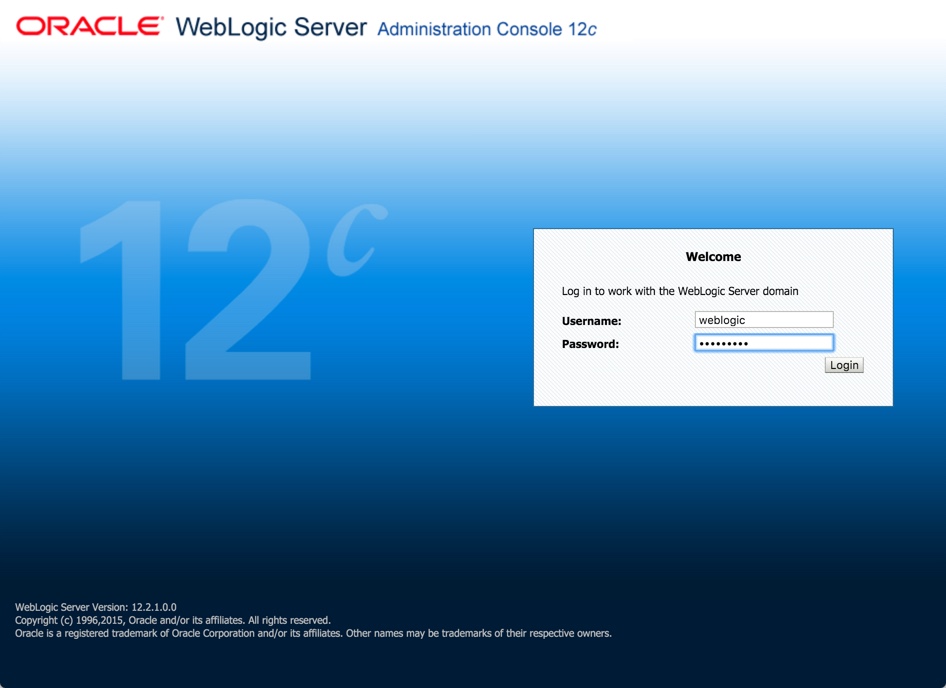
Once the server is started you can access the administrator console using the "http://hostname:port/console" URL. Log in using the username and password provided in the previous step.
Reset Node Manager Username/Password
If you've not configured the node manager credentials during the domain creation, the following steps show you how to do it once the AdminServer has been started.
- Log in to the administration server (http://ol7.localdomain:7001/console).
- In the "Domain Structure" tree on the left, click on the domain name (frsdomain).
- Click on the "Security" tab. This should automatically put you in the "General" sub-tab.
- Click the "Advanced" link towards the bottom of the screen.
- If you are running in production mode, click the "Lock & Edit" button.
- Enter the "NodeManager Username", "NodeManager Password" and "Confirm NodeManager Password", then click the "Save" button.
- If you are running in production mode, click the "Activate Changes" button.
The node manager password has now been reset.
If you only have a single node manager on the server, this only needs to be done once per server. If you are using domain-specific node managers, you will need to do this for every new domain.
Web Tier
Since OPMN is no longer used, starting the HTTP Server must be done using WLST or the Enterprise Manager console. The process for starting it using EM is shown below.
- Log into the Enterprise Manager console (http://ol7.localdomain:7001/em).
- Click on the "Target Navigation" icon.
- Expand the "HTTP Server" node.
- Click on the "ohs1" instance.
- The resulting page has "Start Up" and "Shut Down" links at the top.
If you have any problems starting the OHS, it's likely that the NodeManager is not running. Make sure this is started and try again.
The HTTP Server must be started once, for the directories associated with "ohs1" instance to be created. The web tier is not configured by default, so you will need to do the following.
Edit the "$ORACLE_HOME/forms/templates/config/forms.conf" file to contain the following.
  <Location /forms>
      SetHandler weblogic-handler
      WebLogicHost ol7.localdomain
      WebLogicPort 9001
  </Location>
Edit the "$ORACLE_HOME/reports/conf/reports_ohs.conf" file to contain the following.
  <Location /reports>
      SetHandler weblogic-handler
      WebLogicHost ol7.localdomain
      WebLogicPort 9002
  </Location>
Copy the config files to the "moduleconf" directory under the "ohs1" instance.
cp $ORACLE_HOME/forms/templates/config/forms.conf $OHS_INST/moduleconf
cp $ORACLE_HOME/reports/conf/reports_ohs.conf $OHS_INST/moduleconf
You shouldn't need to make any changes to the "$OHS_INST/httpd.conf" file.
Restart the HTTP Server, as described above, for the configuration changes to take effect.
To start the HTTP Server from the command line, issue the following command and type the node manager password when prompted.
$DOMAIN_HOME/bin/startComponent.sh ohs1 storeUserConfig
Subsequent stop and start calls can be made without the extra parameter and without specifying any node manager password.
# Start HTTP Server.
$DOMAIN_HOME/bin/startComponent.sh ohs1

# Stop HTTP Server.
$DOMAIN_HOME/bin/stopComponent.sh ohs1
You will see this used in the following section.
Startup Shutdown
The following scripts are useful. They assume the following.
- A "boot.properies" file has been created for the AdminServer and the WLS_FORMS and WLS_REPORTS managed servers.
- The node manager credentials have been set and saved, as described previously.
- The database holding the repository is already started.
To start up the whole WebLogic and FRS stack, issue the following commands.
# Adjust paths and domain name to suit your installation.
export ORACLE_BASE=/u01/app/oracle
export MW_HOME=$ORACLE_BASE/product/12.2.1
export WLS_HOME=$MW_HOME/wlserver
export WL_HOME=$WLS_HOME
export DOMAIN_HOME=$ORACLE_BASE/config/domains/frsdomain
export OHS_INST=$DOMAIN_HOME/config/fmwconfig/components/OHS/instances/ohs1

# Start NodeManager
nohup $DOMAIN_HOME/bin/startNodeManager.sh > /dev/null 2>&1 &

# Start WebLogic Domain
nohup $DOMAIN_HOME/bin/startWebLogic.sh > /dev/null 2>&1 &

sleep 60

# Start the managed Servers
nohup $DOMAIN_HOME/bin/startManagedWebLogic.sh WLS_FORMS > /dev/null 2>&1 &
nohup $DOMAIN_HOME/bin/startManagedWebLogic.sh WLS_REPORTS > /dev/null 2>&1 &

# Start the web tier.
$DOMAIN_HOME/bin/startComponent.sh ohs1
To stop the whole WebLogic and FRS stack, issue the following commands.
# Adjust paths and domain name to suit your installation.
export ORACLE_BASE=/u01/app/oracle
export MW_HOME=$ORACLE_BASE/product/12.2.1
export WLS_HOME=$MW_HOME/wlserver
export WL_HOME=$WLS_HOME
export DOMAIN_HOME=$ORACLE_BASE/config/domains/frsdomain
export OHS_INST=$DOMAIN_HOME/config/fmwconfig/components/OHS/instances/ohs1

# Stop the web tier.
$DOMAIN_HOME/bin/stopComponent.sh ohs1

# Stop the managed Servers
$DOMAIN_HOME/bin/stopManagedWebLogic.sh WLS_FORMS
$DOMAIN_HOME/bin/stopManagedWebLogic.sh WLS_REPORTS

# Stop WebLogic Domain
$DOMAIN_HOME/bin/stopWebLogic.sh

# Stop NodeManager
$DOMAIN_HOME/bin/stopNodeManager.sh
Important URLs
The basic URLs of importance are shown below. Ports may vary between installations.
- http://localhost:7001/console (Console)
- http://localhost:7001/em (Enterprise Manager)
- http://localhost:9001/forms/frmservlet (Forms Base URL)
- http://localhost:9002/reports/rwservlet (Reports Base URL)
- http://localhost:7777/forms/frmservlet (Base HTTP URL you would normally use to initiate Forms)
- http://localhost:7777/reports (Base HTTP URL you would normally use to initiate Reports)
- https://localhost:4443/forms/frmservlet (Base HTTPS URL you would normally use to initiate Forms)
- https://localhost:4443/reports (Base HTTPS URL you would normally use to initiate Reports)
Before you can start using Forms and Reports Services you will need to do some environment configuration, which is discussed here.
Web Start
Oracle Forms can easily be run using Java Web Start, freeing you from issues with browser compatibility. For this to work, you need a Java 8 JRE installed on the PC. To run using Web Start for the first time, simply issue the URL in the following form.
http://hostname:9001/forms/frmservlet?config=webstart
http://hostname:7777/forms/frmservlet?config=webstart
Depending on your browser, the Web Start version of the URL will either just run, or will ask you to save a ".jnlp" file on your computer. Once saved, you can double click on the file and it will launch Forms directly from the PC as a Web Start application, without using a browser.
For more information see:
- Oracle WebLogic Server (WLS) 12cR2 (12.2.1) Installation on Oracle Linux 6 and 7
- Oracle Forms and Reports 12c (12.2.1) Installation on Oracle Linux 6 and 7
- WebLogic Server 12cR1 (12.1.2 and 12.1.3) : WebLogic Server 12cR2 (12.2.1) : ADF Application Development Runtime - Repository Configuration Utility (RCU)
Hope this helps. Regards Tim...