8i | 9i | 10g | 11g | 12c | 13c | 18c | 19c | 21c | 23c | Misc | PL/SQL | SQL | RAC | WebLogic | Linux
NGINX : Reverse Proxy Configuration
A reverse proxy can act as a gateway service allowing access to servers on your trusted network from an external network.
There are a number of ways to achieve this, but this article discusses how to configure a reverse proxy using NGINX.
Related articles.
Introduction
Using a reverse proxy is a simple and convenient approach to allowing access to servers on your trusted network from external networks, such as the internet.
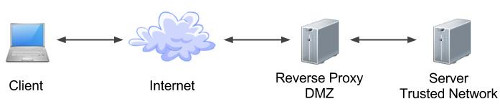
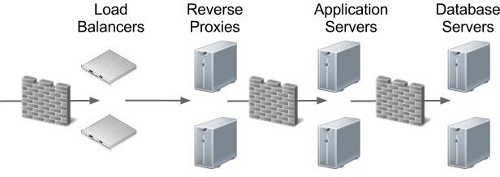
Much of its appeal comes from the fact it allows all your servers to remain hidden from the external networks and the user community. The diagram below shows a simple architecture that could be employed to achieve this. Of course, there are an almost limitless variety of configurations possible depending on your requirements and the products being used.
Reverse proxies provide a number of benefits in terms of security and maintenance, including the following.
- The obvious point is none of your application or database servers are exposed to external networks directly, which is a good starting point when trying to build a secure solution.
- URLs presented to users can be "pretty", rather than containing specific machine names, ports and long paths. A simple redirect would still expose the true URL, while a reverse proxy completely hides it from the user.
- Following on from the previous point, users bookmark URLs. If that bookmark contains a specific machine name, then no matter how resilient you try to make your solution, they will go to their bookmark and think your site it down. Separating them from the physical implementation of your services make your apparent availability better.
- From a security perspective, the less architectural information you expose to the outside world, the better. If hackers are presented the actual machine names and ports that are running a service, it makes it significantly easier for them to attack those services.
- The fact the URLs no longer point directly to actual machines enables dramatic architecture changes to be hidden from users. A simple configuration change within the reverse proxy can direct all the workload to a new set of servers.
Installation
We're going to keep things simple by installing NGINX from the default Oracle Linux Yum repository.
# OL7
yum install -y nginx

# OL8
dnf install -y nginx
Enable and start the NGINX service.
systemctl enable nginx
systemctl start nginx
Top level configuration is in the "/etc/nginx/nginx.conf" file. You can make amendments here, but it is often neater to use the modular approach and add config files for each virtual host in the "/etc/nginx/conf.d/" directory. Any files matching the *.conf" pattern will be picked up from this directory.
HTTP Reverse Proxy
The "proxy_pass" parameter is used to tell NGINX how to proxy requests.
In the following example, the "my-app-1.example.com" URL resolves to the IP address of the reverse proxy server. We create a file called "/etc/nginx/conf.d/my-app-1.example.com.conf" with the following content.
  server {
   listen 80;
   #listen [::]:80 ipv6only=on;

    server_name my-app-1.example.com;

    root /usr/share/nginx/html;
    index index.html;
    location / {
      proxy_pass http://app-server-1.localdomain:7002;
      proxy_set_header Host $host;
    }
  }
If we were proxying to a HTTPS URL from a HTTP endpoint, we will need to add the proxy_ssl_server_name parameter.
  server {
   listen 80;
   #listen [::]:80 ipv6only=on;

    server_name my-app-1.example.com;

    root /usr/share/nginx/html;
    index index.html;
    location / {
      proxy_ssl_server_name on;
      proxy_pass http://app-server-1.localdomain:7002;
      proxy_set_header Host $host;
    }
  }
Changes to the NGINX configuration will not take effect until the service is reloaded or restarted.
# systemctl reload nginx
# # OR
# systemctl restart nginx
Remember, for named virtual hosts to work, the URL must contain the correct name, so to test this you will either need the appropriate DNS entries, or "/etc/hosts" entries. In my case the reverse proxy is running on a server with an IP address of "192.168.0.190", so the hosts file would look like this.
192.168.0.190 my-app-1.example.com
The applications is now being proxied using the following URL.
http://my-app-1.example.com
HTTPS Reverse Proxy
In order to define a HTTPS reverse proxy you will need to configure NGINX to handle HTTPS requests. The HTTPS reverse proxy definitions are similar to those seen previously, with the addition of the SSL related parameters. The following example also includes a number of additional entries to harden the server. The most important points are the ssl_certificate and ssl_certificate_key parameters, which point to the certificates being used for HTTPS.
  server {
   listen 443 ssl http2;
   #listen [::]:443 ipv6only=on ssl http2;

    server_name my-app-1.example.com;

    ssl_certificate /etc/letsencrypt/live/my-app-1.example.com/fullchain.pem;
    ssl_certificate_key /etc/letsencrypt/live/my-app-1.example.com/privkey.pem;

    # Improve HTTPS performance with session resumption
    ssl_session_cache shared:SSL:10m;
    ssl_session_timeout 5m;

    # Enable server-side protection against BEAST attacks
    ssl_prefer_server_ciphers on;
    ssl_ciphers ECDH+AESGCM:ECDH+AES256:ECDH+AES128:DH+3DES:!ADH:!AECDH:!MD5;

    # Disable SSLv3
    ssl_protocols TLSv1.3 TLSv1.2 TLSv1.1;

    # Diffie-Hellman parameter for DHE ciphersuites
    # $ sudo openssl dhparam -out /etc/ssl/certs/dhparam.pem 4096
    #ssl_dhparam /etc/ssl/certs/dhparam.pem;

    # Enable HSTS (https://developer.mozilla.org/en-US/docs/Security/HTTP_Strict_Transport_Security)
    add_header Strict-Transport-Security "max-age=63072000; includeSubdomains; preload" always;

    # Enable OCSP stapling (http://blog.mozilla.org/security/2013/07/29/ocsp-stapling-in-firefox)
    ssl_stapling on;
    ssl_stapling_verify on;
    ssl_trusted_certificate /etc/letsencrypt/live/my-app-1.example.com/fullchain.pem;
    resolver 8.8.8.8 8.8.4.4 valid=300s;
    resolver_timeout 5s;

    root /usr/share/nginx/html;
    index index.html;
    location / {
      proxy_pass http://app-server-1.localdomain:7002;
      proxy_set_header Host $host;
    }
  }
After a restart of the NGINX service, the following URL will be proxied appropriately.
https://my-app-1.example.com
The above example used a Let's Encrypt certificate. For internal servers you may want to create a self-signed certificate. Here's an example of doing that with OpenSSL.
openssl req \
  -newkey rsa:4096 -nodes -sha256 -keyout /path/to/certs/${HOSTNAME}_key.pem \
  -x509 -days 3650 -out /path/to/certs/${HOSTNAME}_cert.pem \
  -subj "CN=${HOSTNAME}, OU=My Department, O=My Company, L=Birmingham, ST=West Midlands, C=GB"
For more information see:
- Apache : Reverse Proxy Configuration
- Let's Encrypt - Free Certificates on Oracle Linux (CertBot)
- Server Icon
- Cloud Icon
Hope this helps. Regards Tim...