8i | 9i | 10g | 11g | 12c | 13c | 18c | 19c | 21c | 23ai | Misc | PL/SQL | SQL | RAC | WebLogic | Linux
Flashback and LogMiner Enhancements in Oracle Database 11g Release 1
The Flashback Query feature was first introduced in Oracle 9i. Oracle 10g improved Flashback Query and introduced several new features. The improvements to Flashback technology have continued in Oracle 11g, which has also improved the usability of Logminer, another long standing feature.
Related articles.
- Flashback Query
- Flashback New Features and Enhancements in Oracle Database 10g
- Flashback Data Archive (FDA) Enhancements in Oracle Database 12c Release 1 (12.1)
- LogMiner (8i)
- LogMiner Enhancements In Oracle9i
LogMiner Enhancements
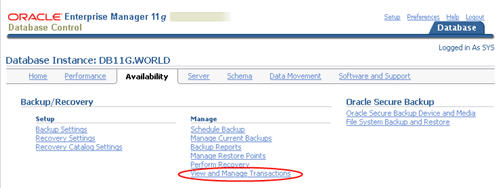
In previous versions of Oracle the LogMiner viewer was a separate Java based console, but in Oracle 11g it has been incorporated into Enterprise Manager and integrated with the new Flashback Transaction feature, making it simple to recover transactions that have had an undesirable affect. The logminer functionality is accessed using the "View and Manage Transactions" link on the "Availability" tab.
The section on Flashback Transaction will make use of this feature, so there is little point discussing more here.
Flashback Transaction
As the name implies, Flashback Transaction allows the changes made by a transaction to be undone, optionally including changes made by dependent transactions. The best way to explain this is to see it in action. For this we will be using the new LogMiner screens in Enterprise Manager.
LogMiner requires minimal supplemental logging, but Flashback Transaction requires primary key logging. These can be turned on for the database using the following commands.
CONN sys/password AS SYSDBA

ALTER DATABASE ADD SUPPLEMENTAL LOG DATA;
ALTER DATABASE ADD SUPPLEMENTAL LOG DATA (PRIMARY KEY) COLUMNS;
In order to test the LogMiner and Flashback Transaction functionality we need some transactions to view. First, create a test user.
CONN sys/password AS SYSDBA

CREATE USER test_user IDENTIFIED BY test_user
  QUOTA UNLIMITED ON users;

GRANT CONNECT, CREATE TABLE TO test_user;
Next, connect to the test user, create a test table and perform a few transactions against it.
CONN test_user/test_user

CREATE TABLE test_tab (
  id          NUMBER,
  description VARCHAR2(50),
  CONSTRAINT test_tab_pk PRIMARY KEY (id)
);

INSERT INTO test_tab (id, description) VALUES (1, 'Description for 1');
COMMIT;

INSERT INTO test_tab (id, description) VALUES (2, 'Description for 2');
COMMIT;

UPDATE test_tab SET description = 'Tree' WHERE  id = 1;
COMMIT;

UPDATE test_tab SET description = 'Field' WHERE  id = 2;
COMMIT;

DELETE FROM test_tab WHERE id = 1;
COMMIT;
Log into Enterprise Manager and click the "View and Manage Transactions" link on the "Availability" tab.
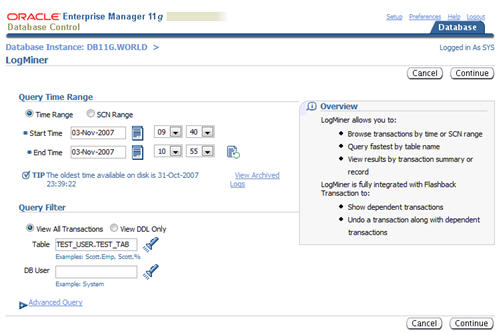
Enter a suitable date range that is likely to pick up the transactions we've just performed and enter the table name of "TEST_USER.TEST_TAB". You can customize the query further by editing the WHERE clause in the "Advanced Query" section. Clicking the "Info Icon" on the page displays a description of the V$LOGMNR_CONTENTS, including its columns and some useful functions for querying them. For this example, we are just going to ignore this section and click the "Continue" button.
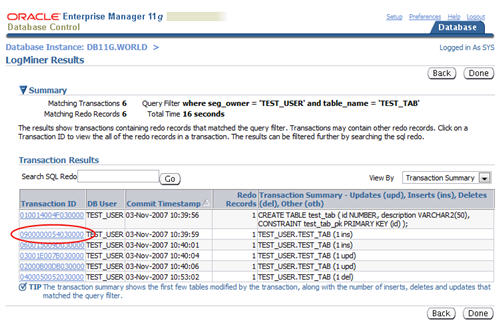
Wait while the contents of the online and archived redo logs are searched for transactions matching the search criteria. The resulting page shows the transactions that match our search criteria. Click on the transaction ID associated with the first insert operation, in this case it is listed as "TEST_USER.TEST_TAB (1 ins)".
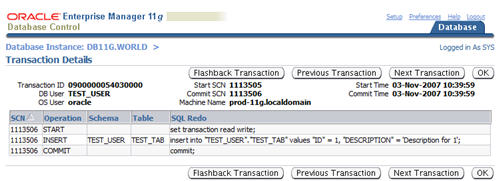
The "Transaction Details" page shows the full insert statement. Click the "Flashback Transaction" button.
Confirm the flashback request by clicking the "Yes" button.

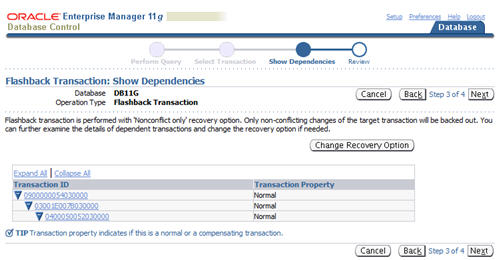
The insert operation we originally selected had two dependent transactions, the update and delete, so we need to decide how this flashback should deal with the dependents. The text currently states that the "Nonconflict only" option is set. We want to change that, so click the "Change Recovery Option" button.
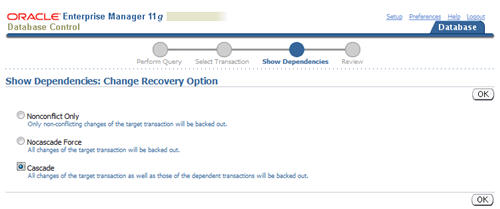
Select the "Cascade" option and click the "OK" button.
The "Show Dependencies" screen now states the "Cascade" option is set. Click the "Next" button.

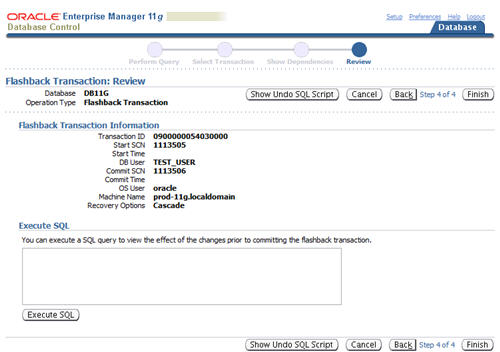
The "Review" screen allows us to take a look at the state of the database before commiting the operation. To check the current state of the data, enter a query in the "Execute SQL" section and click the "Execute SQL" button. To view the undo SQL script, click the "Show Undo SQL Script" button. Click the "Finish" button to commit the flashback operation.
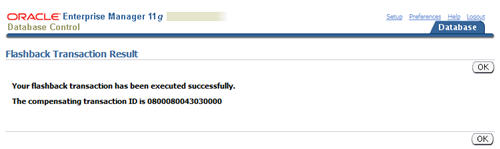
Click the "OK" button on the subsequent result screen.
You are then returned to the "Transaction Details" screen. Clicking the "OK" button returns you to the "LogMiner Results" screen. Clicking the "Done" button will return you to the top level "Availability" tab screen.
The flashback transaction functionality is also available using the TRANSACTION_BACKOUT procedure of the DBMS_FLASHBACK package. The procedure accepts multiple transaction IDs or names, along with an OPTIONS parameter to indicate how dependent transactions should be treated.
- NOCASCADE - The transaction should have no dependencies. If any are detected a error is raised.
- NOCASCADE_FORCE - The transaction is forcibly backed out without affecting dependent transactions, assuming no constraints are violated as a result of this action.
- NONCONFLICT_ONLY - The transaction will be backed out, but only the non-conflicting rows of the transaction will be removed.
- CASCADE - The transaction and all it's dependencies will be removed.
Transactions are always processed in reverse order of their commit times.
In addition to backing out the required transactions, the procedure generates a report of the actions taken, which can be viewed using the DBA_FLASHBACK_TXN_STATE and DBA_FLASHBACK_TXN_REPORT views. Based on the information present in these views, the user can decide whether to commit or rollback the flashback operation.
The previous "LogMiner Results" screen showed the second insert transaction had an ID of "060015009D030000". We can use this with the TRANSACTION_BACKOUT procedure to flashback this transaction also.
BEGIN
  DBMS_FLASHBACK.transaction_backout (numtxns => 1,
                                      xids    => xid_array('060015009D030000'),
                                      options => DBMS_FLASHBACK.cascade);
END;
/
Querying the test table shows that the row has been removed.
SQL> SELECT * FROM test_user.test_tab;

no rows selected

SQL>
We can use the transaction ID to query the DBA_FLASHBACK_TXN_STATE view.
SELECT *
FROM   dba_flashback_txn_state
WHERE  xid = '060015009D030000';

COMPENSATING_XID XID              DEPENDENT_XID    BACKOUT_MODE     USERNAME
---------------- ---------------- ---------------- ---------------- ------------------------------
05001800A0030000 060015009D030000 02000B00DB030000 CASCADE          SYS

1 row selected.

SQL>
The COMPENSATING_XID returned from this query is used to query the DBA_FLASHBACK_TXN_REPORT view.
COLUMN xid_report FORMAT A80
SET LONG 100000

SELECT xid_report
FROM   dba_flashback_txn_report
WHERE  compensating_xid = '05001800A0030000';

XID_REPORT
--------------------------------------------------------------------------------
<?xml version="1.0" encoding="ISO-8859-1"?>
<COMP_XID_REPORT XID="05001800A0030000">
        <TRANSACTION XID="060015009D030000">
        <CHARACTERISTICS>
        </CHARACTERISTICS>
        <UNDO_SQL>
                <USQL exec="yes">
                 delete from "TEST_USER"."TEST_TAB" where "ID" = '2' and "DESCRIPTION" = 'Desc
ription for 2'
                </USQL>
        </UNDO_SQL>

XID_REPORT
--------------------------------------------------------------------------------
        <DEPENDENT_XIDS>
                <TRANSACTION XID="02000B00DB030000">
                <CHARACTERISTICS>
                </CHARACTERISTICS>
                <UNDO_SQL>
                        <USQL exec="yes">
                         update "TEST_USER"."TEST_TAB" set "DESCRIPTION" = 'Description for 2' where
"ID" = '2' and "DESCRIPTION" = 'Field'
                        </USQL>
                </UNDO_SQL>
                <DEPENDENT_XIDS>

XID_REPORT
--------------------------------------------------------------------------------
                </DEPENDENT_XIDS>
                </TRANSACTION>
        </DEPENDENT_XIDS>
        </TRANSACTION>
<EXECUTED_UNDO_SQL>
<EXEC_USQL>update "TEST_USER"."TEST_TAB" set "DESCRIPTION" = 'Description for 2'
 where "ID" = '2' and "DESCRIPTION" = 'Field'
</EXEC_USQL>
<EXEC_USQL>delete from "TEST_USER"."TEST_TAB" where "ID" = '2' and "DESCRIPTION"
 = 'Description for 2'
</EXEC_USQL>

XID_REPORT
--------------------------------------------------------------------------------
</EXECUTED_UNDO_SQL>
</COMP_XID_REPORT>


1 row selected.

SQL>
Based on this information, we can decide if the flashback operation should be commited or rolled back.
Flashback Data Archive (Oracle Total Recall)
Most flashback features work at the logical level, in that they don't directly allow you to recover an object. They simply give you a view of how the data was in the past, which in turn can be used to recover from logical corruption, such as accidental deletions. Typically, this view of the past is constructed using undo segments, which are retained for a period of time indicated by the UNDO_RETENTION parameter. Once the undo information is lost, the view of the past is lost also. At least that's how it was before Oracle 11g introduced the Flashback Data Archive functionality.
A flashback data archive is essentially an extended store of undo information, allowing some logical flashback operations to extend way back into the past with no difference in how they are coded. An individual flashback archives consists of one or more tablespaces, or parts of tablespace. Each flashback archive has a name, retention period and a quota on each associated tablespace. The database can have multiple flashback data archives, but only a single default archive. When a DML transaction commits an operation on a flashback archive enabled table, the Flashback Data Archiver (FBDA) process stores the pre-image of the rows into a flashback archive, along with metadata of the current rows. The FBDA process is also responsible for managing the data within the flashback archives, such as purging data beyond the retention period.
The following script creates a new tablespace, then creates two flashback data archives using the CREATE FLASHBACK ARCHIVE command. The first is limited in size to 10Gig with a retention period of 1 year, while the second has an unlimited quota and a retention period of 2 years.
CREATE TABLESPACE fda_ts
  DATAFILE '/u01/app/oracle/oradata/DB11G/fda1_01.dbf'
  SIZE 1M AUTOEXTEND ON NEXT 1M;

CREATE FLASHBACK ARCHIVE DEFAULT fda_1year TABLESPACE fda_ts
  QUOTA 10G RETENTION 1 YEAR;

CREATE FLASHBACK ARCHIVE fda_2year TABLESPACE fda_ts
  RETENTION 2 YEAR;
Management of flashback archives falls into three distinct categories.
Tablespace management.
-- Set as default FBA
ALTER FLASHBACK ARCHIVE fba_name SET DEFAULT;

-- Add up to 10G of the specified tablespace to the specified flashback archive.
ALTER FLASHBACK ARCHIVE fba_name ADD TABLESPACE ts_name QUOTA 10G;

-- Add an unlimited quota of the specified tablespace to the specified flashback archive.
ALTER FLASHBACK ARCHIVE fba_name ADD TABLESPACE ts_name;

-- Change the tablespace quota to 20G.
ALTER FLASHBACK ARCHIVE fba_name MODIFY TABLESPACE ts_name QUOTA 20G;

-- Change the tablespace quota to unlimited.
ALTER FLASHBACK ARCHIVE fba_name MODIFY TABLESPACE ts_name;

-- Remove the specified tablespace from the archive.
ALTER FLASHBACK ARCHIVE fba_name REMOVE TABLESPACE ts_name;
Modifying the retention period.
ALTER FLASHBACK ARCHIVE fba_name MODIFY RETENTION 2 YEAR;
Purging data.
-- Remove all historical data.
ALTER FLASHBACK ARCHIVE fba_name PURGE ALL;

-- Remove all data before the specified time.
ALTER FLASHBACK ARCHIVE fba_name PURGE BEFORE TIMESTAMP (SYSTIMESTAMP - INTERVAL '1' DAY);

-- Remove all data before the specified SCN.
ALTER FLASHBACK ARCHIVE fba_name PURGE BEFORE SCN 728969;
Archives are removed using the DROP FLASHBACK ARCHIVE command, which drops the archive and all its historical data, but doesn't drop the associated tablespace.
DROP FLASHBACK ARCHIVE fba_name;
To enable flashback archiving on a specific table the user must have the FLASHBACK ARCHIVE object privilege on the specific flashback archive used. To try this out create a test user and grant the object privilege on the first flashback archive created earlier.
CONN sys/password AS SYSDBA

CREATE USER fda_test_user IDENTIFIED BY fda_test_user
  QUOTA UNLIMITED ON users
  QUOTA UNLIMITED ON fda_ts;

GRANT CONNECT, CREATE TABLE TO fda_test_user;
GRANT FLASHBACK ARCHIVE ON fda_1year TO fda_test_user;
If we connect to the test user we are able to create a table and associate it with the default flashback archive as follows.
CONN fda_test_user/fda_test_user

CREATE TABLE test_tab_1 (
  id          NUMBER,
  desription  VARCHAR2(50),
  CONSTRAINT test_tab_1_pk PRIMARY KEY (id)
)
FLASHBACK ARCHIVE;
If we try to create a similar table, but point it at the second archive it fails, as we have no privileges on it.
CONN fda_test_user/fda_test_user

CREATE TABLE test_tab_2 (
  id          NUMBER,
  desription  VARCHAR2(50),
  CONSTRAINT test_tab_2_pk PRIMARY KEY (id)
)
FLASHBACK ARCHIVE fda_2year;
CREATE TABLE test_tab_2 (
*
ERROR at line 1:
ORA-55620: No privilege to use Flashback Archive


SQL>
The ALTER TABLE command allows existing tables to have flashback archiving switched on or off.
-- Enable using the default FBDA.
ALTER TABLE table_name FLASHBACK ARCHIVE;

-- Enable using specific FBDA.
ALTER TABLE table_name FLASHBACK ARCHIVE fda_name;

-- Disable flashback archiving.
ALTER TABLE table_name NO FLASHBACK ARCHIVE;
As with the CREATE TABLE statement, the FLASHBACK ARCHIVE object privilege must be granted on the flashback archive being used.
Once flashback archiving is enabled the table is protected, so it cannot be switched off unless you have the FLASHBACK ARCHIVE ADMINISTER system privilege, or are logged on as SYSDBA.
SQL> ALTER TABLE test_tab_1 NO FLASHBACK ARCHIVE;
ALTER TABLE test_tab_1 NO FLASHBACK ARCHIVE
*
ERROR at line 1:
ORA-55620: No privilege to use Flashback Archive


SQL>
In addition, there are certain DDL restrictions associated with having flashback archiving enabled in 11gR1. The following operations result in a ORA-55610 error.
ALTER TABLEstatements that drop, rename or modify columns.ALTER TABLEstatements that performs partition or subpartition operations.ALTER TABLEstatements that converts a LONG column to a LOB column.ALTER TABLEstatements that includes an UPGRADE TABLE clause, with or without an INCLUDING DATA clause.DROP TABLEstatements.RENAME TABLEstatements.TRUNCATE TABLEstatements.
In 11gR2 some of these restrictions have been removed and the following DDL is supported.
- Add, drop, rename or modify column.
- Drop or truncate partitions.
- Rename or truncate tables.
- Add, drop, rename or modify constraints.
- More complex DDL can be performed in conjunction with the
DISASSOCIATE_FBAandREASSOCIATE_FBAprocedures of the DBMS_FLASHBACK_ARCHIVE package.
Information about flashback data archives is displayed using the %_FLASHBACK_ARCHIVE view.
CONN sys/password AS SYSDBA

COLUMN flashback_archive_name FORMAT A20

SELECT flashback_archive_name, retention_in_days, status
FROM   dba_flashback_archive;

FLASHBACK_ARCHIVE_NA RETENTION_IN_DAYS STATUS
-------------------- ----------------- -------
FDA_2YEAR                          730
FDA_1YEAR                          365 DEFAULT

2 rows selected.

SQL>
The %_FLASHBACK_ARCHIVE_TS view displays the tablespaces and quotas associated with each flashback archive.
COLUMN flashback_archive_name FORMAT A20
COLUMN quota_in_mb FORMAT A10

SELECT flashback_archive_name, tablespace_name, quota_in_mb
FROM   dba_flashback_archive_ts;

FLASHBACK_ARCHIVE_NA TABLESPACE_NAME                QUOTA_IN_M
-------------------- ------------------------------ ----------
FDA_2YEAR            FDA_TS
FDA_1YEAR            FDA_TS                         10240

2 rows selected.

SQL>
The %_FLASHBACK_ARCHIVE_TABLES view displays tables associated with each flashback archive, along with the name of the table holding the historical information.
COLUMN table_name FORMAT A15
COLUMN owner_name FORMAT A15
COLUMN flashback_archive_name FORMAT A20
COLUMN archive_table_name FORMAT A20

SELECT table_name, owner_name, flashback_archive_name, archive_table_name
FROM   dba_flashback_archive_tables;

TABLE_NAME      OWNER_NAME      FLASHBACK_ARCHIVE_NA ARCHIVE_TABLE_NAME
--------------- --------------- -------------------- --------------------
TEST_TAB_1      FDA_TEST_USER   FDA_1YEAR            SYS_FBA_HIST_72023

1 row selected.

SQL>
Oracle database version 11.2 also includes the DBMS_FLASHBACK_ARCHIVE package, which allows you to disassociate (DISASSOCIATE_FBA) and reassociate (REASSOCIATE_FBA) a table and it's flashback data archive table. Allowing you to perform untracked DML and DDL to the base table. Any DDL applied to the base table must also be applied to the flashback data archive table or it will fail to reassociate.
For more information see:
- Logminer (8i)
- LogMiner Enhancements In Oracle9i
- Using Flashback Technology
- DBMS_FLASHBACK
- Using LogMiner to Analyze Redo Log Files
- DBMS_LOGMNR
- Flashback New Features and Enhancements in Oracle Database 10g
- Flashback Data Archive (FDA) Enhancements in Oracle Database 12c Release 1 (12.1)
- RMAN Enhancements in Oracle Database 11g Release 1
Hope this helps. Regards Tim...