8i | 9i | 10g | 11g | 12c | 13c | 18c | 19c | 21c | 23ai | Misc | PL/SQL | SQL | RAC | WebLogic | Linux
Oracle Data Integrator (ODI) 12c (12.2.1.2.6) Silent Installation on Oracle Linux 6 and 7 (OL6 and OL7)
This article demonstrates how to perform a silent installation of Oracle Data Integrator (ODI) 12c (12.2.1.2.6) on Oracle Linux 6 and 7 (OL6 and OL7) using Oracle Database 12c Release 1 (12.1) for the repository created by the Repository Creation Utility (RCU).
- Assumptions
- Downloads
- Additional OS Packages
- Database Software Installation
- Database Creation
- Response Files
- Prepare Response Files
- WebLogic Installation
- ODI Installation
- Repository Configuration Utility (RCU)
- ODI Configuration
- ODI Agent Config
- Startup/Shutdown
- ODI URLs
- Domain Cleanup
Related articles.
Assumptions
To keep this article as brief as possible I'm going to make the following assumptions.
- You already have a server (Virtual or Physical) with Oracle Linux 6 or 7 (OL6 or OL7) installed (described here OL6 or OL7).
- The prerequisites for an Oracle Database 12c Release 1 (12.1) installation have been completed (described here OL6 or OL7).
- You are somewhat familiar with the concept of silent installations (described here).
- To keep things simple we will install both the database and ODI on a single machine. This is not a recommendation. As a result of this, some of the paths may look a little odd, as it will be a mix of OFA for the database and my typical paths for WebLogic installations.
- All the software listed below will be placed in the "/u01/software" directory.
- All the response files listed below are placed in the "/u01/software" directory and adjusted to suite your purposes.
I don't work with ODI, but I do have to provide basic support of some infrastructure that runs it (database and WebLogic).
Downloads
There is a lot of software to download before you can begin. I've purposely not included the latest critical updates.
- Oracle Database 12c Release 1 (12.1.0.2) (linuxamd64_12102_database_1of2.zip and linuxamd64_12102_database_2of2.zip)
- JDK8 Update 121 (jdk-8u121-linux-x64.tar.gz)
- WebLogic Server (fmw_12.2.1.2.0_infrastructure_Disk1_1of1.zip)
- Oracle Data Integrator 12c (fmw_12.2.1.2.6_odi_Disk1_1of2.zip and fmw_12.2.1.2.6_odi_Disk1_2of2.zip)
Additional OS Packages
Install the following package for the Fusion Middleware prerequisites to be met. Many of them will already be present because of the database prerequisites.
# OL6 and OL7.
yum install binutils -y
yum install compat-libcap1 -y
yum install compat-libstdc++-33 -y
yum install compat-libstdc++-33.i686 -y
yum install gcc -y
yum install gcc-c++ -y
yum install glibc -y
yum install glibc.i686 -y
yum install glibc-devel -y
yum install libaio -y
yum install libaio-devel -y
yum install libgcc -y
yum install libgcc.i686 -y
yum install libstdc++ -y
yum install libstdc++.i686 -y
yum install libstdc++-devel -y
yum install ksh -y
yum install make -y
yum install sysstat -y
yum install numactl -y
yum install numactl-devel -y

# OL7 Only.
yum install motif -y
yum install motif-devel -y

# OL6 ONly.
yum install libXext.i686 -y
yum install libXtst.i686 -y
yum install openmotif -y
yum install openmotif22 -y
Database Software Installation
Assuming you have completed all the OS prerequisites for a database installation, you can install the database software as follows.
Unzip the software.
cd /u01/software
unzip -o linuxamd64_12102_database_1of2.zip
unzip -o linuxamd64_12102_database_2of2.zip
Install the database software in silent mode.
cd database

./runInstaller -ignoreSysPrereqs -showProgress -silent \
  -responseFile /u01/software/database/response/db_install.rsp \
  oracle.install.option=INSTALL_DB_SWONLY \
  ORACLE_HOSTNAME=ol7-odi.localdomain \
  UNIX_GROUP_NAME=oinstall \
  INVENTORY_LOCATION=/u01/app/oraInventory \
  SELECTED_LANGUAGES=en,en_GB \
  ORACLE_HOME=/u01/app/oracle/product/12.1.0.2/db_1 \
  ORACLE_BASE=/u01/app/oracle \
  oracle.install.db.InstallEdition=EE \
  oracle.install.db.DBA_GROUP=dba \
  oracle.install.db.BACKUPDBA_GROUP=dba \
  oracle.install.db.DGDBA_GROUP=dba \
  oracle.install.db.KMDBA_GROUP=dba \
  SECURITY_UPDATES_VIA_MYORACLESUPPORT=false \
  DECLINE_SECURITY_UPDATES=true
When prompted, run the root scripts.
# Run root scripts as directed.
#
# As a root user, execute the following script(s):
#         1. /u01/app/oraInventory/orainstRoot.sh
#         2. /u01/app/oracle/product/12.1.0.2/db_1/root.sh
Database Creation
Start the listener.
lsnrctl start
Create the database using the Database Creation Assistant (DBCA) in silent mode.
#dbca -silent -deleteDatabase -sourceDB repdevcdb -sysDBAUserName sys -sysDBAPassword SysPasswd1

dbca -silent -createDatabase \
 -templateName General_Purpose.dbc \
 -gdbname repdevcdb -sid repdevcdb -responseFile NO_VALUE \
 -characterSet AL32UTF8 \
 -sysPassword SysPasswd1 \
 -systemPassword SysPasswd1 \
 -createAsContainerDatabase true \
 -numberOfPDBs 1 \
 -pdbName repdev \
 -pdbAdminPassword PdbPasswd1 \
 -databaseType MULTIPURPOSE \
 -memoryMgmtType auto_sga \
 -totalMemory 1536 \
 -storageType FS \
 -datafileDestination "/u01/app/oracle/oradata/" \
 -redoLogFileSize 500 \
 -emConfiguration NONE \
 -ignorePreReqs
Set minimum parameter levels and make sure the pluggable database starts when the instance starts.
sqlplus / as sysdba <<EOF
ALTER SYSTEM SET shared_pool_size=150M SCOPE=SPFILE;
--ALTER SYSTEM SET sga_target 150M SCOPE=SPFILE;
ALTER SYSTEM SET session_cached_cursors=100 SCOPE=SPFILE;
ALTER SYSTEM SET processes=500 SCOPE=SPFILE;
ALTER SYSTEM SET open_cursors=800 SCOPE=SPFILE;
ALTER SYSTEM SET db_files=600 SCOPE=SPFILE;

ALTER SESSION SET CONTAINER = repdev;
ALTER PLUGGABLE DATABASE SAVE STATE;

CONN / AS SYSDBA
SHUTDOWN IMMEDIATE;
STARTUP;
EXIT;
EOF
Response Files
The following response files are necessary for the silent installations of ODI shown below. The values we are going to amend during the build are shown in bold.
weblogic.rsp
[ENGINE]

#DO NOT CHANGE THIS.
Response File Version=1.0.0.0.0

[GENERIC]

#Set this to true if you wish to skip software updates
DECLINE_AUTO_UPDATES=true

#My Oracle Support User Name
MOS_USERNAME=

#My Oracle Support Password
MOS_PASSWORD=

#If the Software updates are already downloaded and available on your local system, then specify the path to the directory where these patches are available and set SPECIFY_DOWNLOAD_LOCATION to true
AUTO_UPDATES_LOCATION=

#Proxy Server Name to connect to My Oracle Support
SOFTWARE_UPDATES_PROXY_SERVER=

#Proxy Server Port
SOFTWARE_UPDATES_PROXY_PORT=

#Proxy Server Username
SOFTWARE_UPDATES_PROXY_USER=

#Proxy Server Password
SOFTWARE_UPDATES_PROXY_PASSWORD=

#The oracle home location. This can be an existing Oracle Home or a new Oracle Home
ORACLE_HOME=###ORACLE_HOME###

#Set this variable value to the Installation Type selected. e.g. Fusion Middleware Infrastructure, Fusion Middleware Infrastructure With Examples.
INSTALL_TYPE=Fusion Middleware Infrastructure

#Provide the My Oracle Support Username. If you wish to ignore Oracle Configuration Manager configuration provide empty string for user name.
MYORACLESUPPORT_USERNAME=

#Provide the My Oracle Support Password
MYORACLESUPPORT_PASSWORD=

#Set this to true if you wish to decline the security updates. Setting this to true and providing empty string for My Oracle Support username will ignore the Oracle Configuration Manager configuration
DECLINE_SECURITY_UPDATES=true

#Set this to true if My Oracle Support Password is specified
SECURITY_UPDATES_VIA_MYORACLESUPPORT=false

#Provide the Proxy Host
PROXY_HOST=

#Provide the Proxy Port
PROXY_PORT=

#Provide the Proxy Username
PROXY_USER=

#Provide the Proxy Password
PROXY_PWD=

#Type String (URL format) Indicates the OCM Repeater URL which should be of the format [scheme[Http/Https]]://[repeater host]:[repeater port]
COLLECTOR_SUPPORTHUB_URL=
oraInst.loc
inventory_loc=/u01/app/oraInventory
inst_group=oinstall
odi.rsp
[ENGINE]

#DO NOT CHANGE THIS.
Response File Version=1.0.0.0.0

[GENERIC]

#The oracle home location. This can be an existing Oracle Home or a new Oracle Home
ORACLE_HOME=###ORACLE_HOME###

#Set this variable value to the Installation Type selected. e.g. Standalone Installation, Enterprise Installation.
INSTALL_TYPE=Enterprise Installation
odi_rcu_paramfile.txt
###SYS_PASSWORD###
###ODI_SCHEMA_PASSWORDS###
###SUPERVISOR_PASSWORD###
D
###WORK_REPOSITORY###
###WORK_REPOSITORY_PASSWORD###
###ENCRYPTION###
Prepare Response Files
We have used generic response files containing placeholders for build-specific parameters. Here we will replace the placeholders with the values for our build. If you want to adjust them later, remember to switch back to the original response files before running the commands again.
# Parameter settings.
export ORACLE_HOME=/u01/app/oracle/middleware
export SYS_PASSWORD=SysPasswd1
export PREFIX=ODIDEV
export ODI_SCHEMA_PASSWORDS=OdidevPasswd1
export SUPERVISOR_PASSWORD=SVPasswd1
export WORK_REPOSITORY=WORKREP
export WORK_REPOSITORY_PASSWORD=WRPasswd1
export ENCRYPTION=AES-128

# You will need these later.
export HOST_NAME=ol7-odi.localdomain
export WEBLOGIC_PASSWORD=Admin123
export DOMAIN_NAME=odiDomain
export JDBC_URL=jdbc:oracle:thin:@ol7-odi.localdomain:1521/repdev
export JDBC_URL_RCU=ol7-odi.localdomain:1521:repdev
export STB_USER=${PREFIX}_STB
export STB_PASSWORD=$ODI_SCHEMA_PASSWORDS
export SUPERVISOR_USER=SUPERVISOR
export SUPERVISOR_PASSWORD=SVPasswd1

# Replace placeholders
cd /u01/software
sed -i -e "s|###ORACLE_HOME###|$ORACLE_HOME|g"                        ./odi.rsp
sed -i -e "s|###ORACLE_HOME###|$ORACLE_HOME|g"                        ./weblogic.rsp

sed -i -e "s|###SYS_PASSWORD###|$SYS_PASSWORD|g"                          ./odi_rcu_paramfile.txt
sed -i -e "s|###ODI_SCHEMA_PASSWORDS###|$ODI_SCHEMA_PASSWORDS|g"          ./odi_rcu_paramfile.txt
sed -i -e "s|###SUPERVISOR_PASSWORD###|$SUPERVISOR_PASSWORD|g"            ./odi_rcu_paramfile.txt
sed -i -e "s|###WORK_REPOSITORY###|$WORK_REPOSITORY|g"                    ./odi_rcu_paramfile.txt
sed -i -e "s|###WORK_REPOSITORY_PASSWORD###|$WORK_REPOSITORY_PASSWORD|g"  ./odi_rcu_paramfile.txt
sed -i -e "s|###ENCRYPTION###|$ENCRYPTION|g"                              ./odi_rcu_paramfile.txt
WebLogic Installation
Set the required environment variables.
export MW_HOME=/u01/app/oracle/middleware
export WLS_HOME=$MW_HOME/wlserver
export WL_HOME=$WLS_HOME
export DOMAIN_HOME=$MW_HOME/user_projects/domains/odiDomain
# Set to the appropriate JAVA_HOME.
export JAVA_HOME=/u01/app/oracle/jdk1.8.0_121
export PATH=$JAVA_HOME/bin:$PATH
Install JDK8.
cd /u01/app/oracle/
tar -xvzf /u01/software/jdk-8u121-linux-x64.tar.gz
Create the middleware location.
mkdir -p /u01/app/oracle/middleware
Unzip the WebLogic software.
cd /u01/software
unzip -o fmw_12.2.1.2.0_infrastructure_Disk1_1of1.zip
Install WebLogic in silent mode.
$JAVA_HOME/bin/java -Xmx1024m -jar /u01/software/fmw_12.2.1.2.0_infrastructure.jar \
  -silent -responseFile /u01/software/weblogic.rsp \
  -invPtrLoc /u01/software/oraInst.loc
ODI Installation
Unzip the software.
cd /u01/software
unzip -o fmw_12.2.1.2.6_odi_Disk1_1of2.zip
unzip -o fmw_12.2.1.2.6_odi_Disk1_2of2.zip
Install the ODI software in silent mode.
$JAVA_HOME/bin/java -jar fmw_12.2.1.2.6_odi.jar -silent -responseFile /u01/software/odi.rsp \
  -invPtrLoc /u01/software/oraInst.loc
Repository Configuration Utility (RCU)
Use the following command to run the RCU in silent mode.
$MW_HOME/oracle_common/bin/rcu -silent -createRepository \
  -connectString ol7-odi.localdomain:1521/repdev -dbUser SYS -dbRole SYSDBA \
  -useSamePasswordForAllSchemaUsers true \
  -schemaPrefix ODIDEV \
  -component ODI -component IAU -component IAU_APPEND \
  -component IAU_VIEWER -component OPSS < /u01/software/odi_rcu_paramfile.txt
ODI Configuration
Create a file called "create_odi_domain.py" in the "/u01/software" directory with the following contents. This is a generic file that uses placeholders which we will replace later.
#!/usr/bin/python

print('Set variables.')
host_name = '###HOST_NAME###'
admin_user = 'weblogic'
admin_password = '###WEBLOGIC_PASSWORD###'
admin_port = '7001'
mw_home = '###ORACLE_HOME###'
domain_name = '###DOMAIN_NAME###'
domain_home = mw_home + '/user_projects/domains/' + domain_name   # Check path is correct.
wl_home = mw_home + '/wlserver'
db_url = '###JDBC_URL###'
db_user = '###STB_USER###'
db_password = '###STB_PASSWORD###'
db_driver = 'oracle.jdbc.OracleDriver'
odi_port = '8001'
supervisor_user = '###SUPERVISOR_USER###'
supervisor_password = '###SUPERVISOR_PASSWORD###'
nm_name = 'LocalODIMachine'
nm_port = 5556

print('Create domain (' + domain_name + ').')
print('Load templates.')
selectTemplate('Basic WebLogic Server Domain')
selectTemplate('Oracle Enterprise Manager Plugin for ODI')
selectTemplate('Oracle Data Integrator - Agent')
selectTemplate('Oracle Data Integrator - Console')
selectTemplate('Oracle Data Integrator - JRF Async Web Services')
loadTemplates()

print('AdminServer settings.')
cd('/Security/base_domain/User/' + admin_user)
cmo.setPassword(admin_password)
cd('/Server/AdminServer')
cmo.setName('AdminServer')
cmo.setListenPort(int(admin_port))
cmo.setListenAddress(host_name)

print('Create supervisor credential.')
cd('/SecurityConfiguration/base_domain')
cmo.setUseKSSForDemo(false)
cd('/Credential/TargetStore/oracle.odi.credmap/TargetKey/SUPERVISOR')
create('c','Credential')
cd('Credential')
cmo.setUsername(supervisor_user)
cmo.setPassword(supervisor_password)

print('Create data source.')
cd('/JDBCSystemResource/LocalSvcTblDataSource/JdbcResource/LocalSvcTblDataSource/JDBCDriverParams/NO_NAME_0')
cmo.setPasswordEncrypted(db_password)
cmo.setUrl(db_url)
cmo.setDriverName(db_driver)
cd('Properties/NO_NAME_0/Property/user')
cmo.setValue(db_user)

print('Create node manager.')
cd('/')
machine = create(nm_name, 'UnixMachine')
cd('Machines/' + nm_name)
create(nm_name, 'NodeManager')
cd('NodeManager/' + nm_name)
set('ListenAddress', host_name)
set('ListenPort', int(nm_port))

print('Associate Node Nanager with servers.')
cd('/Servers/AdminServer')
cmo.setMachine(machine)
cd('/Servers/ODI_server1')
cmo.setMachine(machine)

print('ODI_server1 settings')
cd('/Servers/ODI_server1')
cmo.setListenAddress(host_name)
cmo.setListenPort(int(odi_port))

getDatabaseDefaults()

print('Run in production mode.')
setOption('ServerStartMode','prod')

print('Write the domain and close the template.')
setOption('OverwriteDomain', 'true')
writeDomain(domain_home)
closeTemplate()

exit()
Replace the placeholders with the settings we defined earlier.
# Replace placeholders
sed -i -e "s|###HOST_NAME###|$HOST_NAME|g"                        ./create_odi_domain.py
sed -i -e "s|###WEBLOGIC_PASSWORD###|$WEBLOGIC_PASSWORD|g"        ./create_odi_domain.py
sed -i -e "s|###ORACLE_HOME###|$ORACLE_HOME|g"                    ./create_odi_domain.py
sed -i -e "s|###DOMAIN_NAME###|$DOMAIN_NAME|g"                    ./create_odi_domain.py
sed -i -e "s|###JDBC_URL###|$JDBC_URL|g"                          ./create_odi_domain.py
sed -i -e "s|###STB_USER###|$STB_USER|g"                          ./create_odi_domain.py
sed -i -e "s|###STB_PASSWORD###|$STB_PASSWORD|g"                  ./create_odi_domain.py
sed -i -e "s|###SUPERVISOR_USER###|$SUPERVISOR_USER|g"            ./create_odi_domain.py
sed -i -e "s|###SUPERVISOR_PASSWORD###|$SUPERVISOR_PASSWORD|g"    ./create_odi_domain.py
The following command creates a new ODI domain.
cd $MW_HOME/oracle_common/common/bin

./wlst.sh /u01/software/create_odi_domain.py
Make sure the "AdminServer" and "ODI_Server1" servers can start/stop without credentials by creating "boot.properties" files.
mkdir -p $DOMAIN_HOME/servers/AdminServer/security/
echo "username=weblogic" > $DOMAIN_HOME/servers/AdminServer/security/boot.properties
echo "password=Admin123" >> $DOMAIN_HOME/servers/AdminServer/security/boot.properties

mkdir -p $DOMAIN_HOME/servers/ODI_server1/security/
echo "username=weblogic" > $DOMAIN_HOME/servers/ODI_server1/security/boot.properties
echo "password=Admin123" >> $DOMAIN_HOME/servers/ODI_server1/security/boot.properties
The installation is now complete, but the agent definition must be created in the Master Repository, which must be done using the ODI Studio GUI tool. This can be done on the server using X, or from your client PC client, connecting to the repository database. The example in the next section is done using X on the server.
ODI Agent Config
If we started the "ODI_server1" managed server now we would see the following type of error in the "ODI_server1.log" file.
<BEA-149231> <Unable to set the activation state to true for the application "oraclediagent".
weblogic.application.ModuleException: ODI-1405: Agent OracleDIAgent start failure: the agent is not defined in the topology for master repository.
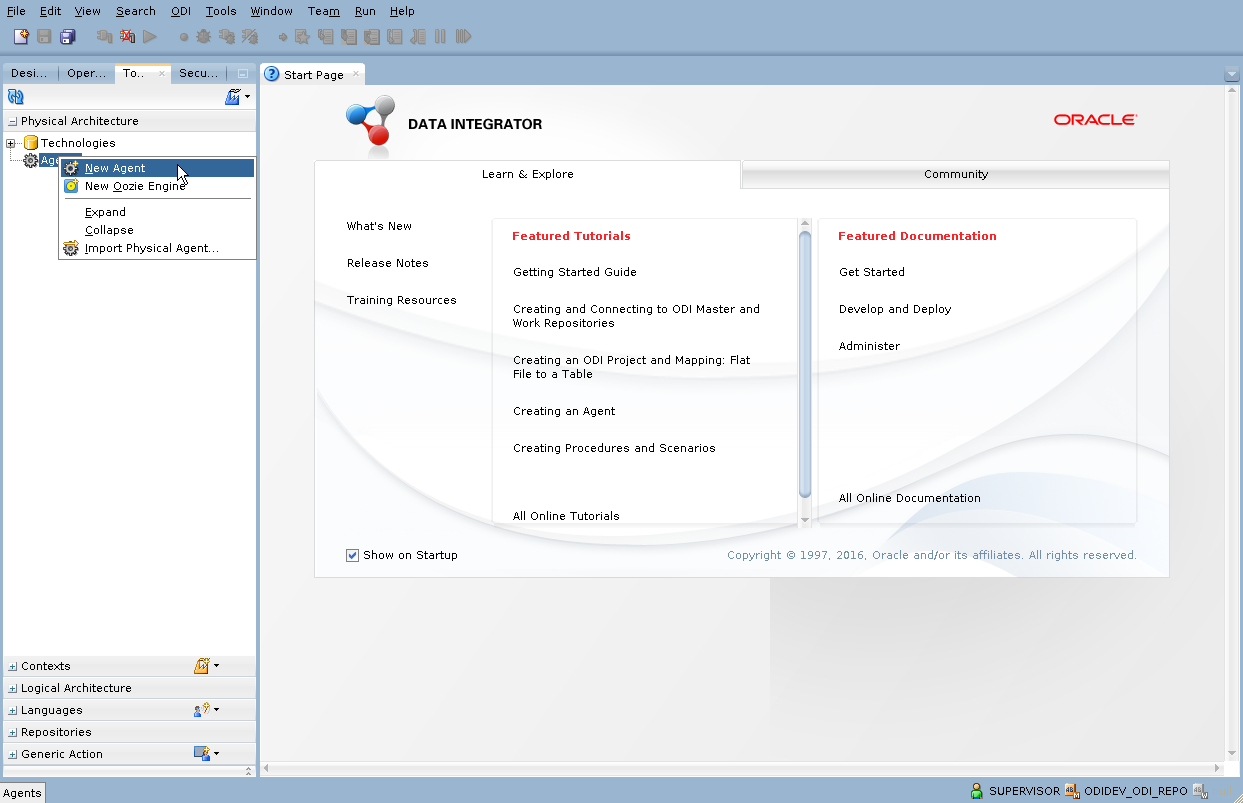
We have created the physical agent, but we need to create the agent in the Master Repository using the ODI Studio.
$MW_HOME/odi/studio/odi.sh
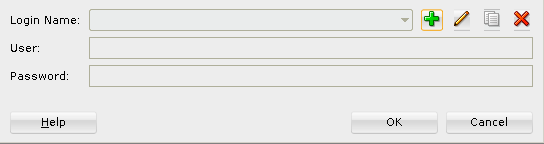
Click the "Connect to Repository..." link.

Click the "+" button.
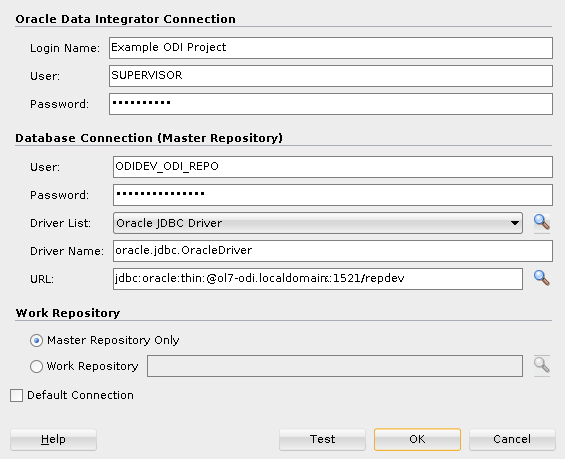
Enter the connection information and click the "Test" button. If successful, click the "OK" button.
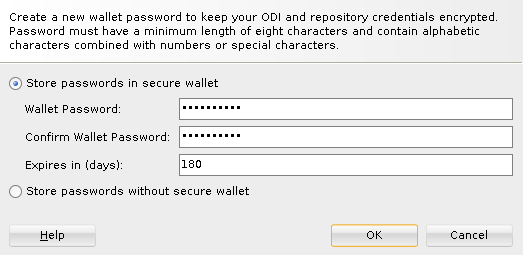
Enter a wallet password and click the "OK" button.
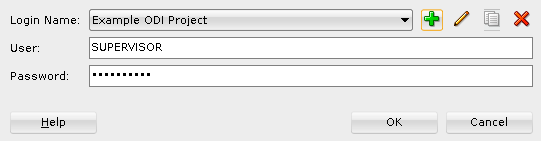
The credentials should now be set, so click the "OK".
Click on the "Topology" tab. Right-click on the "Agents" node and select the "New Agent" menu option.
Set the agent name to "OracleDIAgent", not "OracleDIAgent1" that may be shown by default. Set the host (ol7-odi.localdomain) host and port (8001) values to be consistent with the physical agent definition in the domain. Click the "Save All" icon in the top toolbar.
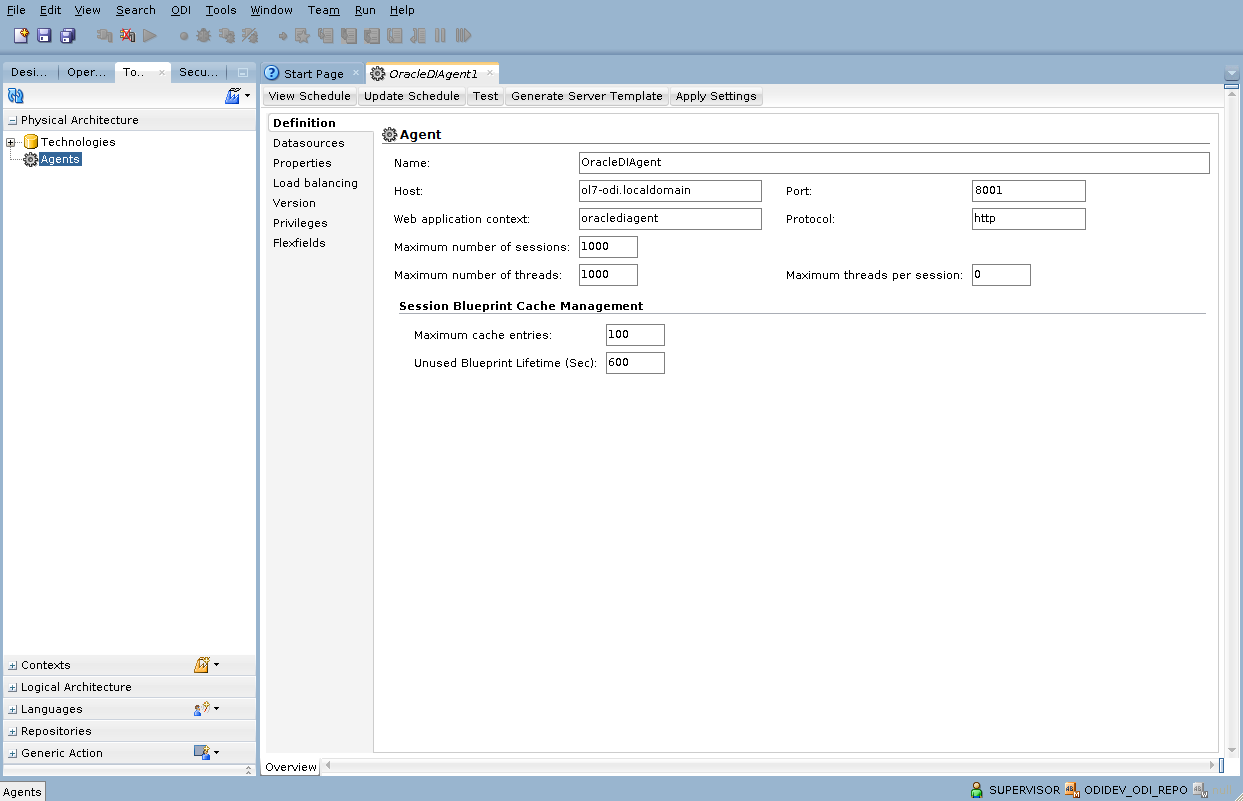
The agent will now be visible in the tree.
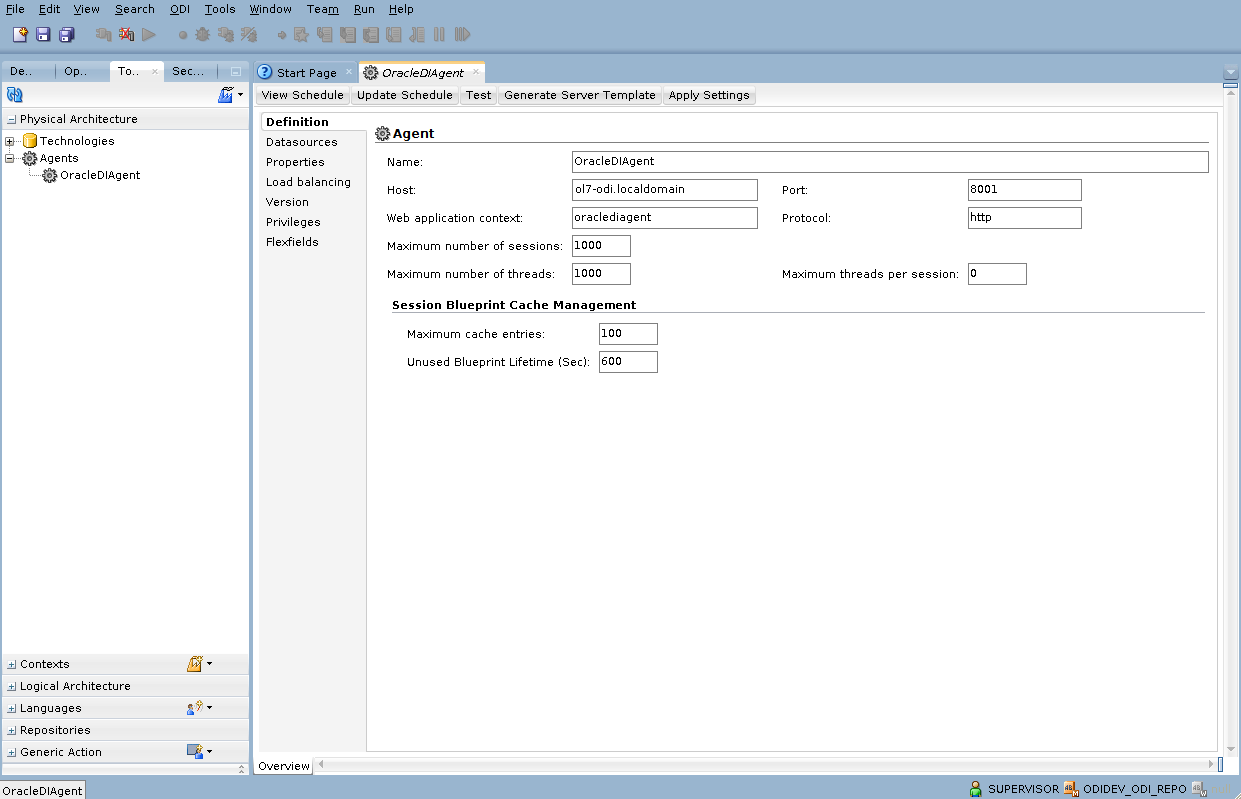
Now the agent topology matches the physical agent definition in the domain, we can start the domain components as described below.
Startup/Shutdown
The database is started and stopped in the normal way.
export ORAENV_ASK=NO
export ORACLE_SID=repdevcdb
. oraenv
export ORAENV_ASK=YES

dbstart $ORACLE_HOME
dbshut $ORACLE_HOME
Make sure you have the environment set correctly.
export MW_HOME=/u01/app/oracle/middleware
export WLS_HOME=$MW_HOME/wlserver
export WL_HOME=$WLS_HOME
export DOMAIN_HOME=$MW_HOME/user_projects/domains/odiDomain
# Set to the appropriate JAVA_HOME.
export JAVA_HOME=/u01/app/oracle/jdk1.8.0_121
export PATH=$JAVA_HOME/bin:$PATH
With then environment in place we can start, check the status and stop OBIEE using the following commands.
# Start
nohup $DOMAIN_HOME/bin/startNodeManager.sh > /dev/null 2>&1 &
sleep 10
nohup $DOMAIN_HOME/bin/startWebLogic.sh > /dev/null 2>&1 &
sleep 120
nohup $DOMAIN_HOME/bin/startManagedWebLogic.sh ODI_server1 > /dev/null 2>&1 &


# Stop
$DOMAIN_HOME/bin/stopManagedWebLogic.sh ODI_server1
$DOMAIN_HOME/bin/stopWebLogic.sh
$DOMAIN_HOME/bin/stopNodeManager.sh
Check out the log files here.
tail -f $DOMAIN_HOME/nodemanager/nodemanager.log
tail -f $DOMAIN_HOME/servers/AdminServer/logs/AdminServer.log
tail -f $DOMAIN_HOME/servers/ODI_server1/logs/ODI_server1.log
ODI URLs
Once the domain is running the main URLs you will need on the server are as follows.
- WebLogic Console : http://ol7-odi.localdomain:7001/console
- WebLogic Enterprise Manager: http://ol7-odi.localdomain:7001/em
- ODI Console: http://ol7-odi.localdomain:8001/odiconsole
Domain Cleanup
During the process of working out the WLST build of the domain I had to recreate the domain several times. This is how I cleaned up between attempts.
# If the domain processed are running, stop them.
$DOMAIN_HOME/bin/stopManagedWebLogic.sh ODI_server1
$DOMAIN_HOME/bin/stopWebLogic.sh
$DOMAIN_HOME/bin/stopNodeManager.sh

# Remove the domain entry in the "domain-registry.xml" file.
sed '/odiDomain/d' $MW_HOME/domain-registry.xml > $MW_HOME/domain-registry.xml2
mv $MW_HOME/domain-registry.xml2 $MW_HOME/domain-registry.xml

# Remove the domain and application files.
rm -Rf /u01/app/oracle/middleware/user_projects/domains/odiDomain
rm -Rf /u01/app/oracle/middleware/user_projects/applications/odiDomain

# Uninstall the repository using the RCU.
$MW_HOME/oracle_common/bin/rcu -silent -dropRepository \
  -connectString ol7-odi.localdomain:1521/repdev -dbUser SYS -dbRole SYSDBA \
  -schemaPrefix ODIDEV -component ODI -component IAU  -component IAU_APPEND \
  -component IAU_VIEWER -component OPSS < /u01/software/odi_rcu_paramfile.txt
Now repeat the process from running the RCU onward.
For more information see:
- Oracle Fusion Middleware Documentation
- Oracle Data Integrator 12.2.1.2.0
- Oracle Fusion Middleware System Requirements and Specifications
- Installing and Configuring Oracle Data Integrator 12c (12.2.1.1)
- Silent Installation and Configuration : OUI, DBCA, WebLogic
Hope this helps. Regards Tim...