8i | 9i | 10g | 11g | 12c | 13c | 18c | 19c | 21c | 23ai | Misc | PL/SQL | SQL | RAC | WebLogic | Linux
Oracle HTTP Server (OHS) 12cR2 (12.2.1) Installation on Oracle Linux 6 and 7
This articles demonstrates how to perform an installation of Oracle HTTP Server (OHS) 12c on Oracle Linux.
- Software
- Additional OS Packages
- Setup
- Install JDK
- Create Response File
- OHS Silent Installation
- Patching OHS
- Create OHS Instance
- First Start
- Start/Stop OHS Instance
- Important Files
Related articles.
Software
Download the WebLogic Server and Java SE software. The examples in this article use the following.
- Java SE 8 (jdk-8u161-linux-x64.tar.gz)
- Oracle WebTier 12cR2 (12.2.1) (fmw_12.2.1.3.0_ohs_linux64_Disk1_1of1.zip)
The rest of this article assumes the software is present in the "/u01/software" directory.
Additional OS Packages
Install the following package for the Fusion Middleware prerequisites to be met. Many of them will already be present.
# OL6 and OL7.
yum install binutils -y
yum install compat-libcap1 -y
yum install compat-libstdc++-33 -y
yum install compat-libstdc++-33.i686 -y
yum install gcc -y
yum install gcc-c++ -y
yum install glibc -y
yum install glibc.i686 -y
yum install glibc-devel -y
yum install libaio -y
yum install libaio-devel -y
yum install libgcc -y
yum install libgcc.i686 -y
yum install libstdc++ -y
yum install libstdc++.i686 -y
yum install libstdc++-devel -y
yum install ksh -y
yum install make -y
yum install sysstat -y
yum install numactl -y
yum install numactl-devel -y

# OL7 Only.
yum install motif -y
yum install motif-devel -y

# OL6 Only.
yum install libXext.i686 -y
yum install libXtst.i686 -y
yum install openmotif -y
yum install openmotif22 -y
Setup
The following actions should be performed by the "root" user.
Make sure the "/etc/hosts" file contains correct entries for both the "localhost" and real host names.
127.0.0.1      localhost localhost.localdomain localhost4 localhost4.localdomain4
192.168.56.103 ol7-122.localdomain ol7-122
Create a new group and user.
groupadd -g 54321 oinstall
useradd -u 54321 -g oinstall oracle
passwd oracle
Create the directories in which the Oracle software will be installed.
mkdir -p /u01/app/oracle/product/12.2.1.3/ohs_1
mkdir -p /u01/app/oracle/product/8/jdk_1
mkdir -p /u01/app/oracle/config/domains
mkdir -p /u01/app/oracle/config/applications
chown -R oracle:oinstall /u01
chmod -R 775 /u01/
Run the following commands as the "oracle" user to set your environment and append them to the "/home/oracle/.bash_profile" file.
mkdir -p /home/oracle/scripts

cat > ~/scripts/setEnv.sh <<EOF
export ORACLE_BASE=/u01/app/oracle
export MW_HOME=\$ORACLE_BASE/product/12.2.1.3/fmw_1
export JAVA_HOME=\$ORACLE_BASE/product/8/jdk_1
export PATH=\$JAVA_HOME/bin:\$PATH
export ORACLE_HOME=\$MW_HOME
export DOMAIN_HOME=\$ORACLE_BASE/config/domains/ohs
export INSTANCE_HOME=\$DOMAIN_HOME/config/fmwconfig/components/OHS/instances/ohs1
EOF

echo ". /home/oracle/scripts/setEnv.sh" >> ~/.bash_profile

. ~/scripts/setEnv.sh
Create start and stop scripts using the following commands.
cat > ~/scripts/start_all.sh <<EOF
#!/bin/bash

. /home/oracle/scripts/setEnv.sh

echo "Start Node Manager" `date`
nohup \$DOMAIN_HOME/bin/startNodeManager.sh > /dev/null 2>&1 &
sleep 10

echo "Start OHS" `date`
\$DOMAIN_HOME/bin/startComponent.sh ohs1

echo "Complete..." `date`
EOF


cat > ~/scripts/stop_all.sh <<EOF
#!/bin/bash

. /home/oracle/scripts/setEnv.sh

echo "Stop OHS..." `date`
\$DOMAIN_HOME/bin/stopComponent.sh ohs1

echo "Stop Node Manager..." `date`
\$DOMAIN_HOME/bin/stopNodeManager.sh

echo "Complete..." `date`
EOF


chmod u+x ~/scripts/*.sh
Install JDK
Installing the JDK is simply a matter of extracting it from the tarball.
cd $JAVA_HOME/..
rm -Rf jdk_1
tar -xvzf /u01/software/jdk-8u161-linux-x64.tar.gz
mv jdk1.8.0_161 jdk_1
Create Response File
The OHS response file is similar to those for WebLogic. The response file below should be saved as "/u01/software/webtier.rsp". It is used to install a Standalone HTTP Server and contains a place-holder for the ORACLE_HOME, which we will set as part of the installation.
[ENGINE]

#DO NOT CHANGE THIS.
Response File Version=1.0.0.0.0

[GENERIC]

#Set this to true if you wish to skip software updates
DECLINE_AUTO_UPDATES=true

#My Oracle Support User Name
MOS_USERNAME=

#My Oracle Support Password
MOS_PASSWORD=<SECURE VALUE>

#If the Software updates are already downloaded and available on your local system, then specify the path to the directory where these patches are available and set SPECIFY_DOWNLOAD_LOCATION to true
AUTO_UPDATES_LOCATION=

#Proxy Server Name to connect to My Oracle Support
SOFTWARE_UPDATES_PROXY_SERVER=

#Proxy Server Port
SOFTWARE_UPDATES_PROXY_PORT=

#Proxy Server Username
SOFTWARE_UPDATES_PROXY_USER=

#Proxy Server Password
SOFTWARE_UPDATES_PROXY_PASSWORD=<SECURE VALUE>

#The oracle home location. This can be an existing Oracle Home or a new Oracle Home
ORACLE_HOME=###ORACLE_HOME###

#Set this variable value to the Installation Type selected as either Standalone HTTP Server (Managed independently of WebLogic server) OR Collocated HTTP Server (Managed through WebLogic server)
INSTALL_TYPE=Standalone HTTP Server (Managed independently of WebLogic server)

#Provide the My Oracle Support Username. If you wish to ignore Oracle Configuration Manager configuration provide empty string for user name.
MYORACLESUPPORT_USERNAME=

#Provide the My Oracle Support Password
MYORACLESUPPORT_PASSWORD=<SECURE VALUE>

#Set this to true if you wish to decline the security updates. Setting this to true and providing empty string for My Oracle Support username will ignore the Oracle Configuration Manager configuration
DECLINE_SECURITY_UPDATES=true

#Set this to true if My Oracle Support Password is specified
SECURITY_UPDATES_VIA_MYORACLESUPPORT=false

#Provide the Proxy Host
PROXY_HOST=

#Provide the Proxy Port
PROXY_PORT=

#Provide the Proxy Username
PROXY_USER=

#Provide the Proxy Password
PROXY_PWD=<SECURE VALUE>

#Type String (URL format) Indicates the OCM Repeater URL which should be of the format [scheme[Http/Https]]://[repeater host]:[repeater port]
COLLECTOR_SUPPORTHUB_URL=
You also need to specify an Oracle inventory location. Create a file called "/u01/software/oraInst.loc" with the following contents.
inventory_loc=/u01/app/oraInventory
inst_group=oinstall
OHS Silent Installation
The following command shows how to initiate the installation in silent mode.
# Unzip the software.
cd /u01/software
unzip -o fmw_12.2.1.3.0_ohs_linux64_Disk1_1of1.zip

# Set the ORACLE_HOME in the response file.
sed -i -e "s|###ORACLE_HOME###|$ORACLE_HOME|g" /u01/software/webtier.rsp

# Install OHS.
./fmw_12.2.1.3.0_ohs_linux64.bin \
  -silent -responseFile /u01/software/webtier.rsp \
  -invPtrLoc /u01/software/oraInst.loc
Patching OHS
Applying patches to OHS 12c is done using the OPatch utility. Make sure any processes running under installation are stopped before applying a patch. That's not a problem here as this is a clean installation.
Download the latest OHS updates from Oracle Support and put them into the "/u01/software" directory with the other software. For example.
- Updates : p27149535_122130_Linux-x86-64.zip
Set the existing OPatch location in your path.
export PATH=$MW_HOME/OPatch:$PATH
Unzip the patch and change to the resulting directory, then apply the patch.
cd /u01/software
unzip -o p27149535_122130_Linux-x86-64.zip
cd 27149535
opatch apply -silent
Create OHS Instance
An OHS instance is created using the configuration wizard, which is started using the following command.
cd $MW_HOME/oracle_common/common/bin
./config.sh
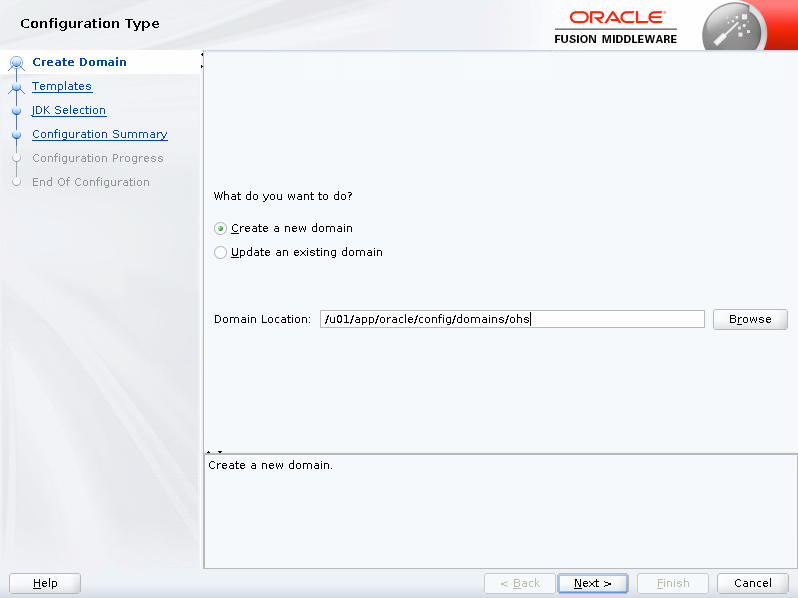
Enter the domain location "/u01/app/oracle/config/domains/ohs" and click the "Next" button.
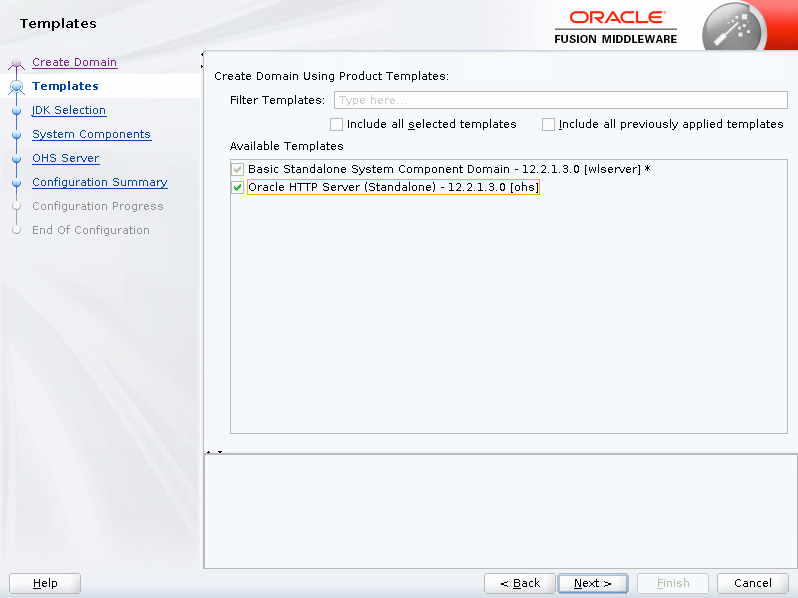
Select the "Oracle HTTP Server (Standalone) - 12.2.1.3.0 [ohs]" template and click the "Next" button.
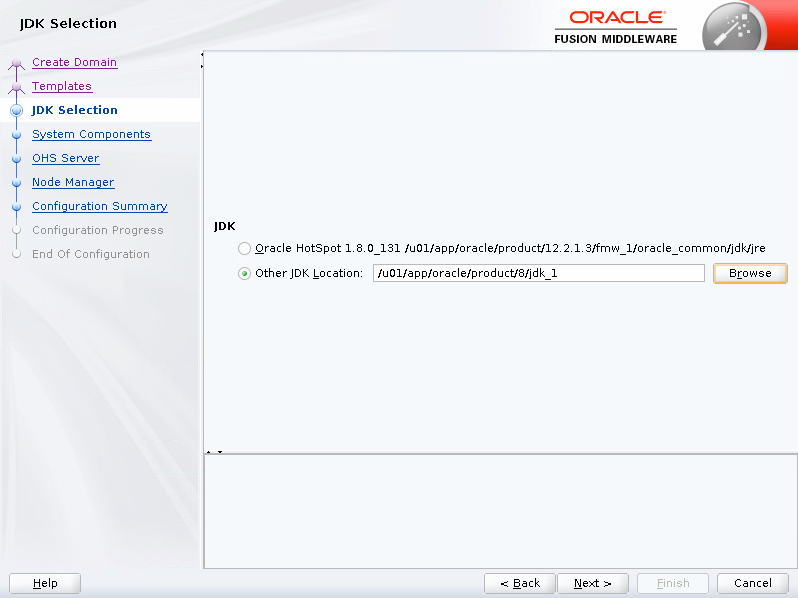
Enter the JDK location "/u01/app/oracle/product/8/jdk_1" template and click the "Next" button.
Click the "Next" button.
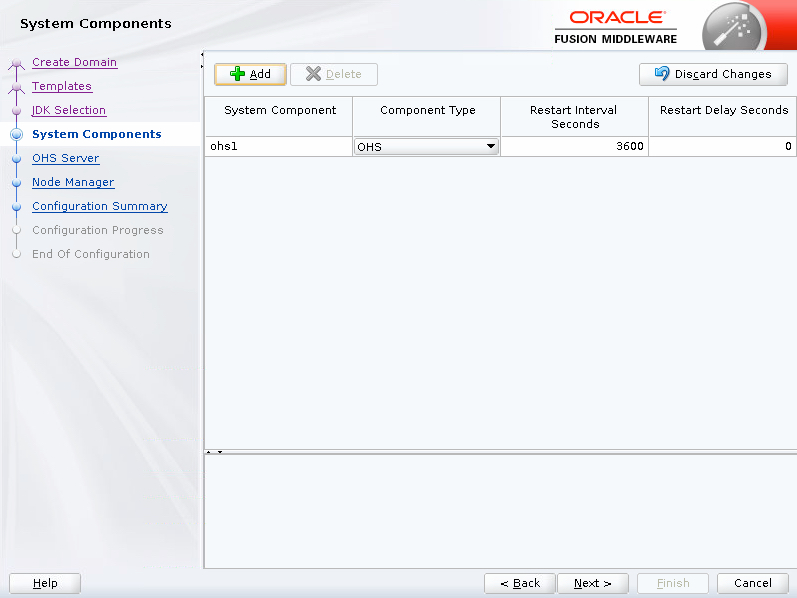
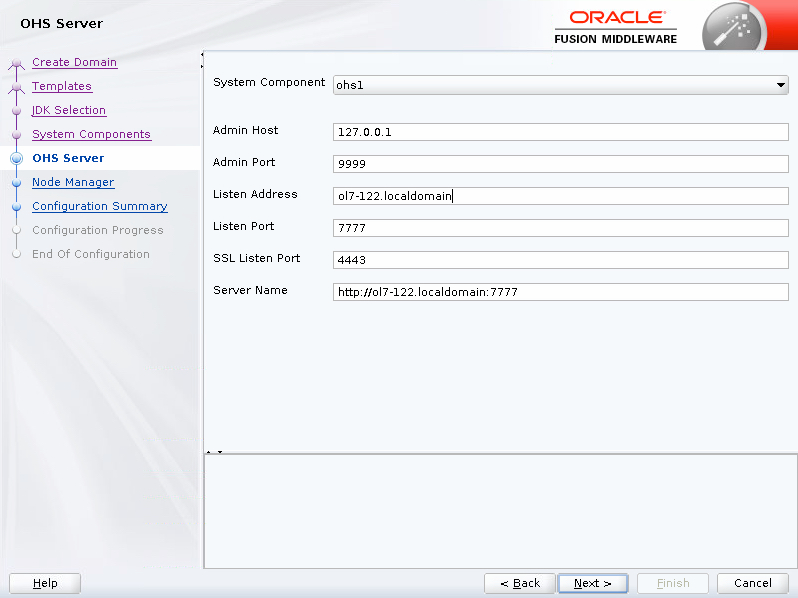
Enter the OHS Server details and click the "Next" button.
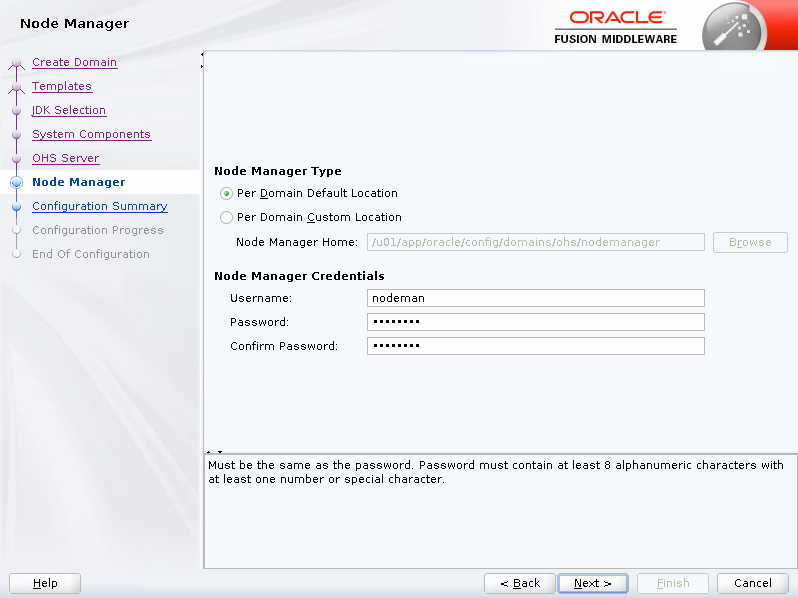
Enter the node manager details and click the "Next" button.
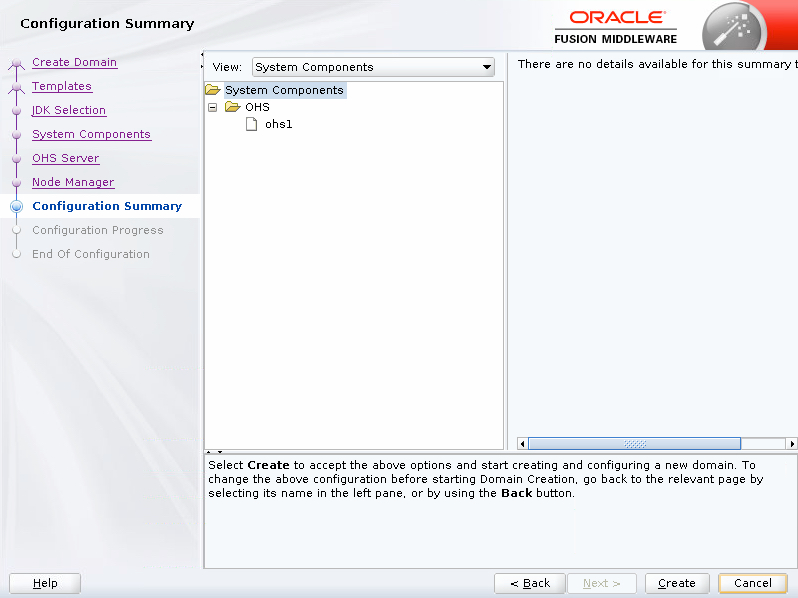
Click the "Create" button.
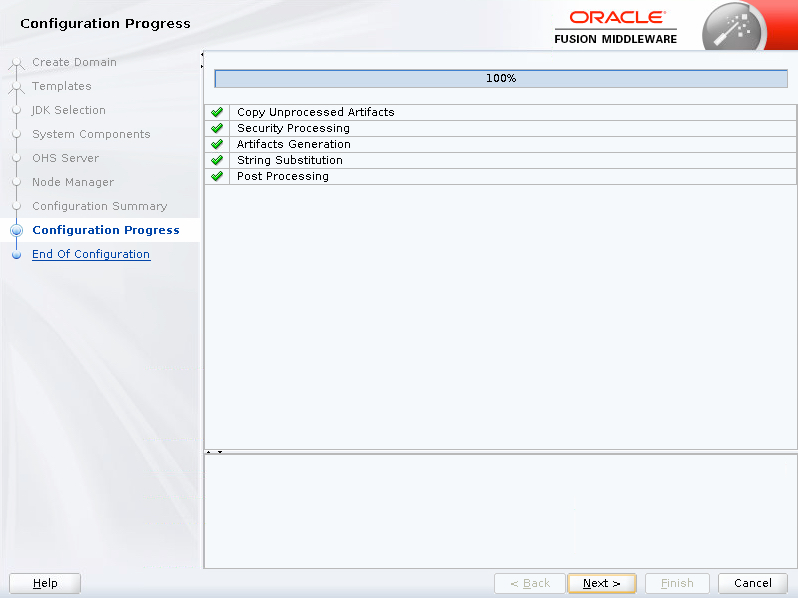
Wait for the configuration to complete and click the "Next" button.
Click the "Finish" button.

First Start
Make sure the environment is set and start the node manager.
. ~/scripts/setEnv.sh
nohup \$DOMAIN_HOME/bin/startNodeManager.sh > /dev/null 2>&1 &
The first time we start the OHS instance we use the "storeUserConfig" option, which will save the credentials, so we never need to enter them again. Enter the password when prompted.
$DOMAIN_HOME/bin/startComponent.sh ohs1 storeUserConfig
The credentials are kept in the "~/.wlst/nm-cfg-ohs.props" and "~/.wlst/nm-key-ohs.props" files.
Start/Stop OHS Instance
Start and stop scripts for the node manager and OHS instance are created under the domain home. The typical start and stop sequences are shown below.
# Start
nohup $DOMAIN_HOME/bin/startNodeManager.sh > /dev/null 2>&1 &
$DOMAIN_HOME/bin/startComponent.sh ohs1

#Stop
$DOMAIN_HOME/bin/stopComponent.sh ohs1
$DOMAIN_HOME/bin/stopNodeManager.sh
It should now be possible to start and stop the OHS instance with the scripts created earlier in the setup section.
~/scripts/start_all.sh
~/scripts/stop_all.sh
Important Files
There are a number of important config files, but the ones you are most likely to visit are the following.
$INSTANCE_HOME/httpd.conf
$INSTANCE_HOME/ssl.conf
$INSTANCE_HOME/mod_wl_ohs.conf
You can diagnose issues by checking the log files under the "$DOMAIN_HOME/servers/ohs1/logs/" directory.
$DOMAIN_HOME/servers/ohs1/logs/admin_log
$DOMAIN_HOME/servers/ohs1/logs/access_log
$DOMAIN_HOME/servers/ohs1/logs/ohs1.log
For more information see:
- Fusion Middleware Installing and Configuring Oracle HTTP Server
- Silent Installation and Configuration
Hope this helps. Regards Tim...