8i | 9i | 10g | 11g | 12c | 13c | 18c | 19c | 21c | 23c | Misc | PL/SQL | SQL | RAC | WebLogic | Linux
Home » Articles » Linux » Here
PXE Network Installations (RHEL5 / OL5)
During PXE network installations, the client's network card broadcasts for information from a DHCP server. In addition to the normal network information, the DHCP can also return details of a TFTP server with the necessary boot files, allowing the client to start a network installation.
In this article I'm going to walk through the steps performed to automate my Oracle Linux (OL5) installations using PXE network installations. In my case, all the servers (HTTP, TFTP and DHCP) reside on the same server.
Related articles.
- PXE Network Installations (RHEL6 / OL6)
- Kickstart - Automated Installations of RHEL and Oracle Linux
HTTP Configuration
The installation files can be presented using HTTP, FTP or NFS. In this example we will use HTTP.
Install the HTTP server and make sure it starts on reboot.
# yum install httpd
# chkconfig httpd on
# service httpd start
To make the installation media available from the HTTP server, create a new directory under the "/var/www/html" directory.
# mkdir -p /var/www/html/OEL5.4
You can mount a DVD or ISO image and copy the files under the new directory, but it is easier to mount the ISO image of the installation media directly. You can do this by adding the following entry to the "/etc/fstab" file. Adjust the path to the media as required.
/u01/software/os/oel/Enterprise-R5-U4-Server-x86_64-dvd.iso /var/www/html/OEL5.4 udf,iso9660 user,loop 0 0
The media will now be mounted automatically after reboots, but we need to mount it now.
# mount /var/www/html/OEL5.4
The media should now be available over HTTP using a URL like this (http://localhost/OEL5.4).
Kickstart
You need to place a Kickstart file on the HTTP server also. You can either build a new Kickstart file or modify an existing one.
To build a new one, install the Kickstart Configurator.
yum install system-config-kickstart
Start the application from the menu (Applications > System Tools > Kickstart). Enter all the required installation choices and save the file under the "/var/www/html" directory.
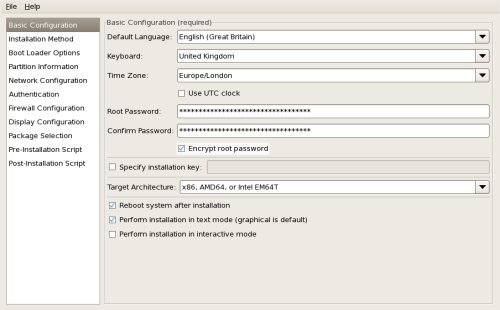
The Kickstart Configurator doesn't handle the Logical Volume Manager (LVM), so if you want the installation to use the LVM you need to amend the resulting file. The available Kickstart options are listed here.
Alternatively, copy the "/root/anaconda-ks.cfg" file from a previous successful OEL installation and amend it.
In the following section my Kickstart file is called OEL4.5.cfg and saved in the "/var/www/html" directory.
PXE Boot Configuration
Install the GUI and command line PXE setup tool.
# yum install system-config-netboot
Next we need to add a PXE operating system description using the following command syntax.
pxeos -a -i "<description>" -p <NFS|HTTP|FTP> -D 0 -s client.example.com \
-L <net-location> -k <kernel> -K <kickstart> <os-identifer>
A full explanation of the parameters can be found here. For my configuration I need to issue to the following.
# pxeos -a -i "OEL 5.4 x86_64" -p HTTP -D 0 -s 192.168.2.2 -L /OEL5.4/ -K http://192.168.2.2/OEL5.4.cfg OEL5.4
Next we need to add a host with the following syntax.
pxeboot -a -K <kickstart> -O <os-identifier> -r <value> <host>
A full explanation of the parameters can be found here. For my configuration I need to issue the following.
# pxeboot -a -K http://192.168.2.2/OEL5.4.cfg -O OEL5.4 -r 2048 192.168.2.200
TFTP Server
Install the TFTP server and make sure it starts on reboot.
# yum install tftp-server
# chkconfig tftp on
# service xinetd start
# chkconfig xinetd on
DHCP Server
Install the DHCP server and make sure it starts on reboot.
# yum install dhcp
# chkconfig --level 345 dhcpd on
If the "/etc/dhcpd.conf" file is missing or empty, copy and amend the sample config file (/usr/share/doc/dhcp*/dhcpd.conf.sample). Add the following into the "/etc/dhcpd.conf" file. Remember to amend the "next-server" entry to point to your TFTP server.
# Added to support PXE Boot
allow booting;
allow bootp;
class "pxeclients" {
	match if substring(option vendor-class-identifier, 0, 9) = "PXEClient";
	next-server 192.168.2.2;
	filename "linux-install/pxelinux.0";
}
You can see my configuration file here.
Start the DHCP server.
service dhcpd start
All the configuration steps are complete now.
Boot Server
Boot the new server and you will be presented with the following boot screen.
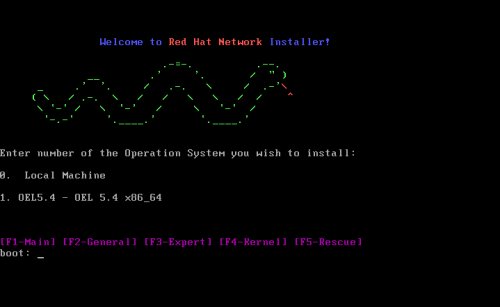
Type "1" and return and the installation will proceed normally.
For more information see:
- PXE Network Installations
- Kickstart Options
- PXE Network Installations (RHEL6 / OL6)
- Kickstart - Automated Installations of RHEL and Oracle Linux
Hope this helps. Regards Tim...