8i | 9i | 10g | 11g | 12c | 13c | 18c | 19c | 21c | 23ai | Misc | PL/SQL | SQL | RAC | WebLogic | Linux
Dbvisit Standby 9 Installation on Oracle Linux 7
Dbvisit Standby is an alternative to Oracle Data Guard for creating and managing standby databases. Dbvisit Standby works equally well on Standard Edition databases, unlike Data Guard, which is an Enterprise Edition option.
The Installing Dbvisit Standby document provides detailed information for the installation of the product on different operating systems and for different database configurations. In this article we will be focusing on the Linux installation and configuration for a simple standby setup.
- TL;DR
- Assumptions
- Installation
- Standby Creation
- Startup/Shutdown of Databases
- Send and Apply Logs Manually
- Read-Only Standby
- Switchover
- Failover
- Automatic Failover
TL;DR
If you want to jump straight into playing with the product, you can use the Vagrant build available here. This will allow you to go straight to the Standby Creation section.
Assumptions
- You are using version 9.0 of the Dbvisit Standby product and have a license key (trial or real).
- You have two servers (physical or VMs) with an operating system and Oracle installed on them. In this case I've used Oracle Linux 7 and Oracle Database 19c.
- The primary server has a database running in archivelog mode, and there is an entry in the "/etc/oratab" file for it.
- The standby server has a software only installation.
- You have a third server with an operating system on to use as the console server.
- If you are using local or network firewalls between servers you will make sure all necessary ports are opened.
The following information may help you to tailor the installation for your own installation.
ORACLE_BASE=/u01/app/oracle
ORACLE_HOME=/u01/app/oracle/product/19.0.0/dbhome_1
ORACLE_SID=cdb1

Primary hostname: ol7-19-dbv1
Standby hostname: ol7-19-dbv2
Console hostname: ol7-19-console
For more complex installations, like those involving RAC, check out the Installing Dbvisit Standby documentation.
Installation
Make sure the "/etc/hosts" file or DNS contains entries for all servers. In this example we added the following to all three servers.
192.168.56.101  ol7-19-dbv1.localdomain  ol7-19-dbv1
192.168.56.102  ol7-19-dbv2.localdomain  ol7-19-dbv2
192.168.56.103  ol7-19-console.localdomain  ol7-19-console
As the "root" user, create the Dbvisit base directory on each server using the following commands. The console server doesn't contain any Oracle software, but I've kept the OS installation and user name the same for consistency.
mkdir /usr/dbvisit
chown -R oracle:oinstall /usr/dbvisit
As the "oracle" user, prepare the software for installation on each server.
mkdir -p ~/9.0
cd ~/9.0
cp /path/to/software/dbvisit-standby*.zip .
unzip -oq dbvisit-standby*.zip
tar xf dbvisit-standby*.tar
cd dbvisit/installer
On the primary server issue the following commands. Notice, in addition to installing the software, we've started the "dbvnet" and "dbvagent" services. You will need a safer passphrase than the one used here.
export NODE1_HOSTNAME=ol7-19-dbv1
export NODE2_HOSTNAME=ol7-19-dbv2
export DBVISIT_PASSPHRASE=MyPassphrase123

./install-dbvisit --batch-install \
  --force \
  --dbvisit-base /usr/dbvisit \
  --components core \
  --dbvnet-local-host ${NODE1_HOSTNAME} \
  --dbvnet-local-port 7890 \
  --dbvnet-remote-host ${NODE2_HOSTNAME} \
  --dbvnet-remote-port 7890 \
  --dbvnet-passphrase ${DBVISIT_PASSPHRASE} \
  --dbvagent-local-host ${NODE1_HOSTNAME} \
  --dbvagent-local-port 7891 \
  --dbvagent-passphrase ${DBVISIT_PASSPHRASE}

/usr/dbvisit/dbvnet/dbvnet -d start
/usr/dbvisit/dbvagent/dbvagent -d start
On the secondary server issue the following commands. It's similar to those used on the primary, but with the local and remote servers swapped as we are on a different machine. You will need a safer passphrase than the one used here.
export NODE1_HOSTNAME=ol7-19-dbv1
export NODE2_HOSTNAME=ol7-19-dbv2
export DBVISIT_PASSPHRASE=MyPassphrase123

./install-dbvisit --batch-install \
  --force \
  --dbvisit-base /usr/dbvisit \
  --components core \
  --dbvnet-local-host ${NODE2_HOSTNAME} \
  --dbvnet-local-port 7890 \
  --dbvnet-remote-host ${NODE1_HOSTNAME} \
  --dbvnet-remote-port 7890 \
  --dbvnet-passphrase ${DBVISIT_PASSPHRASE} \
  --dbvagent-local-host ${NODE2_HOSTNAME} \
  --dbvagent-local-port 7891 \
  --dbvagent-passphrase ${DBVISIT_PASSPHRASE}

/usr/dbvisit/dbvnet/dbvnet -d start
/usr/dbvisit/dbvagent/dbvagent -d start
On the console server we issue the following commands. Notice, we start the "dbvserver" service and the observer.
export CONSOLE_HOSTNAME=ol7-19-console

./install-dbvisit --batch-install \
  --force \
  --dbvisit-base /usr/dbvisit \
  --components dbvserver,observer \
  --dbvserver-local-host ${CONSOLE_HOSTNAME} \
  --dbvserver-local-port 4433

/usr/dbvisit/dbvserver/dbvserver -d start
nohup /usr/dbvisit/observer/observersvc -f /usr/dbvisit/observer/conf/observer.conf &
The installation of all servers is now complete.
Standby Creation
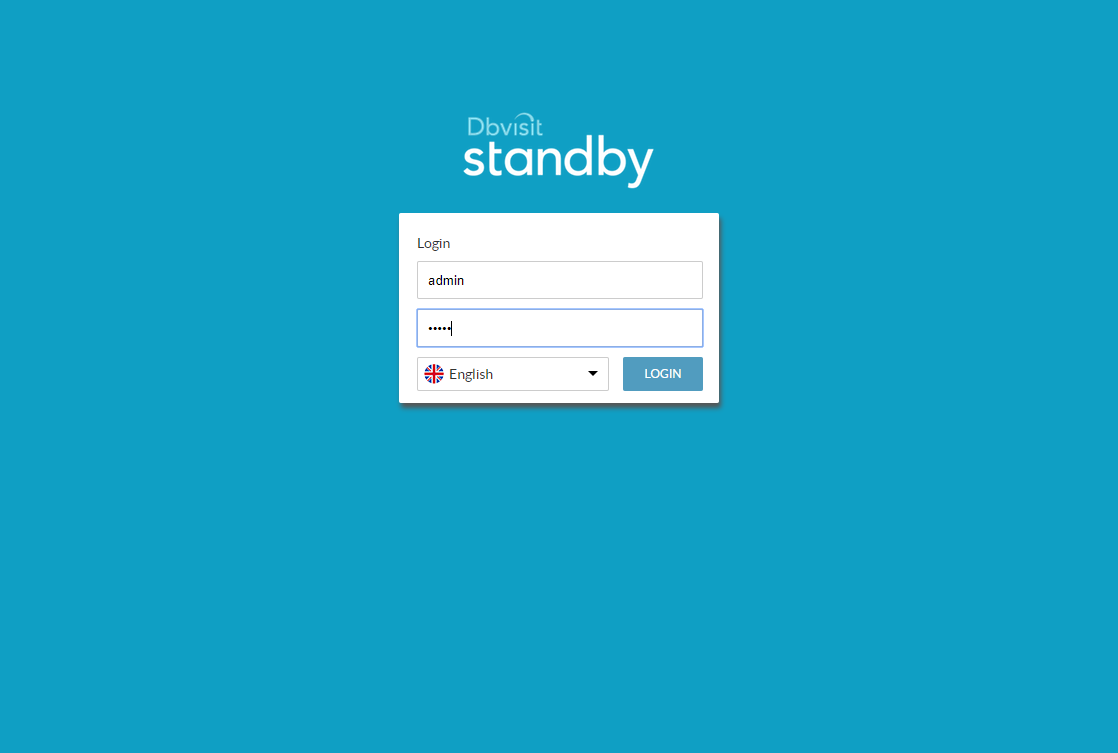
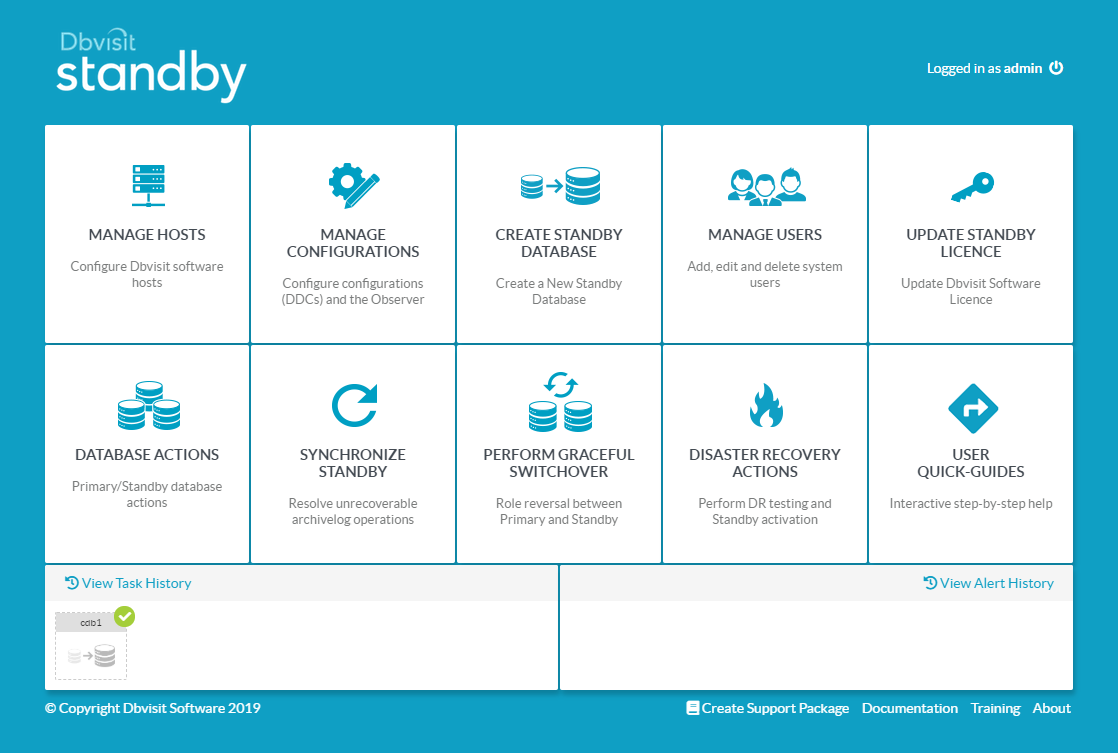
Once the installation is complete you should be able to get to console using a URL like "https://ol7-19-console:4433. You will be presented with the login screen. Use the username "admin" and the password "admin". You can change the password once logged into the console.
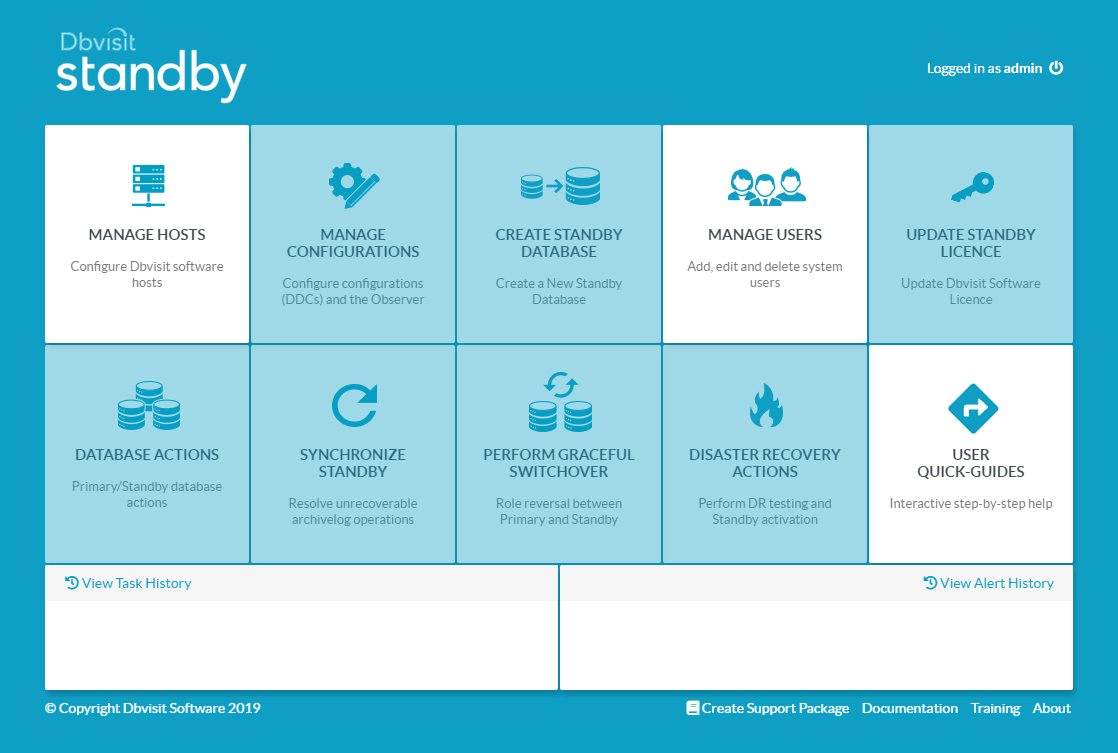
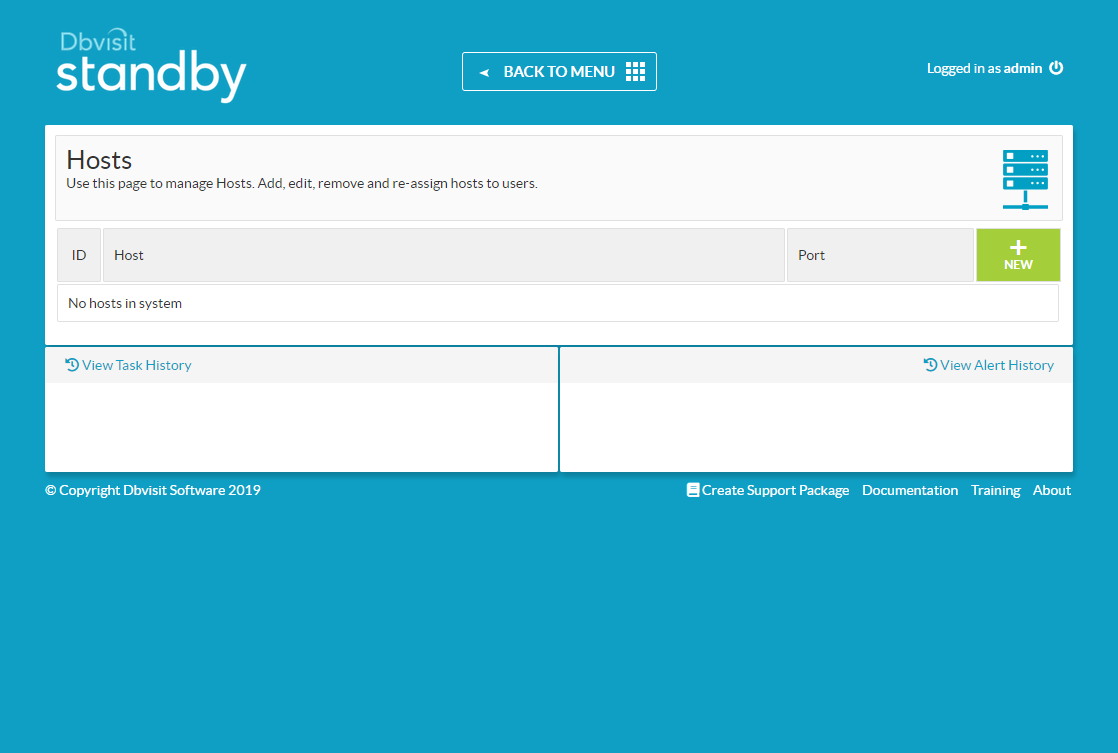
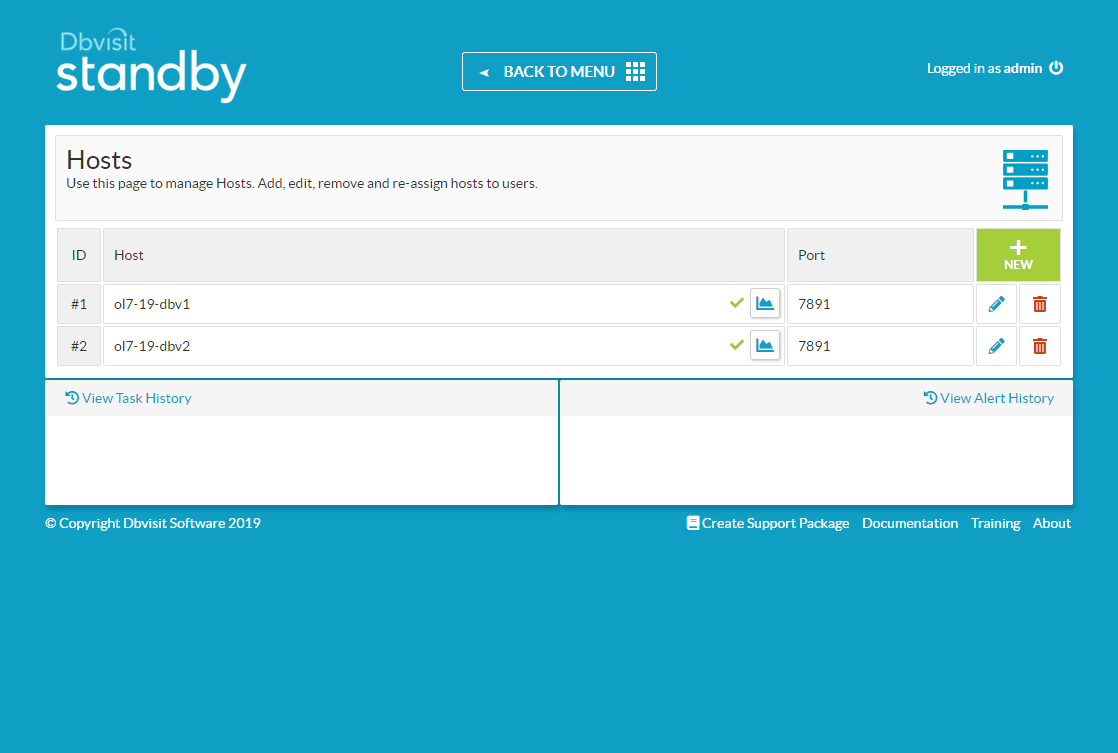
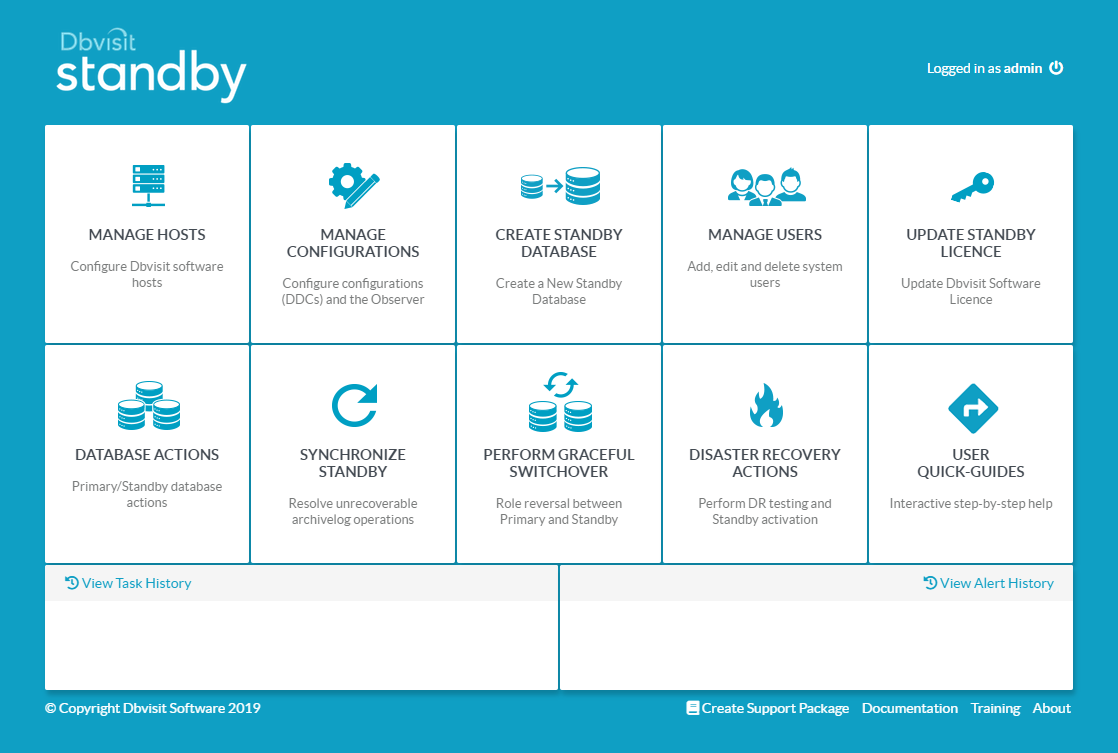
Click on the "MANAGE HOSTS" tile.
To add the first host, which holds the primary database, click the "+NEW" button.
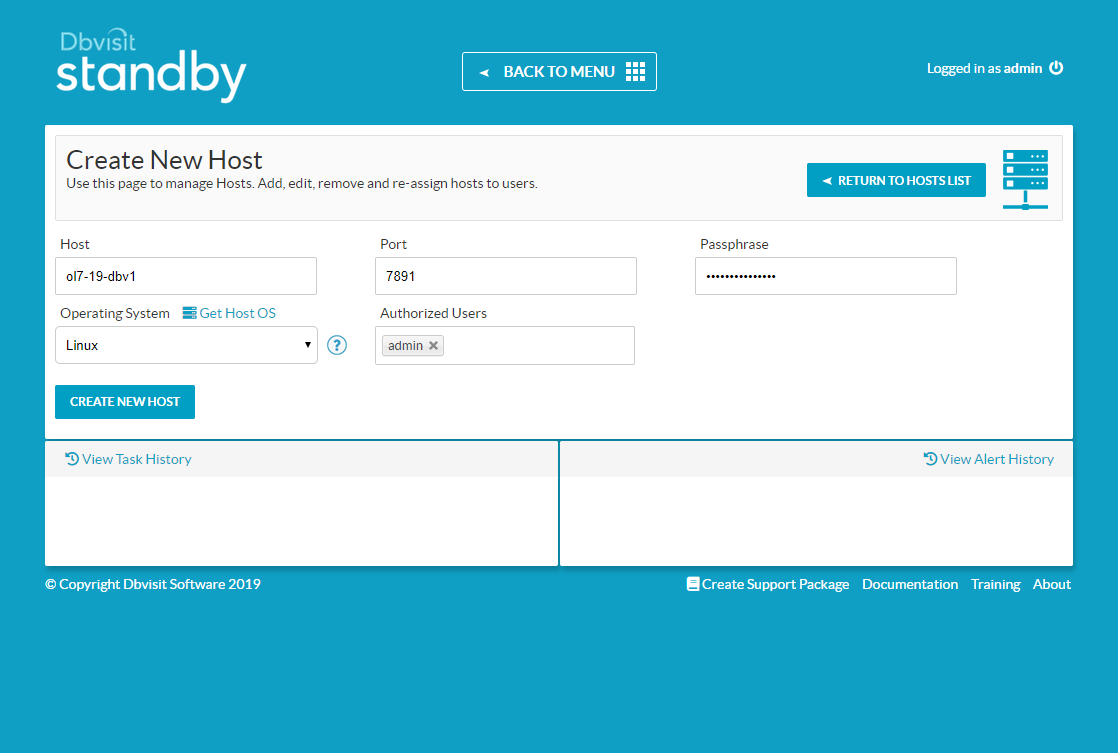
Enter the host details and the passphrase you used during the installation. Click the "CREATE NEW HOST" button.
To add the second host, which will hold the standby database, click the "+NEW" button.

Enter the host details and the passphrase you used during the installation. Click the "CREATE NEW HOST" button.

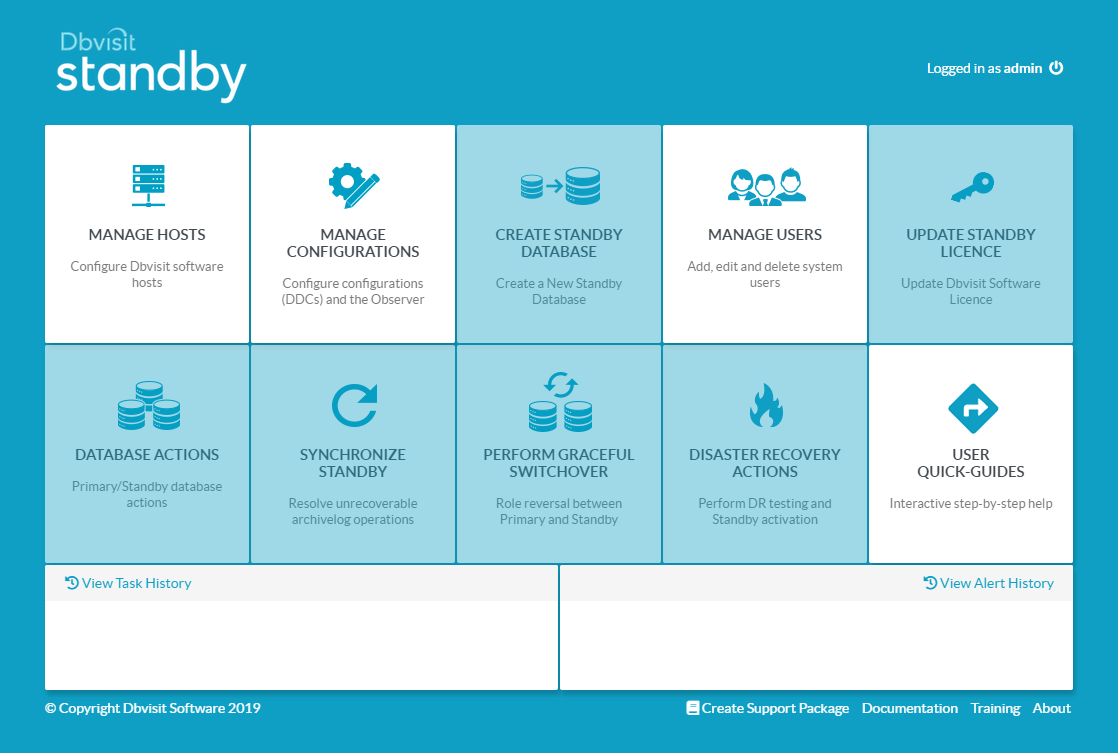
Click the "BACK TO MENU" button.
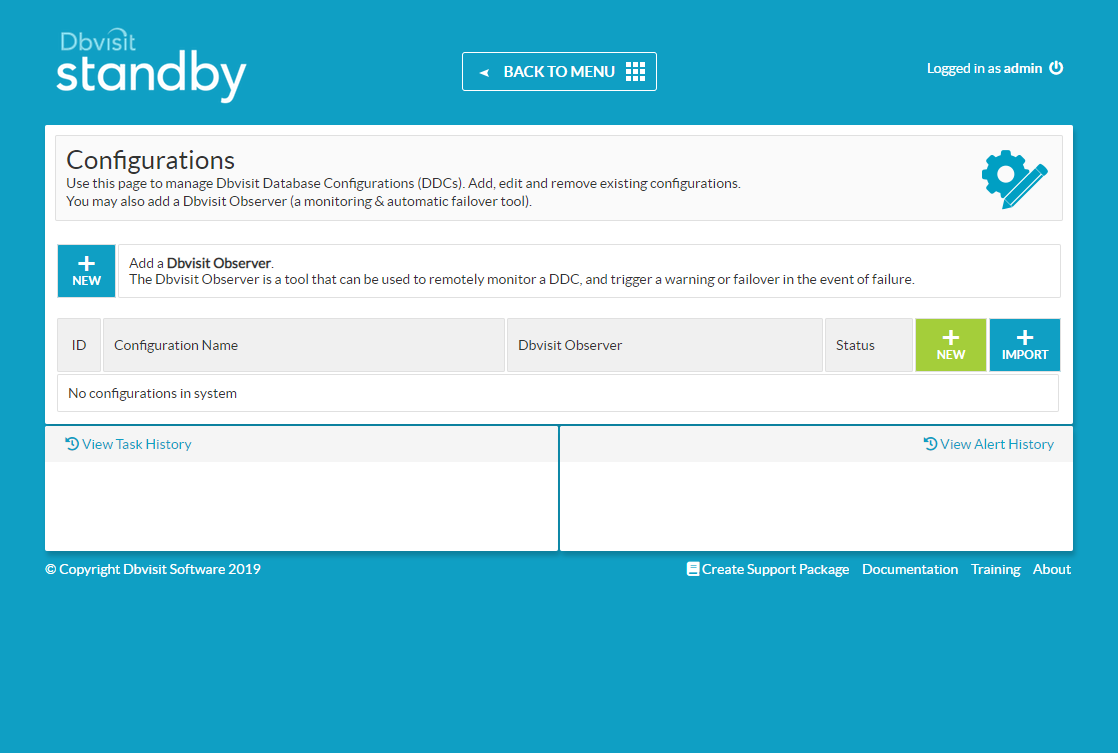
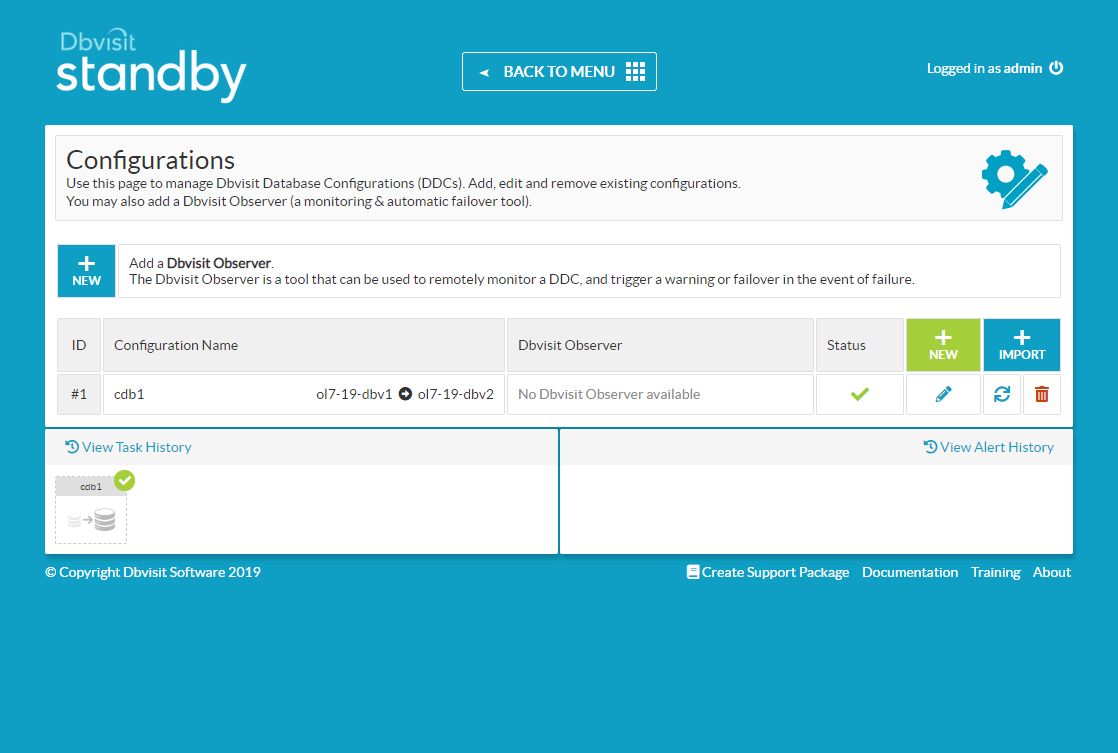
Click the "MANAGE CONFIGURATIONS" tile.
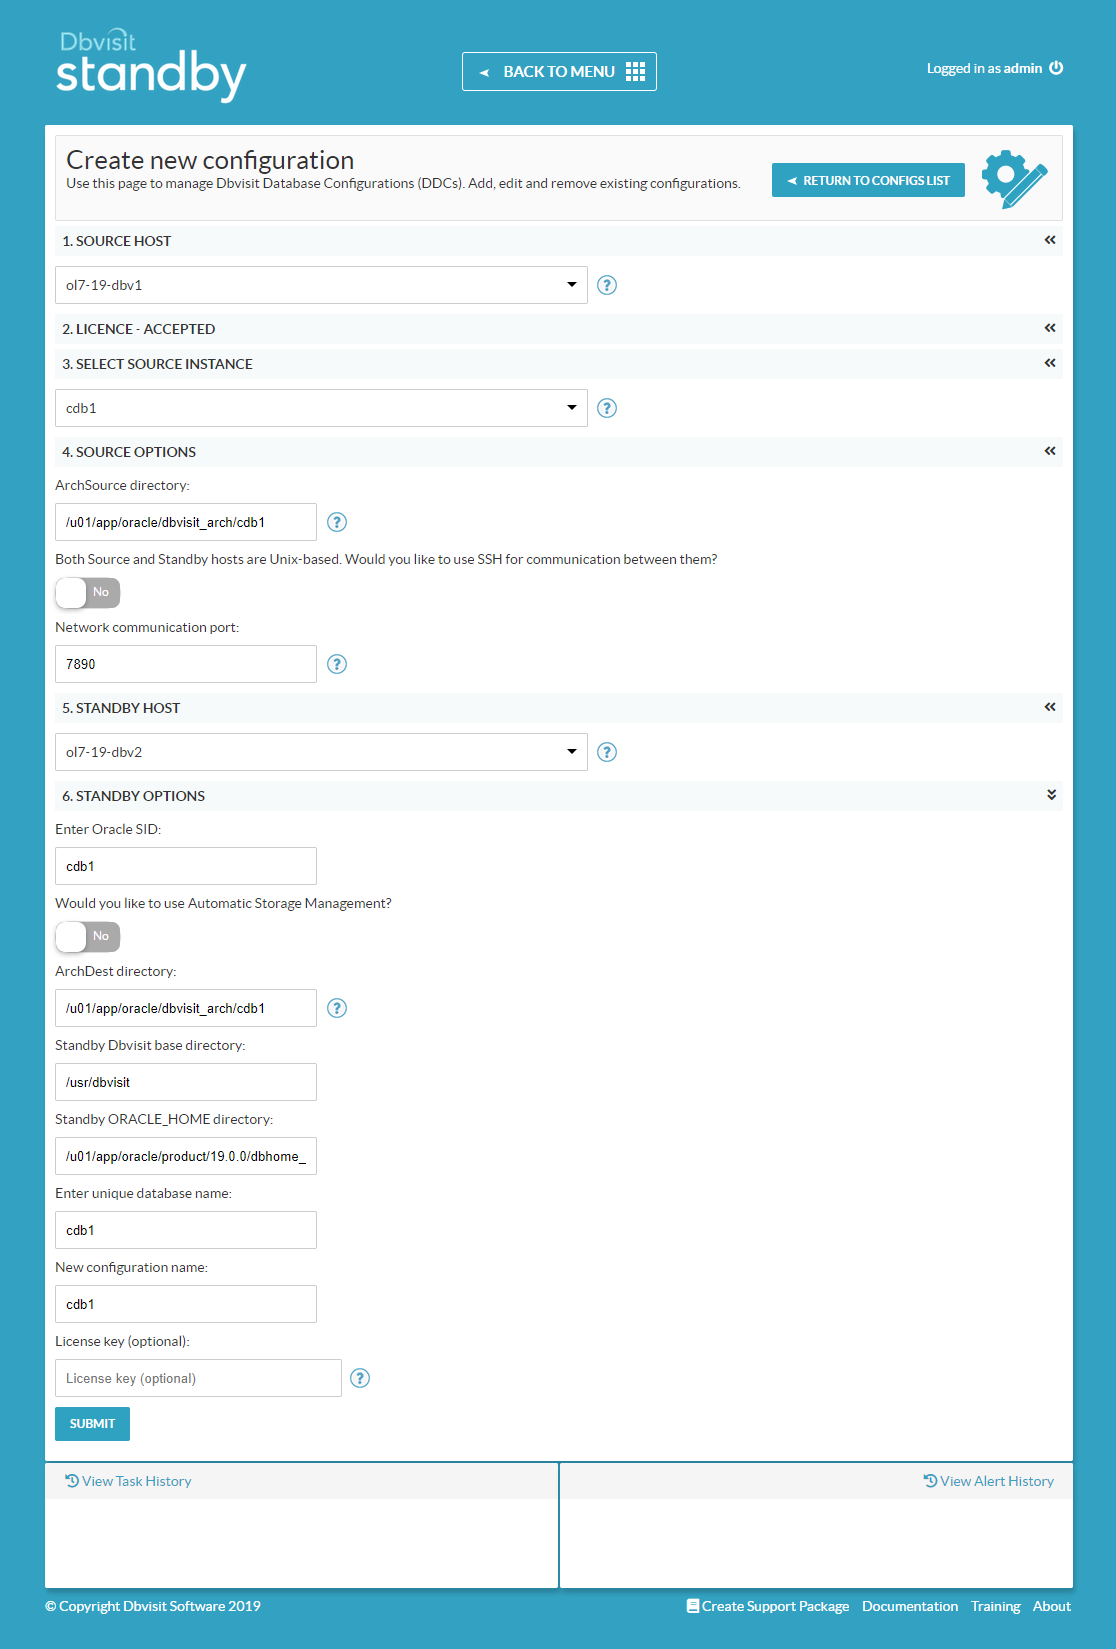
Click the "+NEW" button.
The resulting page looks quite long, but you will mostly use defaults on your first attempt. Select the primary host, agree to the license agreement, then select the primary instance. You can then select the secondary host, and give details about the standby database. Most of them will be pre-filled. You can enter your license key now, but we will add it later. Click the "SUBMIT" button.
Click the "BACK TO MENU" button.
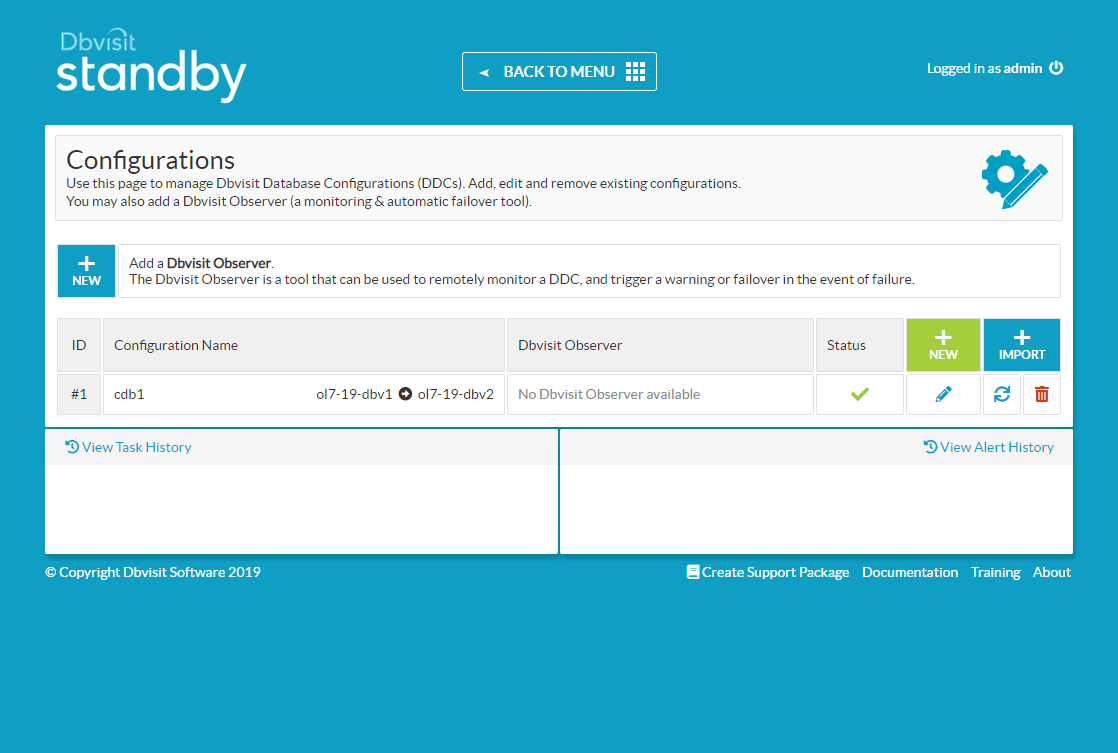
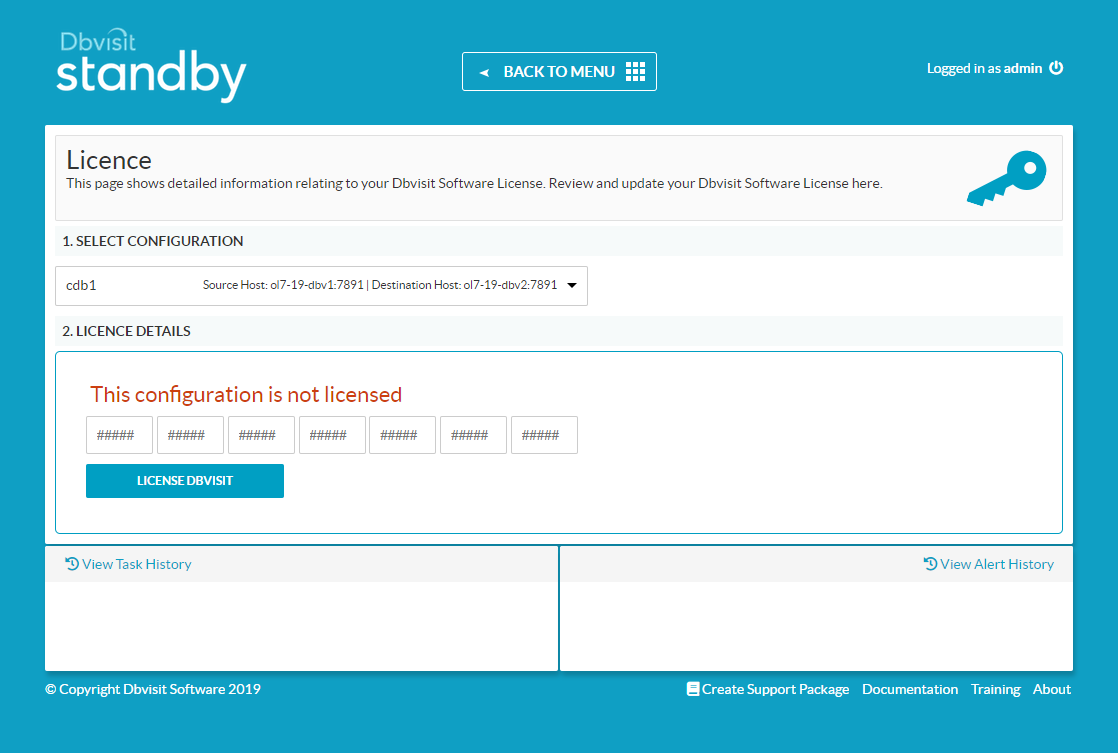
Click the "UPDATE STANDBY LICENSE" tile.

Select the configuration you just defined, and enter the license number. Click the "LICENSE DBVISIT" button.
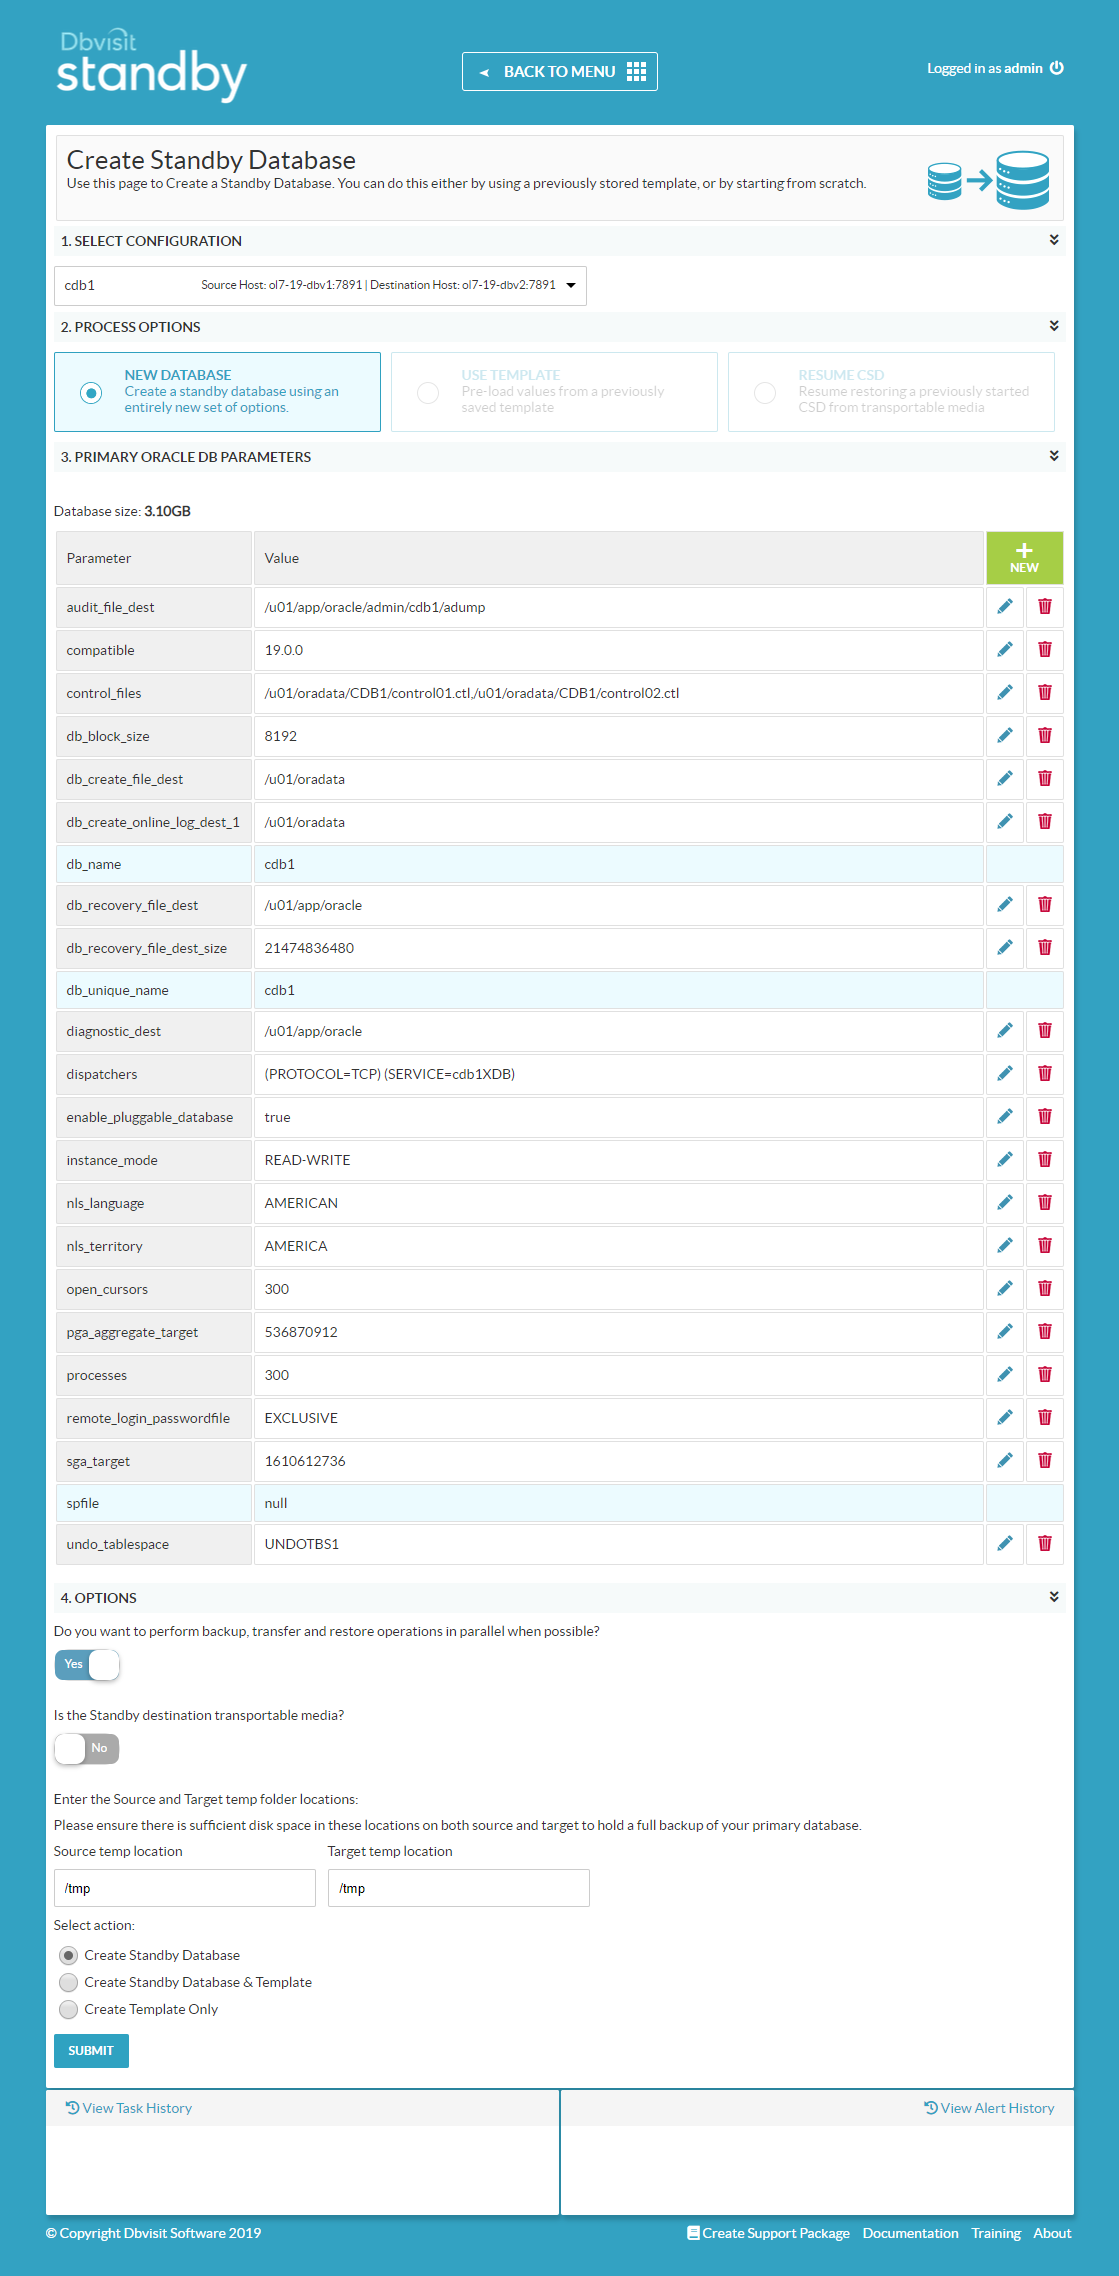
Click the "CREATE STANDBY DATABASE" tile.
Select the configuration you defined previously, and click the "NEW DATABASE" option. I accepted the defaults for everything except the temp locations. I also used the default of "Create Standby Database". Click the "SUBMIT" button.
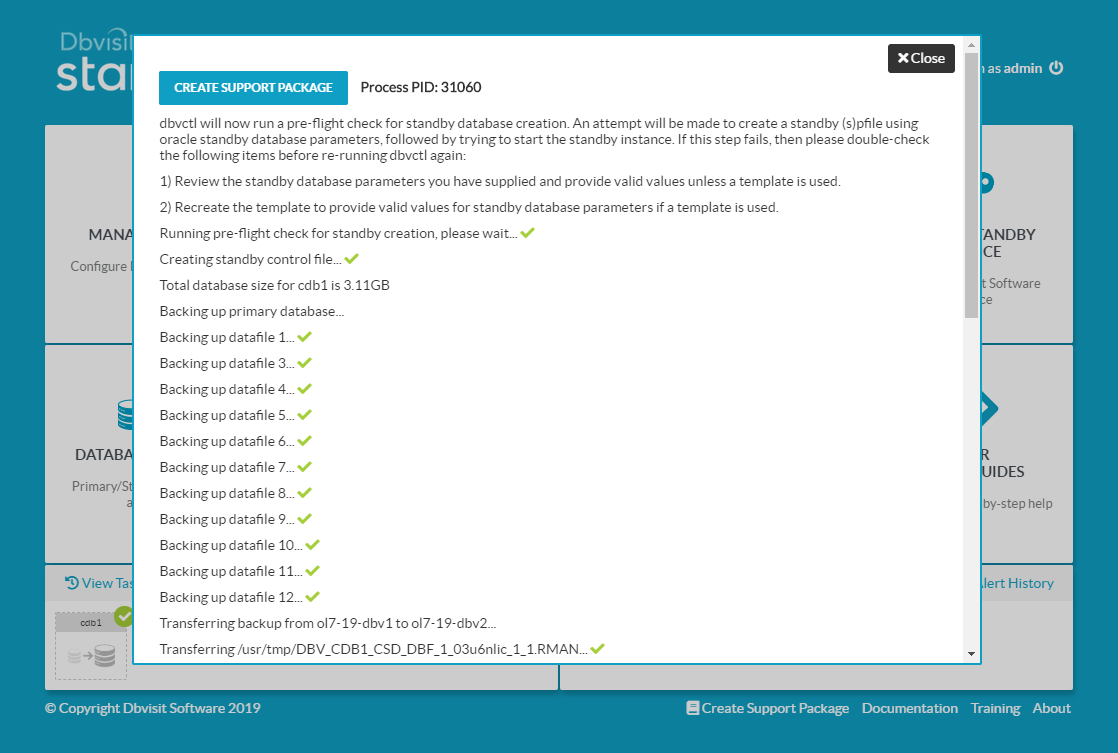
Click on the task in the "View Task History" section on the bottom-left of the console.

Wait while all the actions complete.
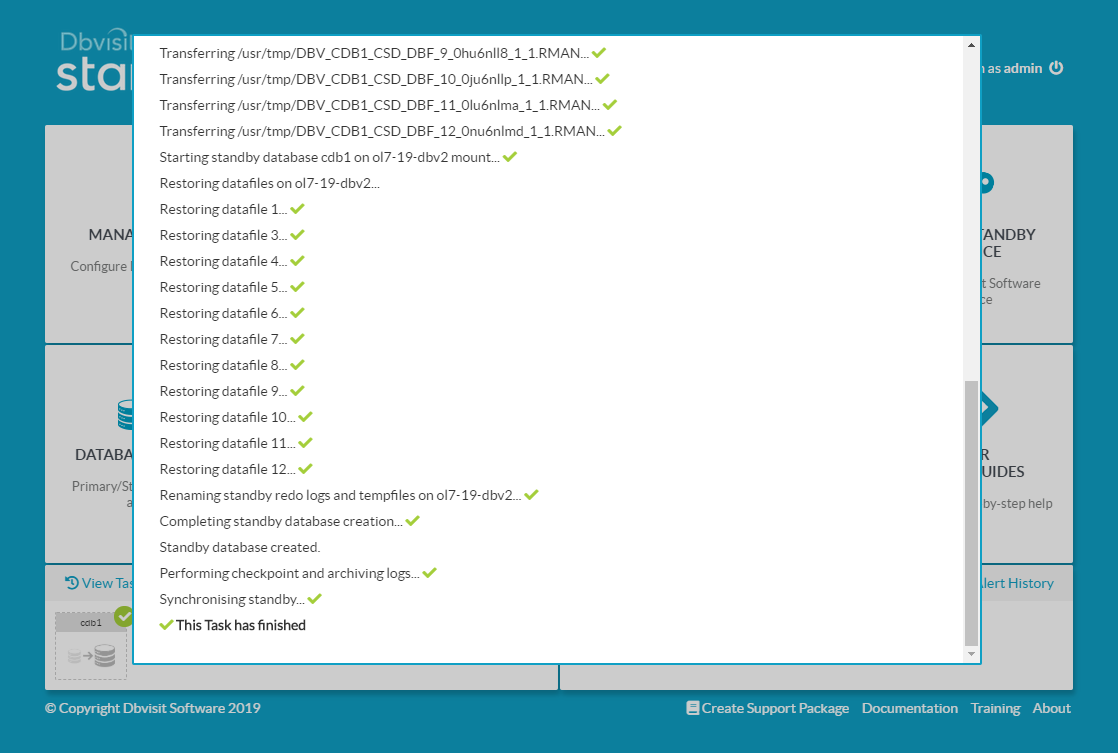
Once complete, either click outside the task window, or scroll to the top and click the "Close" button.
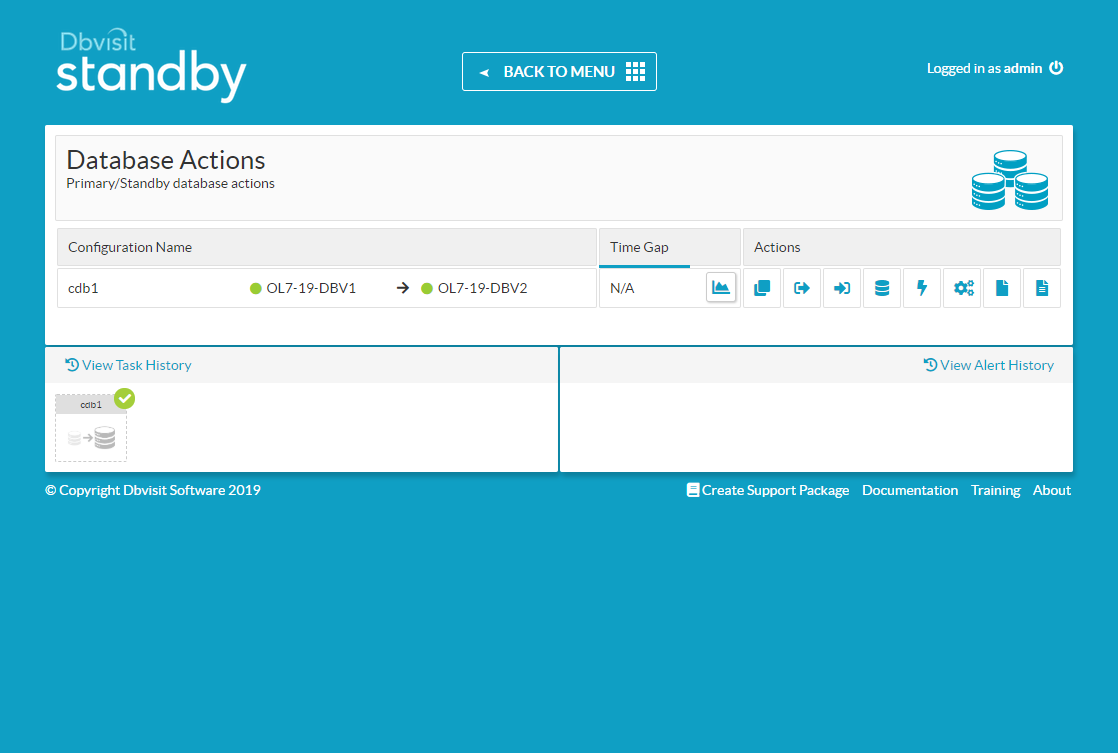
Click the "DATABASE ACTIONS" tile.

Click on the lightening bolt icon to start/stop the deamon processes.
Select the primary node and click the start button to automate the sending of logs.
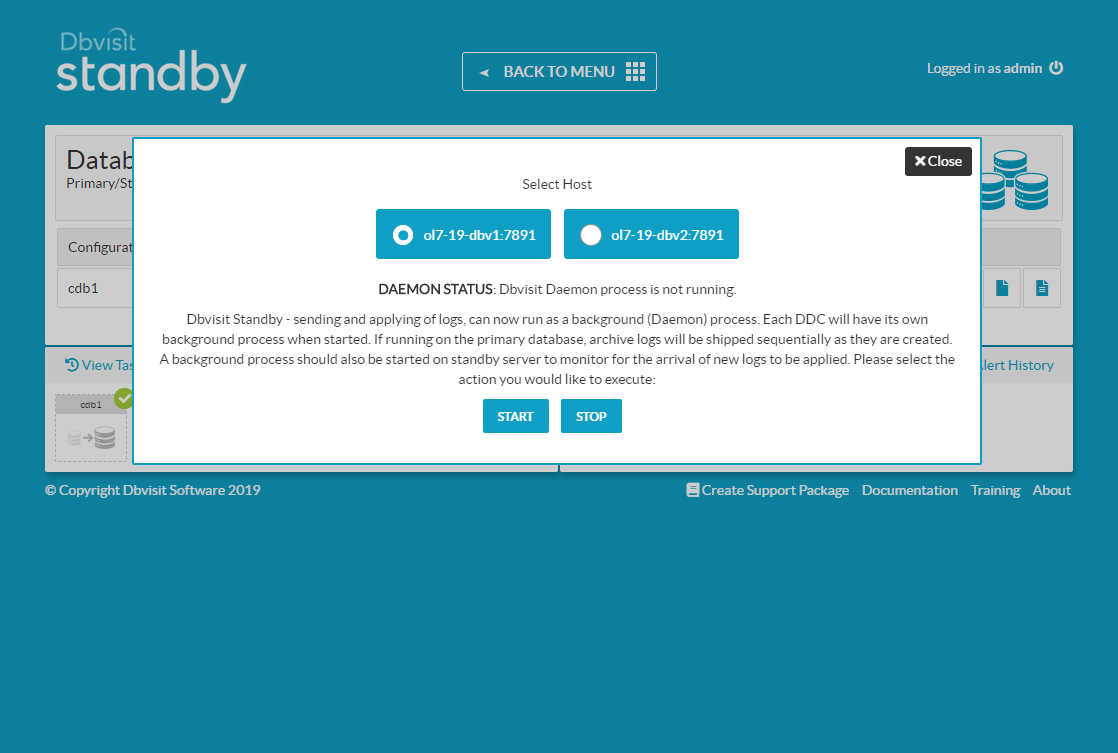
Click the "Close" button on the confirmation.
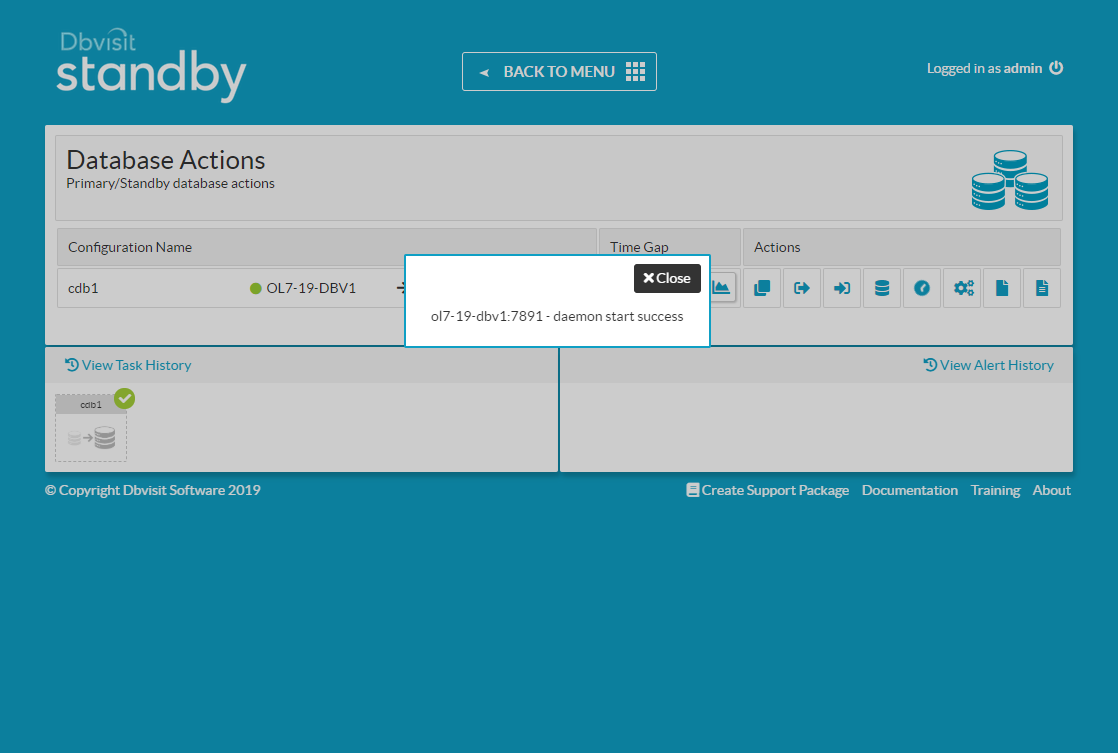
Repeat for the standby node, to make sure all sent logs are applied.
You now have a functioning standby database.
From 9.0.02 onward, you can configure an observer for automatic failover. From the console click the "MANAGE CONFIGURATIONS" tile.
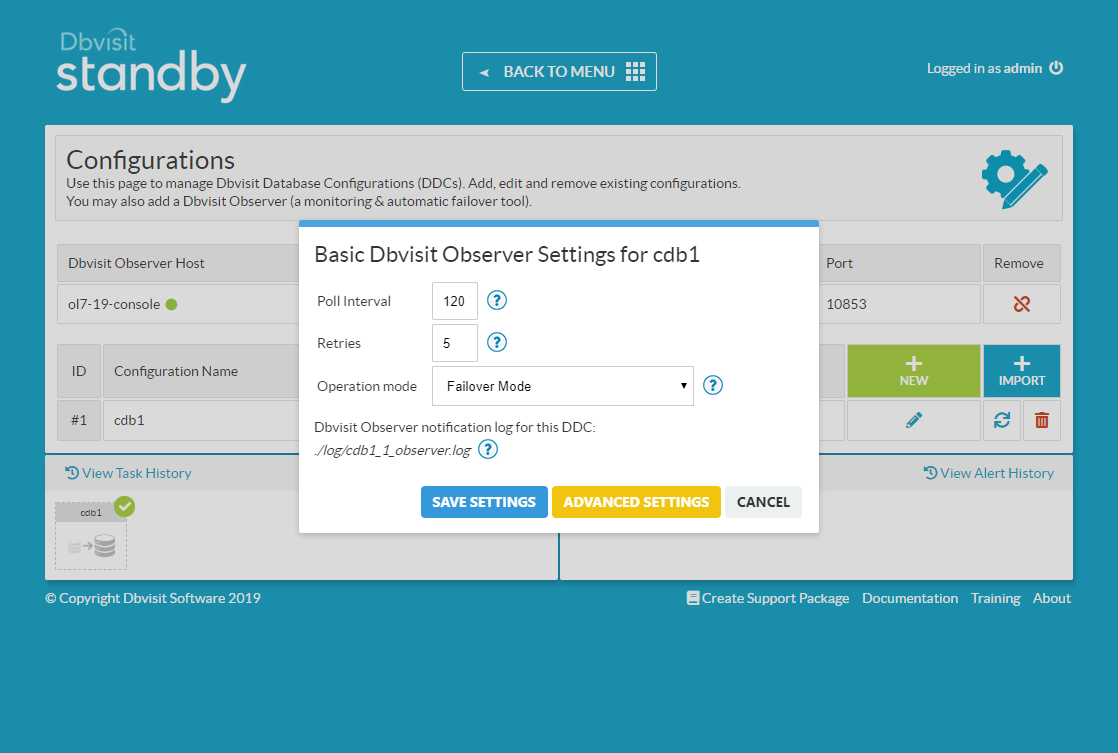
Click the "+ NEW" button next to the "Add a Dbvisit Observer" message.
Enter the host or IP address of the observer. In this case we installed it on the console machine. Enter the default passphrase "admin900" and click the "SAVE" button.
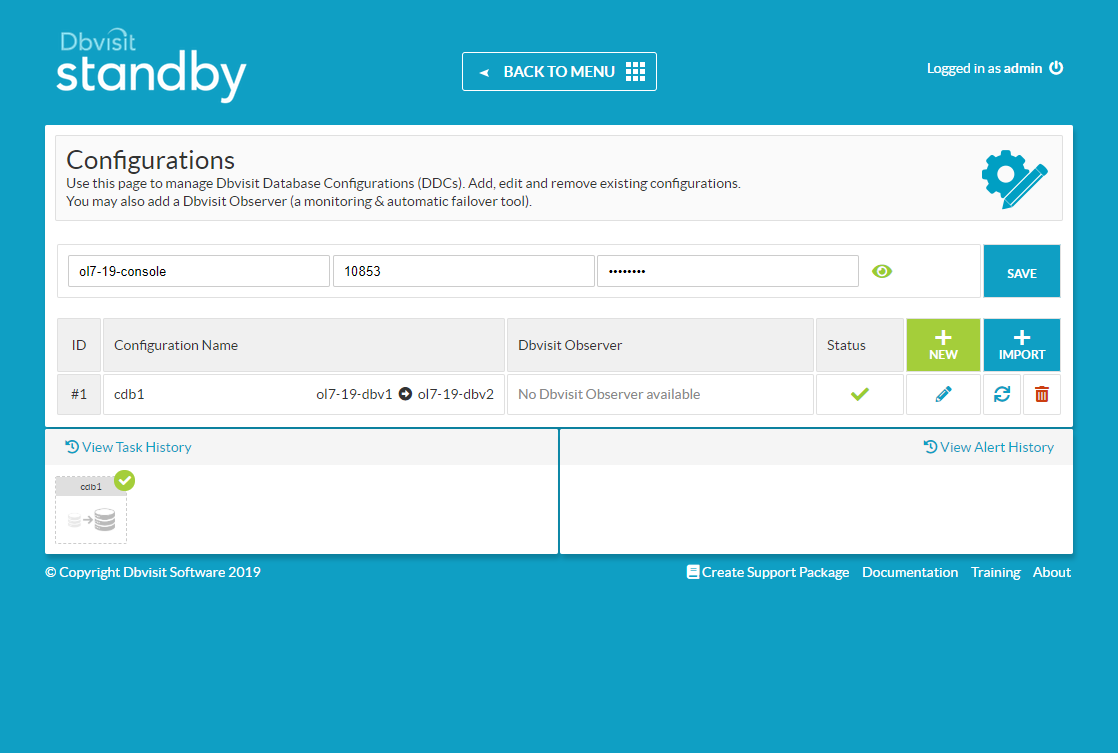
Click the "Monitor" link that is now present for the configuration.

Select the "Operation mode" of "Failover Mode" and click the "SAVE SETTINGS" button.
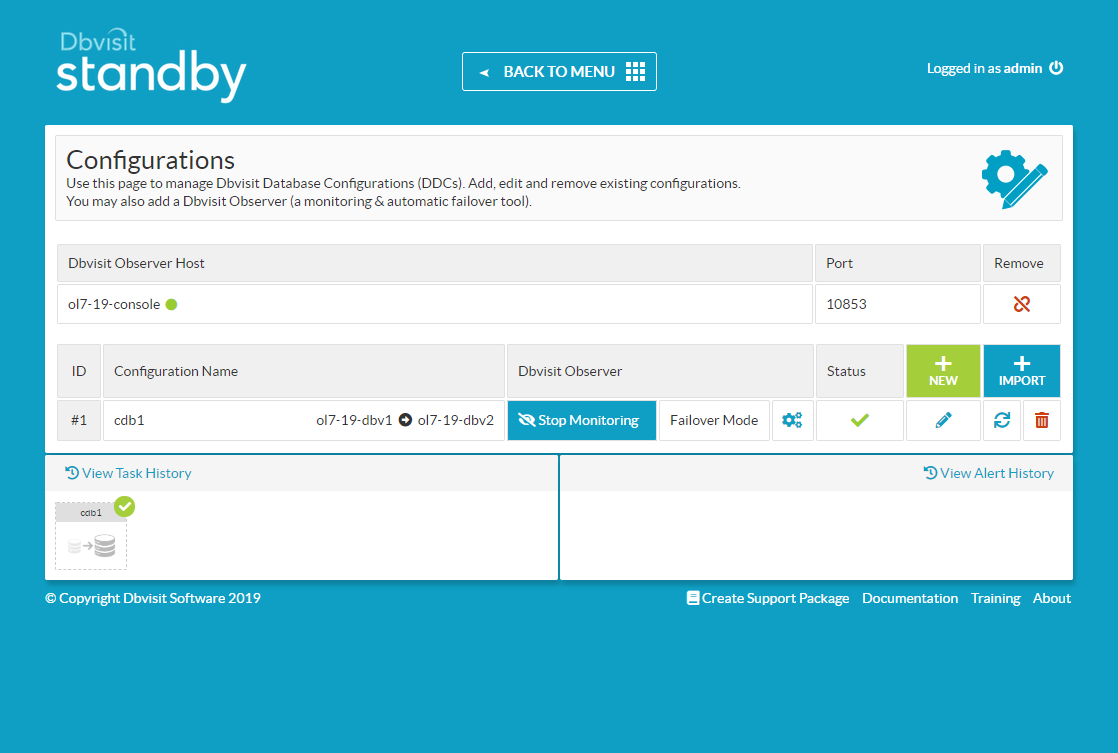
The "Failover Mode" is now listed against the configuration, along with the "Stop Monitoring" button, should you wish to do so.
You can read more about the Failover Mode here.
Most management tasks can be done using the console, but the examples in the rest of the article will use the command line dbvctl utility.
Startup/Shutdown of Databases
The following stop, start and restart commands can be used on the primary or standby database. The start and restart action varies depending on which server they are run from. On the primary the database is started. On the standby, the database is put recovery mode.
$ /usr/dbvisit/standby/dbvctl -d cdb1 -o stop
$ /usr/dbvisit/standby/dbvctl -d cdb1 -o start
$ /usr/dbvisit/standby/dbvctl -d cdb1 -o restart
You can check the status of the primary or standby database using the following command.
$ /usr/dbvisit/standby/dbvctl -d cdb1 -o status
Send and Apply Logs Manually
Send logs from primary server using this command.
$ /usr/dbvisit/standby/dbvctl -d cdb1
Apply logs on the standby server using the following command.
$ /usr/dbvisit/standby/dbvctl -d cdb1
Read-Only Standby
To open the standby database in redo-only mode, simply issue the following command as the "oracle" user on the standby server.
$ /usr/dbvisit/standby/dbvctl -d cdb1 -o open
When you need to switch it back to regular standby mode, either stop and start the standby database, or do a restart.
$ /usr/dbvisit/standby/dbvctl -d cdb1 -o restart
Switchover
To run a graceful (and reversible) switchover, issue the following command on either of the servers.
$ /usr/dbvisit/standby/dbvctl -d cdb1 -o switchover
To switch back, just repeat the command.
Failover
Failover should only be used if you need to activate the standby database in the absence of the primary database. A failover is initiated using the following command on the standby server.
$ /usr/dbvisit/standby/dbvctl -d cdb1 -o activate
Automatic Failover
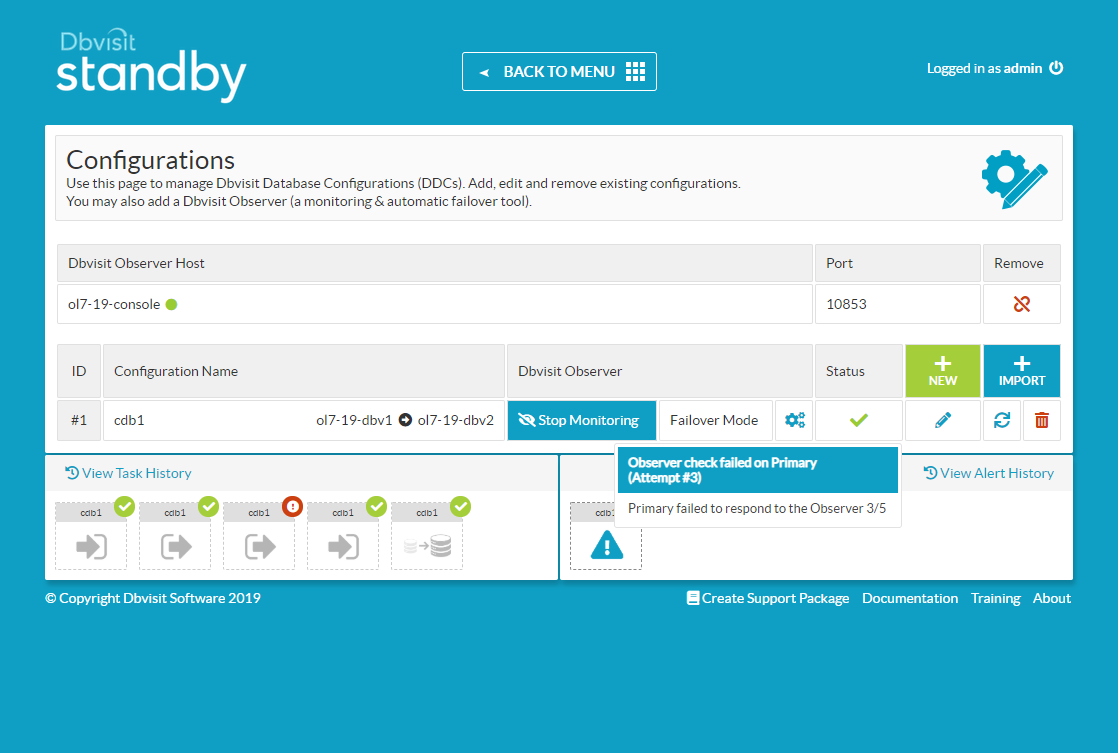
The simplest way to test the automatic failover is to turn off the network adapter on the primary server.
cd /etc/sysconfig/network-scripts
ifdown eth1
When we configured the observer we used the default values, which mean it polls the server every 120 seconds, and will retry 5 times before performing a failover. Hovering over the alert in the Alert History displays the number of failed checks.
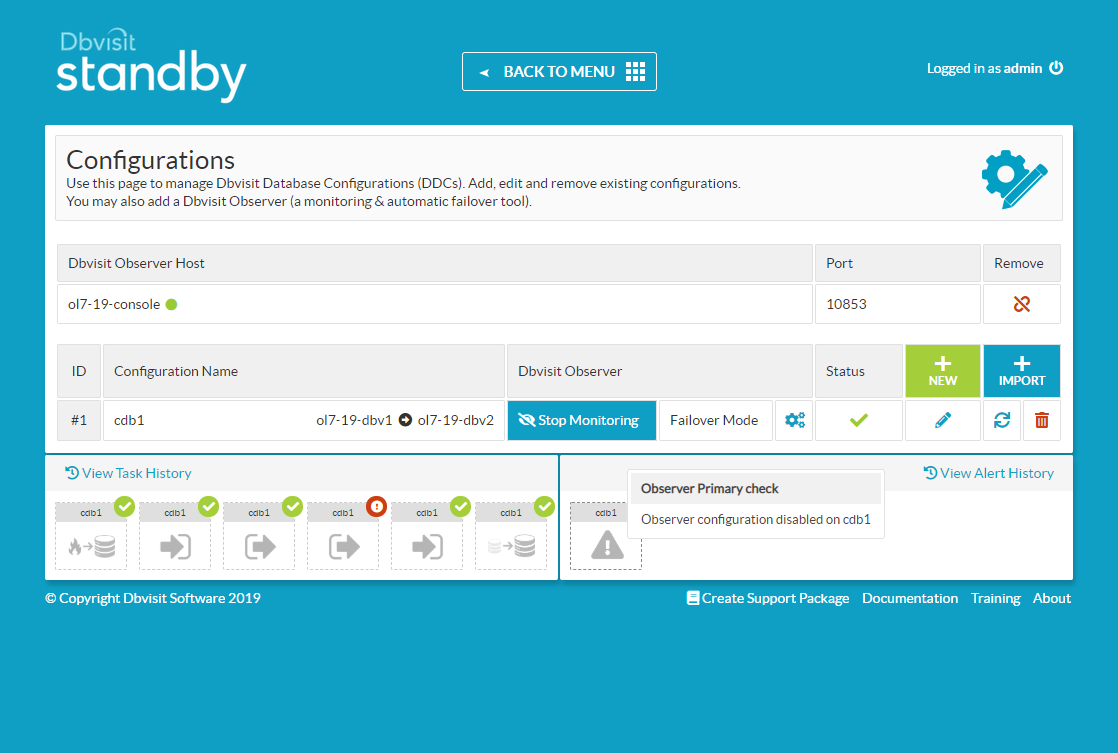
Once the final pool failure takes place the failover is initiated and the observer reports as disabled for this configuration.
For more information see:
- Dbvisit.com
- Dbvisit Standby 9.0
- Installing Dbvisit Standby
- Dbvisit Standby Command Line Interface (CLI)
- Advanced Option - Automatic Failover (Dbvisit Observer)
Hope this helps. Regards Tim...