8i | 9i | 10g | 11g | 12c | 13c | 18c | 19c | 21c | 23ai | Misc | PL/SQL | SQL | RAC | WebLogic | Linux
Reclaiming Unused Space in Datafiles
There are a number of scenarios that can lead to unused space in datafiles. The two most common I see are:
- A lack of housekeeping/maintenance means that one or more tables have grown excessively. After the data is pruned the datafiles contain unused space that needs to be reclaimed.
- One or more segments (tables, partitions or indexes) have been moved to another tablespace leaving empty areas in the datafiles that previously held them.
In this article I will discuss a few of the ways of reclaiming this unused space.
- Setup Test Environment
- Identify Tablespaces with Free Space
- Export/Import
- Manual Tablespace Reorganization
- Enterprise Manager Tablespace Reorganization
- Shrink Bigfile Tablespaces (23ai)
- Shrink?
- Tablespaces with Multiple Datafiles
- Undo Tablespace
- Temp Tablespace
- SYSAUX Tablespace
I do not advise reorganizing tablespaces every time a bit of free space appears. In many cases the space will be used as segments in the tablespace continue to grow. I consider this type of action a one-off task when something significant has happened in the tablespace.
Remember, reorganising a tablespace is a big structural change. You should *always* take backups before doing any structural changes to databases you care about.
Setup Test Environment
Before we can look at the solutions we need to create a test environment so we can clearly see the problem. Each of the solutions presented require that this setup is done first.
CONN / AS SYSDBA

-- Create a tablespace and user for the test.
DROP USER reclaim_user CASCADE;
DROP TABLESPACE reclaim_ts INCLUDING CONTENTS AND DATAFILES;

CREATE TABLESPACE reclaim_ts DATAFILE '/u01/app/oracle/oradata/DB11G/reclaim01.dbf' SIZE 1M AUTOEXTEND ON NEXT 1M;

CREATE USER reclaim_user IDENTIFIED BY reclaim_user DEFAULT TABLESPACE reclaim_ts QUOTA UNLIMITED ON reclaim_ts;
GRANT CREATE SESSION, CREATE TABLE TO reclaim_user;


-- Create and populate two tables in the test schema.
CONN reclaim_user/reclaim_user

CREATE TABLE t1 (
  id NUMBER,
  description VARCHAR2(1000),
  CONSTRAINT t1_pk PRIMARY KEY (id)
);

CREATE TABLE t2 (
  id NUMBER,
  description VARCHAR2(1000),
  CONSTRAINT t2_pk PRIMARY KEY (id)
);

INSERT /*+append*/ INTO t1
SELECT rownum, RPAD('x', 1000, 'x')
FROM dual
CONNECT BY level <= 10000;
COMMIT;

INSERT /*+append*/ INTO t2
SELECT rownum, RPAD('x', 1000, 'x')
FROM dual
CONNECT BY level <= 10000;
COMMIT;

EXEC DBMS_STATS.gather_table_stats(USER, 't1');
EXEC DBMS_STATS.gather_table_stats(USER, 't2');
We can see both table segments are made up of multiple extents, each extent being made up of multiple blocks.
CONN / AS SYSDBA

COLUMN segment_name FORMAT A30

SELECT segment_type, segment_name, COUNT(*)
FROM   dba_extents
WHERE  owner = 'RECLAIM_USER'
GROUP BY segment_type, segment_name
ORDER BY segment_type, segment_name;

SEGMENT_TYPE       SEGMENT_NAME                     COUNT(*)
------------------ ------------------------------ ----------
INDEX              T1_PK                                   3
INDEX              T2_PK                                   3
TABLE              T1                                     27
TABLE              T2                                     27

SQL>

SELECT table_name, num_rows, blocks FROM dba_tables WHERE owner = 'RECLAIM_USER';

TABLE_NAME                       NUM_ROWS     BLOCKS
------------------------------ ---------- ----------
T1                                  10000       1461
T2                                  10000       1461

SQL>
Enterprise Manager gives us a nice image of the contents of the tablespace by doing the following:
- Click on the "Server" tab.
- Click the "Tablespaces" link.
- Select the "RECLAIM_TS" tablespace by clicking the radio button.
- Select the "Show Tablespace Contents" action and click the "Go" button.
- On the resulting page, expand the "Extent Map" section.
The image below shows the extent map for the "RECLAIM_TS" tablespace. Clicking on a specific segment in the list, or an extent in the extent map, causes all extents for that segment to be highlighted yellow. From this point on I will ignore the rest of the page and just focus on the extent maps.

Now truncate the "T1" table to simulate a maintenance operation.
CONN reclaim_user/reclaim_user

TRUNCATE TABLE t1;
What we can see now is the "T1" table has a single extent (yellow) and there is lots of free space (green) in the centre of the tablespace.

The fact that the majority of the free space is before some of the "T2" extents means we can not shrink the size of the datafile to release the space.
CONN / AS SYSDBA

COLUMN name FORMAT A50

SELECT name, bytes/1024/1024 AS size_mb
FROM   v$datafile
WHERE  name LIKE '%reclaim%';

NAME                                                  SIZE_MB
-------------------------------------------------- ----------
/u01/app/oracle/oradata/DB11G/reclaim01.dbf                26

SQL>

ALTER DATABASE DATAFILE '/u01/app/oracle/oradata/DB11G/reclaim01.dbf' RESIZE 24M;

ALTER DATABASE DATAFILE '/u01/app/oracle/oradata/DB11G/reclaim01.dbf' RESIZE 24M
*
ERROR at line 1:
ORA-03297: file contains used data beyond requested RESIZE value


SQL>
So this represents the starting point of our problem. We have free space we need to release from the datafile associated with our tablespace.
Before working through any of the methods described below, recreate this situation.
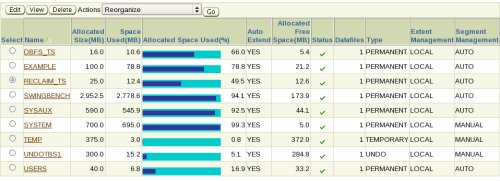
Identify Tablespaces with Free Space
You can easily identify tablespaces with lots of free space using the ts_free_space.sql script.
SQL> @ts_free_space.sql

TABLESPACE_NAME                   SIZE_MB    FREE_MB MAX_SIZE_MB MAX_FREE_MB   FREE_PCT USED_PCT
------------------------------ ---------- ---------- ----------- ----------- ---------- -----------
EXAMPLE                               345         35         345          35         10  XXXXXXXXX-
RECLAIM_TS                             25         12       32767       32754         99  ----------
SYSAUX                                580         33         580          33          5  XXXXXXXXX-
SYSTEM                                720          7         720           7          0  XXXXXXXXXX
UNDOTBS1                               70         41          70          41         58  XXXX------
USERS                                  20         15          20          15         75  XXX-------

6 rows selected.

SQL>
For tablespaces with autoextend enabled, the script calculates the maximum sizes and percentages based on maximum size the datafiles can grow to, but the "FREE_MB" column is based on the current file size, so use that figure for tablespaces with datafiles set to autoextend.
If we switch off autoextend for the relevant datafile, the last four columns will look more representative.
SQL> ALTER DATABASE DATAFILE '/u01/app/oracle/oradata/DB11G/reclaim01.dbf' AUTOEXTEND OFF;

Database altered.

SQL> @ts_free_space.sql

TABLESPACE_NAME                   SIZE_MB    FREE_MB MAX_SIZE_MB MAX_FREE_MB   FREE_PCT USED_PCT
------------------------------ ---------- ---------- ----------- ----------- ---------- -----------
EXAMPLE                               345         35         345          35         10  XXXXXXXXX-
RECLAIM_TS                             25         12          25          12         48  XXXXX-----
SYSAUX                                580         33         580          33          5  XXXXXXXXX-
SYSTEM                                720          7         720           7          0  XXXXXXXXXX
UNDOTBS1                               70         40          70          40         57  XXXX------
USERS                                  20         15          20          15         75  XXX-------

6 rows selected.

SQL>
Export/Import
The export/import process looks like this:
- Export the schema objects that are stored in the specific tablespace/datafile you want to resize.
- Drop the exported objects.
- Resize the datafiles.
- Import the objects.
- Perform any required maintenance, like grants etc.
Although the process is simple, it may involve substantial downtime if the objects being dropped are large. The following shows how each of these stages is achieved.
First, create a directory object for the export and import to work with.
CONN / AS SYSDBA
CREATE DIRECTORY temp_dir AS '/tmp';
GRANT READ, WRITE ON DIRECTORY temp_dir TO reclaim_user;
Export the objects in question. In this case we are doing the whole schema, but you may be able to get away with a subset of the objects if your schema is spread across several tablespaces.
expdp reclaim_user/reclaim_user schemas=RECLAIM_USER directory=TEMP_DIR dumpfile=RECLAIM_USER.dmp logfile=expdpRECLAIM_USER.log
Drop the original objects and reduce the size of the datafile.
CONN / AS SYSDBA
DROP TABLE reclaim_user.t1;
DROP TABLE reclaim_user.t2;
PURGE DBA_RECYCLEBIN;

ALTER TABLESPACE reclaim_ts COALESCE;
ALTER DATABASE DATAFILE '/u01/app/oracle/oradata/DB11G/reclaim01.dbf' RESIZE 5M;
Import the objects back into the schema.
impdp reclaim_user/reclaim_user schemas=RECLAIM_USER directory=TEMP_DIR dumpfile=RECLAIM_USER.dmp logfile=impdpRECLAIM_USER.log
The tablespace map shows we have removed the large section of free space in the middle of the datafile associated with our tablespace.

We can also see the size of the datafile has been reduced from 26M to 14M.
CONN / AS SYSDBA

COLUMN name FORMAT A50

SELECT name, bytes/1024/1024 AS size_mb
FROM   v$datafile
WHERE  name LIKE '%reclaim%';

NAME                                                  SIZE_MB
-------------------------------------------------- ----------
/u01/app/oracle/oradata/DB11G/reclaim01.dbf                14

SQL>
In this example I truncated the first table, so my table segments did not contain much free space internally. If you have segments with lots of internal free space to clean up in addition to the unused space in the datafile, you may want to include the TRANFORM parameter in your import command. Using "TRANSFORM=SEGMENT_ATTRIBUTES:N" setting tells the import command to forget the physical attributes (including the storage clause) of the table when recreating it.
impdp reclaim_user/reclaim_user schemas=RECLAIM_USER directory=TEMP_DIR dumpfile=RECLAIM_USER.dmp logfile=impdpRECLAIM_USER.log \
      transform=segment_attributes:n
Manual Tablespace Reorganization
Support for online segment move operations improve with every release. Depending on the database version you use, and the types of segments you are moving, you may be able to do this entirely as online operations.
This method can take one of two forms. It you are happy to change the datafile name do the following:
- Create a new tablespace.
- Move the segments to the new tablespace.
- Drop the original tablespace.
- Rename the new tablespace to match the original name. *
* As pointed out by Manfred Milhofer in the comments, some versions of the database are susceptible to an error if you rename a tablespace to a name that was used previously, as described in MOS Doc ID 604648.1. If the tablespace must keep the same name, it might be better to drop and recreate the original and move everything back.
If the datafile name must remain the same do the following:
- Create a new tablespace.
- Move the segments to the new tablespace.
- Resize the original datafile.
- Move the segments back to the original tablespace.
- Drop the new tablespace.
Obviously the second method requires much more work as all segments are being moved twice.
The way to move segments depends on the type of segment being moved. Here are a few examples.
-- Move a table segment.
ALTER TABLE tab1 MOVE TABLESPACE new_ts;
-- Online in 12.2 onward.
ALTER TABLE tab1 MOVE ONLINE TABLESPACE new_ts;

-- Move an index segment.
ALTER INDEX ind1 REBUILD TABLESPACE new_ts;
ALTER INDEX ind1 REBUILD TABLESPACE new_ts ONLINE;

-- Move a table partition segment. (Remember to check for unusable indexes)
ALTER TABLE tab1 MOVE PARTITION part_1 TABLESPACE new_ts NOLOGGING;
-- Online in 12.1 onward.
ALTER TABLE tab1 MOVE PARTITION part_1 ONLINE TABLESPACE new_ts NOLOGGING;

-- Move an index partition segment.
ALTER INDEX ind1 REBUILD PARTITION ind1_part1 TABLESPACE new_ts;
ALTER INDEX ind1 REBUILD PARTITION ind1_part1 TABLESPACE new_ts ONLINE;

-- Move LOB segments if we had them.
-- ALTER TABLE tab1 MOVE LOB(lob_column_name) STORE AS (TABLESPACE new_ts);
Of course, the tables and their respective indexes could be moved using the Online Table Redefinition functionality.
The following example performs a manual reorganization where the datafile name is not retained. Remember to recreate the test environment before starting this example.
First, create a new tablespace to hold the objects.
CONN / AS SYSDBA

CREATE TABLESPACE reclaim_ts_temp DATAFILE '/u01/app/oracle/oradata/DB11G/reclaim02.dbf' SIZE 1M AUTOEXTEND ON NEXT 1M;
ALTER USER reclaim_user QUOTA UNLIMITED ON reclaim_ts_temp;
Move the objects to the new tablespace.
ALTER TABLE reclaim_user.t1 MOVE TABLESPACE reclaim_ts_temp;
ALTER INDEX reclaim_user.t1_pk REBUILD TABLESPACE reclaim_ts_temp;
ALTER TABLE reclaim_user.t2 MOVE TABLESPACE reclaim_ts_temp;
ALTER INDEX reclaim_user.t2_pk REBUILD TABLESPACE reclaim_ts_temp;
Drop the original tablespace and rename the new one back to the original name.
DROP TABLESPACE reclaim_ts INCLUDING CONTENTS AND DATAFILES;
ALTER TABLESPACE reclaim_ts_temp RENAME TO reclaim_ts;
Once again, the tablespace map shows we have removed the large section of free space in the middle of the datafile associated with our tablespace.

We can also see the size of the datafile has been reduced from 26M to 13M.
CONN / AS SYSDBA

COLUMN name FORMAT A50

SELECT name, bytes/1024/1024 AS size_mb
FROM   v$datafile
WHERE  name LIKE '%reclaim%';

NAME                                                  SIZE_MB
-------------------------------------------------- ----------
/u01/app/oracle/oradata/DB11G/reclaim01.dbf                13

SQL>
In Oracle 12c Release 1 (12.1) you can move table partitions and sub-partitions online. In Oracle 12c Release 2 (12.2) you can move regular tables online.
- Online Move of Partitions and Sub-Partitions in Oracle 12c Release 1 (12.1)
- Online Move of a Table in Oracle Database 12c Release 2 (12.2)
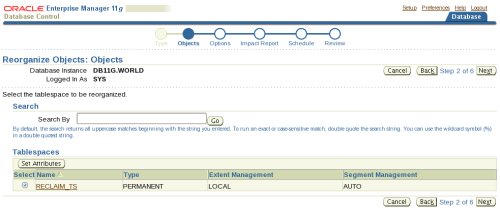
Enterprise Manager Tablespace Reorganization
The manual tablespace reorganization method works well, but when you start dealing with lots of segments it can become a bit painful to script, especially if you start using the online table redefinition functionality. This is where Enterprise Manager comes to the rescue because it can perform all the hard work for you, allowing you to easily define a job to perform a tablespace reorganization.
Starting at the "tablespaces" screen, select the "RECLAIM_TS" tablespace by clicking the radio group button next to it, select the "Reorganize" action and click the "Go" button.
Accept the default object selection by clicking the "Next" button.
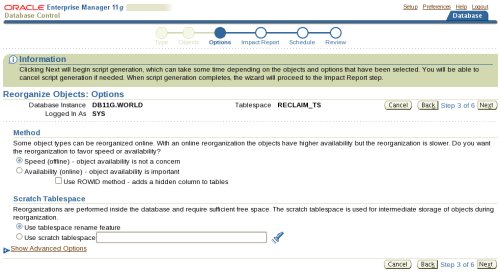
The options screen allows you to decide how the reorganization should take place. The "Method" section has two options:
- Speed: This is an offline operation using MOVE for tables and REBUILD for indexes. Essentially this is the same as the Manual Tablespace Reorganization shown previously.
- Availability: This is an online operation, making use of the online table redefinition functionality. The online table redefinition can be done based on the primary key of the table or the ROWID of the rows.
The "Scratch Tablespace" section has two options which determine if the datafile name is preserved or not.
- Use tablespace rename feature: As the name implies, this uses the first method described in the manual reorganization section.
- Use scratch tablespace: This uses the second method described in the manual reorganization section. You must provide a existing scratch tablespace name to hold all the objects during the reorganaization.
When you have picked the options you want, click the "Next" button.
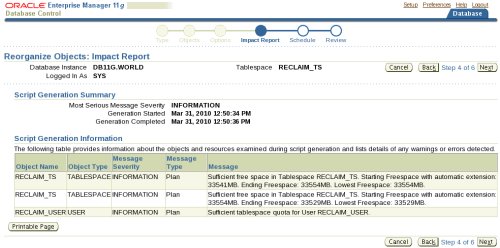
The resulting screen provides an impact report. If it includes any anticipated problems, you may need to move back and alter your options. When you are happy with the impact report, click the "Next" button.
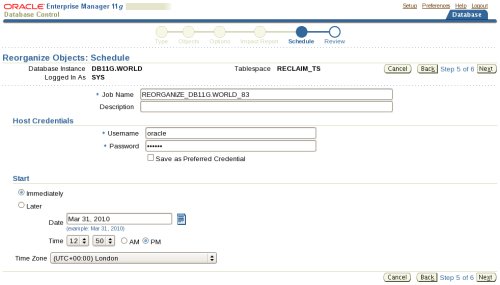
Enter the desired schedule information and click the "Next" button.
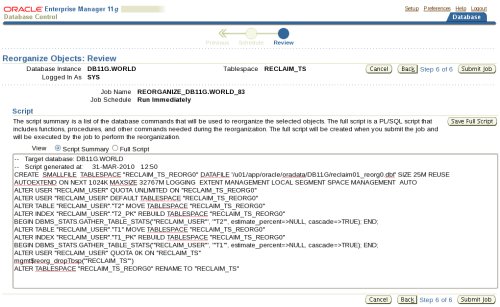
The review page includes the script that will be run by the job. If you are happy with the review information, click the "Submit Job" button.
After the job completes we can see the segments are now at the start of the tablespace map, allowing us to reduce the associated datafile size if we want. The reorganization process doesn't actually do the datafile resize for us, so the tablespace size is unchanged.

Shrink Bigfile Tablespaces (23ai)
When using bigile tablespaces in Oracle database 23ai, the easiest way to reclaim free space is to use the SHRINK_TABLESPACE procedure in the DBMS_SPACE package. Unlike a conventional shrink, discussed below, this actually does move objects to the start of the datafile to free up unused space.
Shrink?
If there is only a single object in the datafile, it's possible a online shrink operation will actually be enough to compact the data and free up the empty blocks, allowing the datafile to be resized to a smaller size.
Remember, the shrink only compacts the data. It doesn't guarantee the blocks will be placed at the front of the datafile, so it's possible you will have blocks at the end of the datafile, which means the datafile can't be resized smaller. If this is the case you will need to use one of the methods mentioned previously.
- ALTER TABLE ... SHRINK SPACE Command : Online Segment Shrink for Tables, LOBs and IOTs
- online shrink operation
Tablespaces with Multiple Datafiles
So far I've conveniently side-stepped the issue of tablespaces with multiple datafiles. Why? Because it makes the tablespace extent map a little more confusing to look at. To see what I mean, perform the setup again, but this time before building the tables add an additional datafile to the tablespace.
ALTER TABLESPACE reclaim_ts ADD DATAFILE '/u01/app/oracle/oradata/DB11G/reclaim02.dbf' SIZE 1M AUTOEXTEND ON NEXT 1M;
With the tables built, populated and the "T1" table truncated, the extent map will look something like this.

The problem here is we can't tell what files the gaps are in without hovering over the gaps and reading the tool tip. That's not very simple when we have lots of files, segments and gaps to contend with. At this point I stop looking at the extent map and just use a script to identify all the gaps in the tablespace, or individual datafiles.
The ts_extent_map.sql script produces a list of all the free space in the tablespace or individual datafile. The combined output and separate output for each datafile is shown below.
SQL> @ts_extent_map reclaim_ts all
Tablespace Block Size (bytes): 8192
*** GAP *** (23 -> 896) FileID=8 Blocks=872 Size(MB)=6.81
*** GAP *** (959 -> 1024) FileID=8 Blocks=64 Size(MB)=.5
*** GAP *** (127 -> 768) FileID=9 Blocks=640 Size(MB)=5
Total Gap Blocks: 1576
Total Gap Space (MB): 12.31

SQL> @ts_extent_map reclaim_ts 8
Tablespace Block Size (bytes): 8192
*** GAP *** (23 -> 896) FileID=8 Blocks=872 Size(MB)=6.81
*** GAP *** (959 -> 1024) FileID=8 Blocks=64 Size(MB)=.5
Total Gap Blocks: 936
Total Gap Space (MB): 7.31

SQL> @ts_extent_map reclaim_ts 9
Tablespace Block Size (bytes): 8192
*** GAP *** (127 -> 768) FileID=9 Blocks=640 Size(MB)=5
Total Gap Blocks: 640
Total Gap Space (MB): 5

SQL>
This can help you make a judgment as to whether a tablespace reorganization is necessary.
Undo Tablespace
The simplest way to reclaim space from the undo tablespace is to create a new undo tablespace, make it the database undo tablespace and drop the old tablespace. In the following example I've used autoextend, but you may wish to remove this if you want manual control over the datafile size.
CREATE UNDO TABLESPACE undotbs2 DATAFILE '/u01/app/oracle/oradata/DB11G/undotbs02.dbf' SIZE 2G AUTOEXTEND ON NEXT 1M;

ALTER SYSTEM SET UNDO_TABLESPACE=undotbs2;

DROP TABLESPACE undotbs1 INCLUDING CONTENTS AND DATAFILES;
Remember, flashback operations requiring undo will not be possible because you have deleted the retained undo. You may want to consider your UNDO_RETENTION parameter setting.
Temp Tablespace
If you are using oracle 11g, you can shrink a temporary tablespace using the ALTER TABLESPACE command, as shown here.
If you are using a database version prior to 11g, reducing the size of the temporary tablespace is similar to reclaiming space from the undo tablespace. Create a new temp tablespace, move the users on to it, then drop the old temp tablespace.
CREATE TEMPORARY TABLESPACE temp2 TEMPFILE '/u01/app/oracle/oradata/DB11G/temp02.dbf' SIZE 2G AUTOEXTEND ON NEXT 1M;

ALTER DATABASE DEFAULT TEMPORARY TABLESPACE temp2;

-- Switch all existing users to new temp tablespace.
BEGIN
  FOR cur_user IN (SELECT username FROM dba_users WHERE temporary_tablespace = 'TEMP') LOOP
    EXECUTE IMMEDIATE 'ALTER USER ' || cur_user.username || ' TEMPORARY TABLESPACE temp2';
  END LOOP;
END;
/

DROP TABLESPACE temp INCLUDING CONTENTS AND DATAFILES;
SYSAUX Tablespace
The SYSAUX tablespace is similar to any other tablespace, so the techniques discussed in this article will work on the SYSAUX tablespace too. If you've moved some of the occupants to a new tablespace, you may want to reduce the size of the SYSAUX tablespace to recovery the room you've saved. Options include the following.
- Online shrink of objects towards the end of the datafile may allow you to reduce the datafile size.
- Move the SYSAUX objects with extents towards the end of the datafile to a temporary tablespace, reduce the datafile size and move them back.
For more information see:
- Oracle Data Pump in Oracle Database 10g
- Online Table Redefinition
- Online Table Redefinition Enhancements in Oracle Database 11g Release 1
- Bigfile Tablespace Shrink in Oracle Database 23ai
- ALTER TABLE ... SHRINK SPACE Command : Online Segment Shrink for Tables, LOBs and IOTs
- online shrink operation
- Automatic Undo Management
- Online Move of Partitions and Sub-Partitions in Oracle 12c Release 1 (12.1)
- Online Move of a Table in Oracle Database 12c Release 2 (12.2)
Hope this helps. Regards Tim...