8i | 9i | 10g | 11g | 12c | 13c | 18c | 19c | 21c | 23ai | Misc | PL/SQL | SQL | RAC | WebLogic | Linux
Oracle Database 19c RAC On Oracle Linux 8 Using VirtualBox and Vagrant
This article describes the "hands-off" installation of Oracle Database 19c RAC on Oracle Linux 8 using VirtualBox and Vagrant with no additional shared disk devices.
If you are wondering why there isn't a GUI version of this installation, please read Why no GUI installations anymore?
- TL;DR
- Introduction
- Required Software
- Clone Repository
- Amend File Paths
- Build the RAC
- Turn Off RAC
- Remove Whole RAC
- Description of the Build
- Extra Notes
Related articles.
- Vagrant Oracle Real Application Clusters (RAC) Build
- All RAC Articles
- Silent Installation and Configuration : All Articles
TL;DR
If you are comfortable with VirtualBox, Vagrant and RAC you might want to jump straight to the GitHub repository and use the basic instructions here.
Introduction
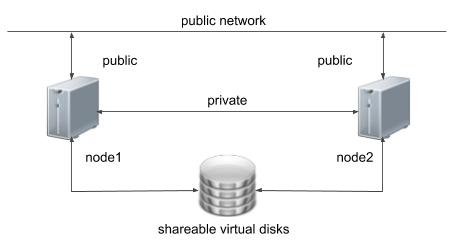
One of the biggest obstacles preventing people from setting up test RAC environments is the requirement for shared storage. In a production environment, shared storage is often provided by a SAN or high-end NAS device, but both of these options are very expensive when all you want to do is get some experience installing and using RAC. A cheaper alternative is to use virtualization to fake the shared storage.
Using VirtualBox you can run multiple Virtual Machines (VMs) on a single server, allowing you to run both RAC nodes on a single machine. In addition, it allows you to set up shared virtual disks, overcoming the obstacle of expensive shared storage.
In previous releases I gave walk through of a manual installation, but this doesn't really make sense as you shouldn't be installing anything this way anymore, so instead I'm discussing a silent installation. I will be describing the contents of the Vagrant builds, so there will be links to the actual scripts on GitHub, rather than repeating them here.
Before you launch into this installation, here are a few things to consider.
- The finished system includes the host operating system, three guest operating systems, two sets of Oracle Grid Infrastructure (Clusterware + ASM) and two Database instances all on a single machine. As you can imagine, this requires a significant amount of disk space, CPU and memory.
- Following on from the last point, the RAC node VMs will each need at least 6G of RAM, but you will see I used 10G for each, and it was still slow. Don't assume you will be able to run this on a small PC or laptop. You won't.
- This procedure provides a bare bones installation to get the RAC working. There is no redundancy in the Grid Infrastructure installation or the ASM installation. To add this, simply create double the amount of shared disks and select the "Normal" redundancy option when it is offered. Of course, this will take more disk space.
- This is not, and should not be considered, instructions for a production-ready system. It's simply to allow you to see what is required to install RAC and give you a system to experiment with.
- The DNS is required to support the scan listener. In previous releases I suggested running the DNS on the host server, but this is easier.
- This article uses the 64-bit versions of Oracle Linux and Oracle 19c.
- When doing this installation on my server, I split the virtual disks on to different physical disks. This is not necessary, but makes things run a bit faster.
- This will probably take over three hours to complete. Maybe a lot longer if you have severe memory or disk speed limitations.
Required Software
Download and install the following software on your PC. If you can't figure out this step, you probably shouldn't be considering a RAC installation.
- VirtualBox
- Vagrant
- A Git client for your PC, so you can clone the vagrant repository.
You will also need to download the 19c grid and database software, along with the latest combo patch for grid. This means you must have an Oracle Support account to complete this installation.
- Grid :LINUX.X64_193000_grid_home.zip
- Database : LINUX.X64_193000_db_home.zip
- Patch 30783556: COMBO OF OJVM RU COMPONENT 19.7.0.0.200414 + GI RU 19.7.0.0.200414
- Patch 6880880: OPatch 19.x
Clone Repository
Pick an area on your PC file system to act as the base for this git repository and issue the following command.
git clone https://github.com/oraclebase/vagrant.git
Copy the Oracle software under the "..../software/" directory. From the "rac/ol8_19" subdirectory, the structure should look like this.
$ tree
.
+--- config
|   +--- install.env
|   +--- vagrant.yml
+--- dns
|   +--- scripts
|   |   +--- root_setup.sh
|   |   +--- setup.sh
|   +--- Vagrantfile
+--- node1
|   +--- scripts
|   |   +--- oracle_create_database.sh
|   |   +--- oracle_db_software_installation.sh
|   |   +--- oracle_grid_software_config.sh
|   |   +--- oracle_grid_software_installation.sh
|   |   +--- oracle_user_environment_setup.sh
|   |   +--- root_setup.sh
|   |   +--- setup.sh
|   +--- Vagrantfile
+--- node2
|   +--- scripts
|   |   +--- oracle_user_environment_setup.sh
|   |   +--- root_setup.sh
|   |   +--- setup.sh
|   +--- Vagrantfile
+--- README.md
+--- shared_scripts
|   +--- configure_chrony.sh
|   +--- configure_hosts_base.sh
|   +--- configure_hosts_scan.sh
|   +--- configure_shared_disks.sh
|   +--- install_os_packages.sh
|   +--- oracle_software_patch.sh
|   +--- prepare_u01_disk.sh
+--- software
|   +--- LINUX.X64_193000_db_home.zip
|   +--- LINUX.X64_193000_grid_home.zip
|   +--- p6880880_190000_Linux-x86-64.zip
|   +--- p30783556_190000_Linux-x86-64.zip
|   +--- put_software_here.txt

$
When you clone the repository on Windows it is important you maintain the line terminators. All ".sh" scripts are run inside the Linux VMs, so they need UNIX style line terminators. If your Git client is set to convert all files to Windows style line terminators on a clone/pull, you will run into problems when those scripts are called from Linux.
Amend File Paths
The "config" directory contains a "install.env" and a "vagrant.yml" file. The combination of these two files contain all the config used for this build. You can alter the configuration of the build here, but remember to make sure the combination of the two stay consistent.
At minimum you will have to amend the following paths in the "vagrant.yml" file, providing suitable paths for the shared disks on your PC.
  asm_crs_disk_1: /u05/VirtualBox/shared/ol8_19_rac/asm_crs_disk_1.vdi
  asm_crs_disk_2: /u05/VirtualBox/shared/ol8_19_rac/asm_crs_disk_2.vdi
  asm_crs_disk_3: /u05/VirtualBox/shared/ol8_19_rac/asm_crs_disk_3.vdi
  asm_crs_disk_size: 2
  asm_data_disk_1: /u05/VirtualBox/shared/ol8_19_rac/asm_data_disk_1.vdi
  asm_data_disk_size: 40
  asm_reco_disk_1: /u05/VirtualBox/shared/ol8_19_rac/asm_reco_disk_1.vdi
  asm_reco_disk_size: 20
For example, if you were working on a Windows PC, you might create a path called "C:\VirtualBox\shared\ol8_19_rac" and use the following settings.
  asm_crs_disk_1: C:\VirtualBox\shared\ol8_19_rac\asm_crs_disk_1.vdi
  asm_crs_disk_2: C:\VirtualBox\shared\ol8_19_rac\asm_crs_disk_2.vdi
  asm_crs_disk_3: C:\VirtualBox\shared\ol8_19_rac\asm_crs_disk_3.vdi
  asm_crs_disk_size: 2
  asm_data_disk_1: C:\VirtualBox\shared\ol8_19_rac\asm_data_disk_1.vdi
  asm_data_disk_size: 40
  asm_reco_disk_1: C:\VirtualBox\shared\ol8_19_rac\asm_reco_disk_1.vdi
  asm_reco_disk_size: 20
If you don't alter them, they will get written to "C:\u05\VirtualBox\shared\ol8_19_rac".
Build the RAC
The following commands will leave you with a functioning RAC installation.
Start the DNS server.
cd dns
vagrant up
Start the second node of the cluster. This must be running before you start the first node.
cd ../node2
vagrant up
Start the first node of the cluster. This will perform all of the installations operations. Depending on the spec of the host system, this could take a long time. On one of my servers it took about 3.5 hours to complete.
cd ../node1
vagrant up
Turn Off RAC
Perform the following to turn off the RAC cleanly.
cd node2
vagrant halt

cd ../node1
vagrant halt

cd ../dns
vagrant halt
Remove Whole RAC
The following commands will destroy all VMs and the associated files, so you can run the process again.
cd node2
vagrant destroy -f

cd ../node1
vagrant destroy -f

cd ../dns
vagrant destroy -f
Description of the Build
From here on we will describe the sections in the build process. Remember, all parameters come from the following two files.
DNS Server Build
The DNS server build is really simple. You can see an example of the vagrant output I received here. This VM took about 2 minutes to build.
The Vagrantfile contains the definition of the VirtualBox VM that will be built, using the parameters from the vagrant.yml file. The default values produce a VM with the following characteristics.
- OS : Oracle Linux 8.2
- VM Name : ol8_19_dns
- CPUs : 1
- RAM : 1G
- NIC 1 : NAT Network
- NIC 2 : 192.168.56.100 - An IP on the "public" network used by the cluster nodes.
- Disk 1 : The box disk with the operating system pre-installed.
The last stage of the VM build it to run the setup.sh script, which simply runs the root_setup.sh script.
The root_setup.sh script does the following.
- Sources the install.env file to make sure all environment variables for the build are present.
- Gets the latest Yum repository file.
- Adds entries to the "/etc/hosts" file in the VM for the public, private and virtual IP addresses of each RAC node, as well as the SCAN IP addresses. These are built using environment variables.
- Installs and enables Dnsmasq. This presents the contents of the "/etc/hosts" file as a DNS server, which is a much simpler alternative to using BIND for the DNS setup. It's not going to be perfect for every DNS solution, but it is really good for this.
Once the vagrant up command completes you will be left with a functioning DNS server ready for use with your RAC.
If you have any problems with the DNS build, don't continue with the RAC nodes until you fix them.
RAC Node 2 Build
The basic setup of the OS for the RAC nodes are very similar, but node 2 doesn't perform any installation actions, so we need this in place before starting node 1. You can see an example of the vagrant output I received here. This VM took about 5 minutes to build.
The Vagrantfile contains the definition of the VirtualBox VM that will be built, using the parameters from the vagrant.yml file. The default values produce a VM with the following characteristics.
- OS : Oracle Linux 8.2
- VM Name : ol8_19_rac2
- CPUs : 4
- RAM : 6144M
- NIC 1 : NAT Network
- NIC 2 : 192.168.56.102 - An IP on the "public" network used by the cluster nodes.
- NIC 3 : 192.168.1.102 - An IP on the "private" network used by the cluster nodes.
- Disk 1 : The box disk with the operating system pre-installed.
- Disk 2 : A disk which will be local to the VM, used for the "/u01" mount point.
- Disk 3 : CRS disk 1.
- Disk 4 : CRS disk 2.
- Disk 5 : CRS disk 3.
- Disk 6 : DATA disk.
- Disk 7 : RECO disk.
The last stage of the VM build it to run the setup.sh script, which simply runs the root_setup.sh.
The root_setup.sh script does the following.
- Sources the install.env file to make sure all environment variables for the build are present.
- Run prepare_u01_disk.sh to partition the "/dev/sdb" local disk, create a file system on the resulting "/dev/sdb1" partition, add an entry into the "/etc/fstab" so it mounts automatically in future, and manually mount it for the first time.
- Run install_os_packages.sh to configure the Yum repositories and install the OS packages needed for the RAC node. This includes the "oracle-database-preinstall-19c" package, which does some of the OS setup for us. It also includes all packages listed in the documentation, even though some are already installed by the preinstall package. Some extra packages are included just because they are needed by the automation of the setup.
- Set the passwords for the "root" and "oracle" users. This is pretty stupid, but we need this to make the whole process silent.
- Run configure_hosts_base.sh to add the public, private and virtual addresses to the "/etc/hosts" file. We don't need the SCAN addresses as they are provided by the DNS. We could use the DNS to provide the local IP addresses too, but I prefer to have these here also.
- Configure the "/etc/resolv.conf" to point to the DNS server VM.
- Run configure_chrony.sh to configure Chrony, so we don't get NTP errors during the installation.
- Run configure_shared_disks.sh to configure the shared disks used by ASM. If the ASM disks aren't already partitioned, it partitions them. It then configures UDEV, so the disks are mounted correctly in this VM after each restart.
- Set the hostname.
- Run oracle_user_environment_setup.sh to create the environment scripts for the "oracle" user, create the
GRID_HOMEandDB_HOMEdirectories, and partially prepare password-less authentication (user equivalence) for the "oracle" user. This process will be completed by node 1. - Source the "/home/oracle/scripts/setEnv.sh" script the previous script created.
- Partially prepare password-less authentication (user equivalence) for the "root" user. This process will be completed by node 1. This is not necessary for RAC to function, but it is necessary for the automation of this installation.
Once the vagrant up command completes you will be left with a prepared RAC node 2.
If you have any problems with the node 2 build, don't continue with the node 1 build until you fix them.
RAC Node 1 Build
The basic setup of the OS for the RAC nodes are very similar, but unlike node 2, the node 1 setup also includes the software installation and configuration actions. Remember, the DNS and node 2 VMs should be running before starting this node. You can see an example of the vagrant output I received here. This VM took about 1.5 hours to build.
The Vagrantfile contains the definition of the VirtualBox VM that will be built, using the parameters from the vagrant.yml file. The default values produce a VM with the following characteristics.
- OS : Oracle Linux 8.2
- VM Name : ol8_19_rac1
- CPUs : 2
- RAM : 7168M
- NIC 1 : NAT Network
- NIC 2 : 192.168.56.101 - An IP on the "public" network used by the cluster nodes.
- NIC 3 : 192.168.1.101 - An IP on the "private" network used by the cluster nodes.
- Disk 1 : The box disk with the operating system pre-installed.
- Disk 2 : A disk which will be local to the VM, used for the "/u01" mount point.
- Disk 3 : CRS disk 1.
- Disk 4 : CRS disk 2.
- Disk 5 : CRS disk 3.
- Disk 6 : DATA disk.
- Disk 7 : RECO disk.
The last stage of the VM build it to run the setup.sh script, which simply runs the root_setup.sh.
The root_setup.sh script does all of the same actions as the node 2 build described above, but it also includes the installation and configuration steps. Rather than repeat the explanations of the common steps we will just focus on the differences here.
- In addition to repeating the password-less authentication (user equivalence) steps from node 2 for the "oracle" and "root" users, the node 1 root_setup.sh script uses
sshpassandssh-copy-idto complete the password-less authentication. - Install the "cvuqdisk" package on node 1 and node 2.
- Run oracle_grid_software_installation.sh to perform a silent installation of the Grid Infrastructure software.
- Run "orainstRoot.sh" on node 1 then node 2.
- Run "root.sh" on node 1 then node 2.
- Run oracle_grid_software_config.sh to perform a silent configuration of the Grid Infrastructure, then show the cluster status.
- Run oracle_db_software_installation.sh to perform a silent installation of the database software.
- Run "root.sh" on node 1 then node 2.
- Apply the OJVM Patch for the DB software on both nodes using calls to the oracle_software_patch.sh script.
- Run oracle_create_database.sh to perform a silent creation of a database using DBCA. Once complete it displays the status of the installed services.
Once the vagrant up command completes you will be left with a fully configured and running 2 node RAC.
Extra Notes
I usually try to stick to base releases of Oracle software, so people without an Oracle Support contract can still test the build. That is difficult here as the 19.7 release update (RU) includes a number of fixes related to running Oracle 19c RAC on OL8.2. It's possible to get round some of these by downgrading OpenSSL to a previous release, but that's messy, so I stuck with making the 19.7 patch a requirement.
If you are interested in trying to complete the installation without the 19.7 RU, here are some things to consider. These are not necessary if you apply the patches as part of the installations using the "-applyRU" parameter. Thanks to Abdellatif AG in the comments for pointing this out.
There is an incompatibility with the way the 19.3 GI installer tests for passwordless SSH and the way SCP works on OL8.2. The workaround for this is to do the following on each RAC node. This information came from a private MOS note (Doc ID 2555697.1). Thanks to Simon Coter for helping me with this.
# Before the installation.
mv /usr/bin/scp /usr/bin/scp.orig
echo "/usr/bin/scp.orig -T \$*" > /usr/bin/scp
chmod 555 /usr/bin/scp

# After the installation.
#mv /usr/bin/scp.orig /usr/bin/scp
The 19.3 software was released before OL8 was certified, so it's not on the list of valid distributions. You can get round this by faking the distribution with the following environment variable.
export CV_ASSUME_DISTID=OEL7.6
Even with these workarounds in place the DBCA still fails to create a database because of the bug described in MOS Doc ID 29529394.8, which states there is no workaround.
For anyone determined to try and make the installation work without the 19.7 RU, focus on downgrading OpenSSL. The errors produced will lead you to the following MOS notes, but they are mostly a distraction from the real problem.
- INS-06005 During Grid Infrastructure Install Due to Missing Execution Access to ping Command (Doc ID 2301337.1)
- Bug 30189609 - CVU Fails to Detect the Passwordless SSH as well as to Setup Passwordless SSH Connectivity (Doc ID 30189609.8)
- Bug 30159782 - Remote Copy Fails if using openssh-7.2. 7.4, etc. (Doc ID 30159782.8)
- GridSetup Results Error Remote node(s) not configured for passwordless SSH connectivity (Doc ID 2523358.1)
- Bug 29529394 - DBCA/NETCA FAIL TO VERIFY SSH CONNECTIVITY [INS-06005] UNABLE TO GET SSH CONNECTIVITY DETAILS (Doc ID 29529394.8)
- INS-06006 GI RunInstaller Fails If OpenSSH Is Upgraded to 8.x (Doc ID 2555697.1)
For more information see:
- Installation Guide for Linux and UNIX : Oracle Real Application Clusters - Release 19
- Installation Guide for Linux : Oracle Database - Release 19
- Vagrant Oracle Real Application Clusters (RAC) Build
- All RAC Articles
- Silent Installation and Configuration : All Articles
Hope this helps. Regards Tim...