8i | 9i | 10g | 11g | 12c | 13c | 18c | 19c | 21c | 23c | Misc | PL/SQL | SQL | RAC | WebLogic | Linux
Ansible : First Steps
This article presents the first steps to get you up and running with Ansible. We will be using Oracle Linux 8 for all the virtual machines.
- What is Ansible and Why Would You Use It?
- Where Do We Install Ansible?
- Ansible Installation
- Inventory
- SSH Configuration
- Setting Default Configuration
- Running Your First Ansible Command
Related articles.
What is Ansible and Why Would You Use It?
Ansible is an open-source tool that enables infrastructure as code. It can be used for the whole lifecycle of your infrastructure, including provisioning, configuration management, and application-deployment.
But can't I do this already with shell scripting? Yes, you can. Ultimately Ansible is just running commands on your servers that you could put into a shell script and check into version control. If you are currently writing robust shell scripts with good error handling, and making sure they can be rerun to make new changes without destroying your server, then Ansible isn't doing anything new for you. In reality, many people don't write robust shell scripts with great error handling. In some cases, rerunning their scripts will destroy the system they've just built.
Ansible allows us to define a system, make changes over time and play only those changes against the server. This means the definition of the system stays up to date, and acts as a permanent record of how the system was built. If we need to rebuild the system in the future, when moving to a newer version of the operating system, our existing Ansible scripts can often be used with little or no modifications to build an exact replica of our original system.
Ansible encourages us to write generic and reusable pieces of code, that allow us to build systems in more consistent and reliable way. In some cases allowing us to use the same scripts across multiple Linux distributions.
Ansible is not magic. Just like shell scripts can be good or bad, Ansible can be good or bad depending on how it is used. If you follow the rules, Ansible will simplify your infrastructure lifecycle.
Where Do We Install Ansible?
There is nothing to stop us installing Ansible on every server and running Ansible playbooks on the servers directly, but typically we would install Ansible on a central administration server, or Ansible control host, and perform all operations from that server. This has a number of advantages.
- We don't have to install Ansible on each server.
- We don't have to manually connect to servers to administer them. We can perform all administration from a central location.
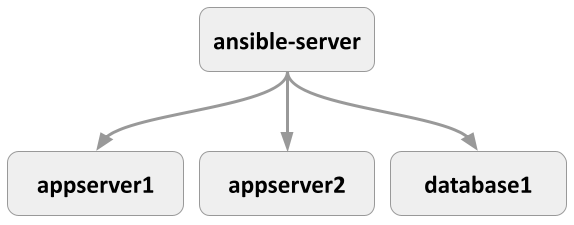
So for now we will assume we are going to install Ansible on a central server, and administer all other servers from that central server. For the remainder of the article, we will assume we have the following servers.
192.168.56.100 ansible-server.localdomain
192.168.56.101 appserver1.localdomain
192.168.56.102 appserver2.localdomain
192.168.56.103 database1.localdomain
The following diagram may make it easier for you to visualise the relationship.
There is a vagrant build for these servers here.
Ansible Installation
The installation guide gives the steps for a number of Linux distributions, but we will follow the steps for Installing Ansible on RHEL, CentOS, or Fedora.
Ansible is part of the EPEL repository. Oracle Linux makes this available from yum.oracle.com. The following commands enable the EPEL repository, and install Ansible.
# dnf install -y epel-release
# dnf install -y ansible
We check the Ansible version installed using the --version flag.
# ansible --version
ansible 2.9.27
  config file = /etc/ansible/ansible.cfg
  configured module search path = ['/root/.ansible/plugins/modules', '/usr/share/ansible/plugins/modules']
  ansible python module location = /usr/lib/python3.6/site-packages/ansible
  executable location = /usr/bin/ansible
  python version = 3.6.8 (default, Nov 10 2021, 06:50:23) [GCC 8.5.0 20210514 (Red Hat 8.5.0-3.0.2)]
#
Inventory
The inventory identifies all the hosts managed by Ansible. These can be listed by IP address or more typically by fully qualified names. They don't actually need to be fully qualified, so long as they resolve to an IP address. The hosts can be grouped, so commands can be run against all hosts in a group. A single host can be present in multiple groups, or ungrouped. The inventory is supported in multiple formats, but we will stick to the basic format here.
The following actions are only needed on the central administration server, called "ansible-server".
We don't have DNS set up for these servers, so we add the IP addresses of the hosts to our "/etc/hosts" file. We have four hosts, representing the central administration server, two application servers and one database server.
# cat >> /etc/hosts <<EOF
192.168.56.100 ansible-server.localdomain ansible-server
192.168.56.101 appserver1.localdomain appserver1
192.168.56.102 appserver2.localdomain appserver2
192.168.56.103 database1.localdomain database1
EOF
We could create a default inventory by adding hosts to the "/etc/ansible/hosts" file, but needing root access to edit this annoying, so we will create an inventory in our current user.
$ cat >> ~/git/oraclebase/ansible/first_steps/inventory.ini <<EOF
ansible-server.localdomain

[appservers]
appserver1.localdomain
appserver2.localdomain

[databases]
database1.localdomain
EOF
The inventory can contain lots of other things including aliases and variables, but we are going to ignore those for now. For more information about the inventory, read the documentation.
The examples in this series use a single inventory that contains all hosts. In reality you may want to use several distinct inventories to separate the hosts. For example:
- Separate inventories for each environment (Dev, Test, Prodution).
- Separate inventories for each project.
- Separate inventories for a combination of project and environment.
There are no rules. The important thing is it has to work for you.
SSH Configuration
We will require SSH access to all hosts when performing administration tasks. The simplest way to handle this is to add the public key from your central Ansible server to the "authorized_keys" file on each managed host.
There is more information about setting up passwordless SSH here.
We create a key pair on the central Ansible server with the following command. I used the name "ansible_key" for the key name, but you could use the defaults if you prefer. It's more secure to use a passphrase, but if you want you can hit return on the passphrase prompts also.
$ /usr/bin/ssh-keygen -t rsa
We now have a private and public key on the central server.
$ ls ~/.ssh
ansible_key  ansible_key.pub
$
We will let the central administrative server connect to itself using passwordless SSH, by copying the public key to the "authorized_keys" file.
$ cat ~/.ssh/ansible_key.pub >> ~/.ssh/authorized_keys
$ chmod 600 ~/.ssh/authorized_keys
We push the public key to the managed hosts as authorized keys using the ssh-copy-id command. We will be prompted to confirm we want to connect to the remote host, and for the password for the remote host.
# appserver1
ssh-copy-id -i ~/.ssh/ansible_key appserver1.localdomain

# appserver2
ssh-copy-id -i ~/.ssh/ansible_key appserver2.localdomain

# database1
ssh-copy-id -i ~/.ssh/ansible_key database1.localdomain
If your key has a passphrase, you will probably want to cache the password, so you are not prompted each time you use it in your current terminal session. You can do this by starting an SSH agent and caching the passphrase for your key. Run the following commands, and enter the passphrase when prompted. If you didn't give your key a passphrase, you can ignore this step.
$ ssh-agent bash
$ ssh-add ~/.ssh/ansible_key
We should now have passwordless SSH working between the central server and managed hosts, provided we use the key.
$ ssh -i ~/.ssh/ansible_key appserver1.localdomain date
Sun Feb 20 12:34:28 UTC 2022
$ ssh -i ~/.ssh/ansible_key appserver2.localdomain date
Sun Feb 20 12:34:33 UTC 2022
$ ssh -i ~/.ssh/ansible_key database1.localdomain date
Sun Feb 20 12:34:37 UTC 2022
$
Setting Default Configuration
We are now able to run Ansible commands provided we explicitly include the private key (--private-key or --key-file) and the inventory (-i, --inventory or --inventory-file) file we want to use.
$ ansible --private-key ~/.ssh/ansible_key --inventory inventory.ini database1.localdomain -m ping
To simplify things we can set the default key and the inventory files in the "ansible.cfg" file.
$ cat > ansible.cfg <<EOF
[defaults]
inventory = /home/vagrant/git/oraclebase/ansible/first_steps/inventory.ini
private_key_file = ~/.ssh/ansible_key
interpreter_python = auto_legacy_silent
EOF
We no longer need to include them in the Ansible commands.
$ ansible database1.localdomain -m ping
An alternative to having the "ansible.cfg" file in the current directory is to place a file with the same contents called ".ansible.cfg" in the home directory for the user.
Running Your First Ansible Command
We can now use Ansible to perform an action on the hosts by name, using the group name they are part of, or using the "all" and "ungrouped" default groups. In this case we use the "ping" module, which makes a connection to the server, allowing us to check the connectivity to the server.
We ping an individual host by name.
$ ansible database1.localdomain -m ping
database1.localdomain | SUCCESS => {
    "ansible_facts": {
        "discovered_interpreter_python": "/usr/libexec/platform-python"
    },
    "changed": false,
    "ping": "pong"
}
$
We ping all the hosts that are part of the "appservers" group.
$ ansible appservers -m ping
appserver2.localdomain | SUCCESS => {
    "ansible_facts": {
        "discovered_interpreter_python": "/usr/libexec/platform-python"
    },
    "changed": false,
    "ping": "pong"
}
appserver1.localdomain | SUCCESS => {
    "ansible_facts": {
        "discovered_interpreter_python": "/usr/libexec/platform-python"
    },
    "changed": false,
    "ping": "pong"
}
$
We ping all the hosts in the inventory.
$ ansible all -m ping
database1.localdomain | SUCCESS => {
    "ansible_facts": {
        "discovered_interpreter_python": "/usr/libexec/platform-python"
    },
    "changed": false,
    "ping": "pong"
}
appserver2.localdomain | SUCCESS => {
    "ansible_facts": {
        "discovered_interpreter_python": "/usr/libexec/platform-python"
    },
    "changed": false,
    "ping": "pong"
}
appserver1.localdomain | SUCCESS => {
    "ansible_facts": {
        "discovered_interpreter_python": "/usr/libexec/platform-python"
    },
    "changed": false,
    "ping": "pong"
}
ansible-server.localdomain | SUCCESS => {
    "ansible_facts": {
        "discovered_interpreter_python": "/usr/bin/python3.6"
    },
    "changed": false,
    "ping": "pong"
}
$
We ping all hosts that are not part of a group.
$ ansible ungrouped -m ping
ansible-server.localdomain | SUCCESS => {
    "ansible_facts": {
        "discovered_interpreter_python": "/usr/bin/python3.6"
    },
    "changed": false,
    "ping": "pong"
}
$
For more information see:
- Installing Ansible
- How to build your inventory
- User Equivalence (Key-Based Authentication) Configuration on Linux
- Ansible : Installation and Configuration
- Ansible : All Articles
Hope this helps. Regards Tim...